In this lesson, you will
learn how to:
·
Start Excel
·
Work with Excel windows
·
Work with worksheets
·
Use menu commands - mouse
·
Use menu commands - keyboard
·
Display and hide toolbars
·
Exit Excel
d Discussion
Microsoft Excel 97 is a software
application that can be used as a spreadsheet, database, or graphing program.
The electronic spreadsheet portion of Excel allows you to
perform sophisticated calculations and create formulas that automatically
calculate answers. The advantage of using formulas is that when data in the
worksheet changes, all the formulas recalculate automatically. This feature
assists you in developing budgets, forecasting models, creating sales plans,
making financial projections, calculating inventories calculations, generating
banking statements, and basically working with any format involving numbers. In
addition, an AutoCalculate feature provides you with instant answers using
functions such as Sum, Count, and Average.
Excel’s data management capability allows you to manipulate
lists of information such as names, addresses, inventory items, prices, etc.
Excel can sort lists and select specific pieces of information based on
specified conditions.
You can use information created in an Excel spreadsheet or
database to create an Excel chart. Chart types include Bar, Line, Pie, Area,
Doughnut, Radar, Surface, and Bubble. All charts can be formatted using styles
provided by Excel.
Before you work in an application, it must be loaded. There are
several ways you can load the Excel program. One way to start Excel is to use
the Windows Start menu.

Starting Excel
|
|
|
|
o
|
The first time you open Excel after installation, the
Office Assistant appears, welcoming you to the program. In this instance,
select Start using Microsoft Excel to close the Assistant balloon and
start Excel 97. If the User Setup dialog box opens, enter your name and
initials as necessary and then select OK.
|
|
|
|
C Procedures
|
1. Click the Start button on
the taskbar.
|
|
2. Point to Programs.
|
|
3. Select Microsoft Excel.
|
f Step-by-Step
Start Microsoft Excel 97 from the Start
menu.
|
Steps
|
Practice Data
|
|
1. Click the Start button on the
taskbar.
The Start menu appears.
|
Click  Start Start
|
|
2. Point to Programs.
The Programs submenu appears.
|
Point to  Programs Programs
|
|
3. Select Microsoft Excel.
Excel opens.
|
Click  Microsoft Excel Microsoft Excel
|
d Discussion
There are two types of windows in Excel:
the application window and the workbook window. The application window contains the menu bar,
toolbars, formula bar, status bar, and workbook window. The menu bar allows you to access various
commands, which are grouped according to function. The toolbar buttons provide shortcuts to
many menu commands. The formula bar displays the data in the
active cell. You can edit this information as desired. The status bar provides information on the
current action you are performing or on a command you have selected.
The workbook window opens within the application
window when you start Excel, open an existing file, or create a new file. The
workbook window contains the tab scrolling buttons, worksheet tabs, tab split box, scroll bars, and worksheet area. Several workbook windows
may be open at the same time.
The worksheet area consists of thousands of cells in which you
can enter text, numbers, or formulaic expressions.
The Office Assistant, a context-sensitive
help feature, may appear within its own window in either the application or
document window. The Office Assistant may appear when you open Excel. You can
adjust the capabilities of the Office Assistant, as well as choose not to have
the Assistant appear, if desired.
|
|
|
|
o
|
You can select not to install the Office Assistant
during the installation process, if desired.
|
|
|
|
d Discussion
Information in Excel is stored in a workbook. A workbook is a collection of individual
worksheets. Each worksheet has a name that appears in a worksheet tab at the
bottom of the screen. These names appear as Sheet1, Sheet2, Sheet3,
etc. You can change the default names, if desired. Worksheet tab names can be
up to 31 characters long.
Worksheets in a workbook are usually
related to one another. For example, a company budget could have 13 worksheets,
one for each month of the year, and one representing the total year. These 13
worksheets can all be stored in one workbook as a single file and can be
accessed as one unit.
A worksheet is a grid composed of 256 columns and 65,536 rows. The first 26 columns are labeled column A through
column Z. Columns 27 through 52 are labeled column AA through column AZ. Column
53 is labeled BA. This pattern continues until the last column, which is
labeled IV. The rows are numbered sequentially down the left side of the
worksheet, starting at 1 and ending at 65,536.
The intersection of a row and a column is called a cell, which is the basic unit
of the worksheet. Cells are used to store data entries. Each cell is referred
to by its cell address. A cell address consists of the column letter and the
row number. For example, the address of the cell in the first column and first
row of a worksheet is A1.
The active, or current, cell is
where you enter and edit data. The active cell has a thick black border around
it and its address appears in the Name box on the formula bar. Only one
cell can be active at a time. Excel also helps you identify the active cell by
bolding its corresponding column letter at the top of the worksheet and row
number on the left side of the worksheet.
Often, you will want to select a range of cells or multiple
cells. For example, you could select from cell A1 to cell A10 and format the
data contained in those cells.
The scroll bars on the bottom and right side
of the worksheet allow you to view parts of the worksheet that are not
currently visible.

The parts of a worksheet
d Discussion
The menu bar provides access
to all the features of Excel. Each menu contains commands grouped by function.
Some menu commands are grayed or dimmed, which indicates that the command is
not available for the current task.
When you select an item on the menu bar, the corresponding menu
appears from which you can select the desired command.
When a menu command is followed by an ellipsis (...),
selecting it opens a dialog box in which additional information is entered.
In addition to the standard menus on the menu bar, Excel
contains shortcut menus that may be accessed by clicking the right mouse
button. Shortcut menus contain commonly used commands and are
context-sensitive. Therefore, the options available on the shortcut menu vary,
depending on the area of the window or the object selected.
|
|
|
|
o
|
If you have installed Microsoft IntelliMouse, you can
use the mouse for both scrolling and zooming. For further instructions on the
use of the IntelliMouse, see your IntelliPoint Online User's Guide.
|
|
|
|
C Procedures
|
1. Click the desired menu.
|
|
2. Click the desired command.
|
f Step-by-Step
Execute a menu command using the mouse.
|
Steps
|
Practice Data
|
|
1. Click the desired menu.
The Edit menu appears.
|
Click Edit
|
|
2. Click the desired command.
The Find command is executed and the Find dialog box opens.
|
Click Find...
|
Select Close to close the Find dialog box.
d Discussion
Some users prefer to keep both hands on the keyboard rather
than use the mouse to execute commands. You can execute many
menu commands using key combinations. To display a menu, you press the [Alt]
key and the underlined letter of the menu name. You can then press the
underlined letter of the desired command to perform the action.
|
|
|
|
o
|
When selecting a menu command using key combinations,
you can press the desired letter in either uppercase or lowercase.
|
|
|
|
|
o
|
Many menu commands have predefined keys combinations
(such as [Ctrl+F]) that you can use to execute the command instead of
pressing the [Alt] key and letter combination to open the menu.
|
|
|
|
C Procedures
|
1. Press [Alt] to activate the menu bar.
|
|
2. Type the underlined letter of the menu you want to display.
|
|
3. Type the underlined letter of the command you want to perform.
|
f Step-by-Step
Execute a menu command using the keyboard.
|
Steps
|
Practice Data
|
|
1. Press [Alt] to activate the menu
bar.
The File command is selected on the menu bar.
|
Press [Alt]
|
|
2. Type the underlined letter of the menu you want to display.
The Edit menu appears.
|
Type E
|
|
3. Type the underlined letter of the command you want to perform.
The Find command is executed and the Find dialog box opens.
|
Type F
|
Press [Esc] to close the Find dialog box.
d Discussion
Toolbars provide shortcuts to menu commands. Each Excel toolbar
is composed of buttons and pull-down lists. Each
button executes a specific menu
command.
Excel provides several default toolbars, each of which groups
related features. When Excel starts, the Standard and Formatting
toolbars appear by default. The Standard toolbar contains buttons used
for many general Excel functions, whereas the Formatting toolbar
contains buttons and pull-down lists used to enhance the appearance of text and
cells.
You can choose to display one, several, or all the toolbars at
any given time, or you can hide all the toolbars. You use the Toolbar
submenu on the View menu to display and hide toolbars.
Many of the toolbars display as floating palettes that can be
moved to any location on the screen. You can also change the size and shape of
the palettes. These options provide flexibility when you need to display
several toolbars at once.
When you point to a button on a toolbar, the name for its
function appears. This description is referred to as a toolbar ScreenTip.

Displaying and hiding toolbars
|
|
|
|
o
|
Even if a toolbar button is grayed (because it is not
available for the current task), the ScreenTip still appears when you point
to the button.
|
|
|
|
|
o
|
You can customize various toolbars by adding or
removing buttons.
|
|
|
|
|
o
|
You can also display and hide toolbars by clicking the
right mouse button on the menu bar or any toolbar and selecting or
deselecting any of the toolbars. A checkmark next to the name of a toolbar
indicates that it is active.
|
|
|
|
|
o
|
If you hide all the toolbars, you must use the Toolbars
command on the View menu to redisplay them.
|
|
|
|
C Procedures
|
1. Select the View menu.
|
|
2. Point to the Toolbars
command.
|
|
3. Select the toolbar you want to display or hide.
|
f Step-by-Step
Display and hide a toolbar.
|
Steps
|
Practice Data
|
|
1. Select the View menu.
The View menu appears.
|
Click View
|
|
2. Point to the Toolbars command.
The Toolbars submenu appears.
|
Point to Toolbars
|
|
3. Select the toolbar you want to display or hide.
The Drawing toolbar appears.
|
Click Drawing
|
Hide the Drawing toolbar.
d Discussion
When you have finished using Excel, you should exit the
application properly, since Excel performs necessary
housekeeping before it closes.
If the current document has been modified but not saved, Excel
prompts you to save the changes before exiting.
|
|
|
|
o
|
You can also click the Close button on the
application window title bar to exit Excel.
|
|
|
|
|
o
|
If the Office Assistant is not displayed when you exit
Excel, and you have not saved any changes to the worksheet, a message box
opens, asking if you want to save the changes.
|
|
|
|
C Procedures
|
1. Select the File menu.
|
|
2. Select the Exit command.
|
f Step-by-Step
Exit Excel.
|
Steps
|
Practice Data
|
|
1. Select the File menu.
The File menu appears.
|
Click File
|
|
2. Select the Exit command.
Excel closes.
|
Click Exit
|
e Task
Start Excel, view toolbar ScreenTips, access menu commands, and
display and hide toolbars.
|
1. Start Excel, if necessary.
|
|
2. Explore the toolbar ScreenTips until you find the New
button.
|
|
3. Use the mouse to view the Insert menu commands.
|
|
4. Use the keyboard to view the Edit menu commands.
|
|
5. Display the Chart and Drawing toolbars.
|
|
6. Hide the Chart and Drawing toolbars.
|
|
7. Exit Excel.
|
In this lesson, you will
learn how to:
·
Use the Office Assistant
·
Find an answer
·
Select an Assistant
·
Change Assistant options
·
Hide the Assistant
d Discussion
To assist you in quickly and efficiently getting
comprehensive help on any Excel feature, you can use the Office Assistant. The
Office Assistant appears in the application
window as an animated graphic in a small window with a balloon attached. The balloon contains shortcuts for
accessing additional topics and tips. When you display the Assistant, the
balloon automatically appears. You can move the window portion of the Assistant
anywhere on the screen, as well as resize it.
The Office Assistant provides helpful hints called tips to help you get the most
from Excel. A typical tip might provide a keyboard combination that quickly
displays a particular dialog box or a more efficient way to accomplish a task.
When the Assistant has a tip for your current task, a light bulb appears in the
Office Assistant window. If the Assistant is not displayed when a tip is
available, a light bulb appears on the Office Assistant button on the Standard
toolbar. You can click the Office Assistant button to open the Office
Assistant and view the tip.
After you have read the tip, you can close it, or you can view
previous tips. However, tips are not available for all Excel functions.

Using the Office Assistant
|
|
|
|
o
|
You can also display a tip by clicking the Office
Assistant and selecting the Tips button or by clicking the Office Assistant
with the right mouse button and selecting the See Tips command.
|
|
|
|
|
o
|
Once you have closed a tip, it does not appear again.
To view a previous tip, you can select Back in any Tip balloon or
select the Reset my tips button on the Options page of the Office
Assistant dialog box.
|
|
|
|
C Procedures
|
1. Click the Office Assistant
button  on the Standard toolbar. on the Standard toolbar.
|
|
2. Select Tips.
|
|
3. When you have finished viewing the tip, select Close.
|
f Step-by-Step
Use the Office Assistant to get a tip.
Start Excel, if necessary.
|
Steps
|
Practice Data
|
|
1. Click the Office Assistant button on
the Standard toolbar.
The Office Assistant balloon appears.
|
Click 
|
|
2. Select Tips.
A balloon with the text of the tip appears.
|
Click Tips
|
|
3. When you have finished viewing the tip, select Close.
The balloon with the tip closes, and the Office Assistant window remains
open.
|
Click Close
|
d Discussion
You can query the Office Assistant directly
with any questions you may have regarding Excel. When you query the Assistant,
help topics related to your question appear. You can select any available help topic
to view additional information. If there are more topics than can be displayed
at one time, you can use the See more and the See previous
commands to scroll through the available topics.
The Office Assistant provides the best answers when you enter a
complete sentence or question in a query, rather than just a word or phrase.
For example, it is better to enter How do I create headers? rather than
just headers. The last query remains in the Office Assistant until you
create a new query or close Excel.

Finding an answer
C Procedures
|
1. Open the Office Assistant, if
necessary.
|
|
2. Click the Office Assistant.
|
|
3. Type the desired question or sentence.
|
|
4. Select Search.
|
|
5. Select the desired help topic.
|
f Step-by-Step
Find an answer to a
question using the Office Assistant.
Open the Office Assistant, if necessary.
|
Steps
|
Practice Data
|
|
1. Click the Office Assistant.
The Office Assistant balloon appears.
|
Click the Office Assistant, if
necessary
|
|
2. Type the desired question or sentence.
The query appears in the text box.
|
Type How do I create headers?
|
|
3. Select Search.
A list of pertinent help topics appears.
|
Click Search
|
|
4. Select the desired help topic.
The corresponding help window with the answer to the question opens.
|
Click Create custom headers and footers
|
Close the help window.
d Discussion
The default Office Assistant is an animated paper clip called Clippit.
Other Assistants are available, including The Dot, The Genius, Hoverbot,
Office Logo, Mother Nature, Power Pup, Scribble,
and Will. You can preview and select the desired Assistant in the Office
Assistant dialog box.
When you preview the Assistants, each one greets you with a
message. The name of the Assistant appears as well as an introduction to it.
Even though you can select any Assistant you want, you are limited to only one
Assistant at a time. No matter which Assistant you choose, however, the Office
Assistant maintains the same functionality.
Other Office programs, such as Word and
PowerPoint, share the Office Assistant. Therefore, any changes you make to the
Assistant in Excel affect all other Office programs.

Selecting an Assistant
|
|
|
|
o
|
Two Assistants, Mother Nature and The Genius,
are only available when Excel is installed from CD-ROM.
|
|
|
|
|
o
|
If you have Internet access to the World Wide Web, you can
select additional Assistants from Microsoft’s web page. These Assistants are
found under the home page address of http://www.microsoft.com.
|
|
|
|
|
o
|
You can also select an Assistant by clicking the right
mouse button on the Office Assistant and selecting the Choose Assistant
command.
|
C Procedures
|
1. Open the Office Assistant, if
necessary.
|
|
2. Click the Office Assistant.
|
|
3. Select Options.
|
|
4. Select the Gallery tab.
|
|
5. Select Next as desired to view each Assistant.
|
|
6. Select Back as desired to view previous Assistants.
|
|
7. Select OK.
|
f Step-by-Step
Select a different Assistant.
Open the Office Assistant, if necessary.
|
Steps
|
Practice Data
|
|
1. Click the Office Assistant.
The Office Assistant balloon appears.
|
Click the Office Assistant, if
necessary
|
|
2. Select Options.
The Office Assistant dialog box opens.
|
Click Options
|
|
3. Select the Gallery tab.
The Gallery page appears.
|
Click the Gallery tab
|
|
4. Select Next as necessary to view each Assistant.
The next Assistant appears.
|
Click Next twice
|
|
5. Select Back as desired to view previous Assistants.
The previous Assistant appears.
|
Click Back
|
|
6. Select OK.
The Office Assistant dialog box closes and the new Assistant appears in
the Office Assistant window.
|
Click OK
|
Change the Assistant back to Clippit.
d Discussion
You can use the options available on the Options page of
the Office Assistant dialog box to make the Office Assistant work best for you.
These options, some of which are activated by default, are divided into three
distinct groups: Assistant capabilities, Show tips about, and Other
tip options.
Some of the options that can be selected under Assistant
capabilities include: Respond to F1 key, which opens the
Assistant whenever you press [F1]; Move when in the way, which
moves the Assistant as needed when screen elements (such as a dialog box) are
open; and Guess help topics, in which the Assistant automatically
displays help on the current task. These options are all enabled by default.
Under Show tips about, you can choose exactly which type
of tip you want to display or hide, depending upon your individual needs. For
example, you can select to show or hide tips about Using features more
effectively, Using the mouse more effectively, and Keyboard
shortcuts. The Using features more effectively and Using the
mouse more effectively options are enabled by default.
Under Other tip options, you can select the following
options: Only show high priority tips, which shows only important tips
(such as time-saving tips); and Show the Tip of the Day at startup,
which opens an Office Assistant tip each time Excel starts. Neither of these
options are enabled by default.
You can also reset your tips. This option allows you to review
previous tips in the current Excel session.
|
|
|
|
o
|
You can also open the Office Assistant dialog box by
clicking the right mouse button on the Office Assistant and selecting the Options
command.
|
|
|
|
C Procedures
|
1. Open the Office Assistant, if
necessary.
|
|
2. Click the Office Assistant.
|
|
3. Select Options.
|
|
4. Select the Options tab.
|
|
5. Select or deselect the desired options.
|
|
6. Select OK.
|
f Step-by-Step
Change Assistant options.
Open the Office Assistant, if necessary.
|
Steps
|
Practice Data
|
|
1. Click the Office Assistant.
The Office Assistant balloon appears.
|
Click the Office Assistant, if
necessary
|
|
2. Select Options.
The Office Assistant dialog box opens.
|
Click Options
|
|
3. Select the Options tab.
The Options page appears.
|
Click the Options tab, if necessary
|
|
4. Select or deselect the desired options.
The options are selected or deselected.
|
Click  Move when in the way to
deselect it Move when in the way to
deselect it
|
|
5. Select OK.
The Office Assistant dialog box closes and the appropriate options are
enabled or disabled.
|
Click OK
|
Move the Office Assistant to the center of the document window
and open the Find dialog box. Notice that the Assistant does not move to
accommodate the Find dialog box. Close the Find dialog box.
Open the Office Assistant dialog box again and enable the Move
when in the way option. Then, open the Find dialog box again. Notice that
the Assistant now moves to accommodate the Find dialog box. Close the Find
dialog box.
d Discussion
You can display or hide the Office Assistant as desired.
Hiding the Assistant removes it from view, but does not disable it. The
Assistant continues to monitor your activities and, if it detects that you are
using procedures that can be performed more efficiently, the Office
Assistant button on the toolbar displays a light bulb.
You may want to hide the Office Assistant if you are not using
it, find it distracting, or require a larger working area.
|
|
|
|
o
|
You can also hide the Office Assistant by clicking it
with the right mouse button and selecting the Hide Assistant command.
|
|
|
|
C Procedures
|
1. Open the Office Assistant, if necessary.
|
|
2. Click the Close button on
the Assistant.
|
f Step-by-Step
Hide the Office Assistant.
Open the Office Assistant, if necessary.
|
Steps
|
Practice Data
|
|
1. Click the Close button on the
Assistant.
The Office Assistant window closes.
|
Click 
|
Open the Office Assistant and the Office Assistant dialog box.
On the Options page, select Reset my tips. Close the Office
Assistant dialog box and hide the Assistant.
e Task
Use the Office Assistant to view a tip and find an answer to a
question. Select a different Assistant and change an Assistant option. Hide the
Assistant.
|
1. Start Excel, if necessary.
|
|
2. Open the Office Assistant, if necessary.
|
|
3. Select Tips to view a tip. Close the tip window.
|
|
4. Query the Assistant by asking, How do I create headers and
footers?.
|
|
5. From the Assistant balloon, select the help topic Create
custom headers and footers. Close the help window.
|
|
6. Change the Clippit Assistant to the The Dot
Assistant.
|
|
7. Disable the Respond to F1 key option.
|
|
8. Change the Assistant back to Clippit and the Respond
to F1 key option back to the default.
|
|
9. In the Office Assistant dialog box, reset the tips.
|
|
10. Hide the Office Assistant.
|

In this lesson, you will
learn how to:
·
Create a new workbook
·
Select a cell - keyboard
·
Scroll with the mouse
·
Enter text into cells
·
Save a new workbook
·
Close a workbook
·
Open an existing workbook
·
Use AutoComplete
·
Use Pick From List
·
Enter numbers into cells
·
Edit cell entries
·
Rename an existing workbook
d Discussion
When you Start Excel, you begin with a new workbook. Excel
labels this workbook as Book1 in the application title bar.
You can open more than one workbook at a time. For example, you
can open a workbook that contains all the sales for your company, and at the
same time, open a workbook that contains all the expenses for your company.
When you create a new, blank workbook, it has default settings,
such as margin settings, font, and text alignment. You can change these settings
for the new workbook, or you can customize Excel to change the defaults for all
new workbooks.
|
|
|
|
o
|
The application title bar displays the current
workbook. When you start Excel, Book1 appears. When you create a new
workbook, the name of the new workbook (i.e. Book2) appears in the
title bar. You can change these default names when you save the file.
|
|
|
|
|
o
|
You can also create a new, blank workbook by selecting
the New command from the File menu or by pressing [Ctrl+N]
and selecting a workbook type.
|
|
|
|
C Procedures
|
1. Start Excel, if necessary.
|
|
2. Click the New button  . .
|
f Step-by-Step
Create a new, blank workbook.
Start Excel, if necessary.
|
Steps
|
Practice Data
|
|
1. Click the New button.
A new, blank workbook opens with its default name in the title bar.
|
Click 
|
d Discussion
The location of the cell pointer indicates
the active cell, which appears with a thick black border.
You can use the keyboard to select a cell and
make it active. When you press certain arrow keys or a combination of keys, the
cell pointer moves to a new cell, making it the active cell. The ways in which
you can use the keyboard to move to a cell are listed in the table below:
|
Keystroke
|
Action
|
|
[Left]
|
Moves the cell pointer one cell
to the left.
|
|
[Right]
|
Moves the cell pointer one cell to the right.
|
|
[Up]
|
Moves the cell pointer one cell up.
|
|
[Down]
|
Moves the cell pointer one cell down.
|
|
[Page Up]
|
Moves the cell pointer up one screen.
|
|
[Page Down]
|
Moves the cell pointer down one screen.
|
|
[Alt+Page Up]
|
Moves the cell pointer one screen to the left.
|
|
[Alt+Page Down]
|
Moves the cell pointer one screen to the right.
|
|
[Ctrl+Home]
|
Moves the cell pointer to the upper left cell in the
active worksheet.
|
|
[Ctrl+End]
|
Moves the cell pointer to the lower right cell in the
active worksheet.
|
|
|
|
|
o
|
When you open a new, blank workbook, the active cell
is always cell A1.
|
|
|
|
C Procedures
|
1. Create a new, blank workbook, if necessary.
|
|
2. Press [Down] to move one cell down.
|
|
3. Press [Right] to move one cell to the right.
|
|
4. Press [Left] to move one cell to the left.
|
|
5. Press [Up] to move one cell up.
|
|
6. Press [Ctrl+Home] to move to the upper left cell in the
worksheet.
|
|
7. Press [Page Down] to move down one screen.
|
|
8. Press [Page Up] to move up one screen.
|
|
9. Press [Alt+Page Down] to move one screen to the right.
|
|
10. Press [Alt+Page Up] to move one screen to the left.
|
f Step-by-Step
Select a cell using the keyboard.
Create a new, blank workbook, if necessary.
|
Steps
|
Practice Data
|
|
1. Press [Down] to move one cell down.
The cell pointer moves down.
|
Press [Down] three times
|
|
2. Press [Right] to move one cell to the right.
The cell pointer moves one cell to the right.
|
Press [Right]
|
|
3. Press [Left] to move one cell to the left.
The cell pointer moves one cell to the left.
|
Press [Left]
|
|
4. Press [Up] to move one cell up.
The cell pointer moves one cell up.
|
Press [Up]
|
|
5. Press [Ctrl+Home] to move to the upper left cell in the
worksheet.
The cell pointer moves to the upper left cell in the worksheet.
|
Press [Ctrl+Home]
|
|
6. Press [Page Down] to move down one screen.
The cell pointer moves down one screen.
|
Press [Page Down]
|
|
7. Press [Page Up] to move up one screen.
The cell pointer moves up one screen.
|
Press [Page Up]
|
|
8. Press [Alt+Page Down] to move one screen to the right.
The cell pointer moves one screen to the right.
|
Press [Alt+Page Down]
|
|
9. Press [Alt+Page Up] to move one screen to the left.
The cell pointer moves one screen to the left.
|
Press [Alt+Page Up]
|
d Discussion
You can use the mouse to move the cell pointer to a new cell.
However, the cell to which you want to move is not always visible on the screen
display. On larger worksheets, all the data may not fit on the
screen display at once. The horizontal and vertical scroll bars allow you to
scroll the display so that you can view other parts of the worksheet. If you
drag the scroll box in a scroll bar, the column letter or row number in the
current view appears in a ScreenTip next to the scroll bar. This feature
assists you in determining when to stop scrolling.
Scrolling does not change the location of the cell pointer. You
change the location of the cell pointer by clicking in the desired cell. Any
commands executed affect the active cell, not the cells in the part of the
worksheet you are viewing. For example, if you click in cell A1, and then
scroll to cell A50 and press the [Delete] key, the contents of cell A1
will be deleted, not cell A50.
C Procedures
|
1. Create a new, blank workbook,
if necessary.
|
|
2. Click in the cell to which you want to move
the cell pointer.
|
|
3. Click in the horizontal scroll bar to scroll the display one
screen to the right.
|
|
4. Click the right arrow on the horizontal scroll bar to scroll the
display one column to the right.
|
|
5. Drag the horizontal scroll box to the left end of the scroll bar
to scroll the display to the left.
|
|
6. Release the mouse button.
|
|
7. Click in the vertical scroll bar to scroll the display down one
screen.
|
|
8. Click the bottom arrow on the vertical scroll bar to scroll the
display down one row.
|
|
9. Drag the vertical scroll box to the top of the scroll bar to
scroll the display up.
|
|
10. Release the mouse button.
|
f Step-by-Step
Scroll through a worksheet using the mouse.
Create a new, blank workbook, if necessary.
|
Steps
|
Practice Data
|
|
1. Click in the cell to which you want to move
the cell pointer.
The cell pointer moves to the selected cell.
|
Click in cell D3
|
|
2. Click in the horizontal scroll bar to scroll the display one
screen to the right.
The display scrolls one screen to the right.
|
Click to the right of the horizontal scroll box in the
horizontal scroll bar
|
|
3. Click the right arrow on the horizontal scroll bar to scroll the
display one column to the right.
The display scrolls one column to the right.
|
Click 
|
|
4. Drag the horizontal scroll box to the left end of the scroll bar
to scroll the display to the left.
The scroll box moves and the column letter in the current view appears in
a ScreenTip next to the scroll bar as you drag.
|
Drag the horizontal scroll box to the left end of the
horizontal scroll bar
|
|
5. Release the mouse button.
The display scrolls to the left.
|
Release the mouse button
|
|
6. Click in the vertical scroll bar to scroll the display down one
screen.
The display scrolls down one screen.
|
Click below the vertical scroll box in the vertical
scroll bar
|
|
7. Click the bottom arrow on the vertical scroll bar to scroll the
display down one row.
The display scrolls down one row.
|
Click 
|
|
8. Drag the vertical scroll box to the top of the scroll bar to
scroll the display up.
The scroll box moves and the row number in the current view appears in a
ScreenTip next to the scroll bar as you drag.
|
Drag the vertical scroll box to the top of the
vertical scroll bar
|
|
9. Release the mouse button.
The display scrolls up.
|
Release the mouse button
|
d Discussion
In Excel, text is defined as letters or any
combination of numbers and letters. For example, Expenses, 2nd Qtr,
and BN9847 are all treated as text. Text automatically aligns to the
left in a cell. If the text is too long to fit within a cell, it appears as if
it has spilled over into the next cell. When text is entered into the adjacent
cell, the long text entry appears as if characters have been deleted. They are
not deleted and will display if you widen the column that contains the long text
entry.
Text is always entered into the current, or active, cell.
Therefore, you should be sure that the cell pointer is in the appropriate cell
before you start typing. If you press [Enter] after you finish typing an
entry, the cell pointer automatically moves down one cell. When you are typing
text into a cell, you are in enter mode. When you are in enter mode, the word Enter
appears on the status bar at the bottom of the screen.

Entering text into cells
C Procedures
|
1. Create a new, blank workbook,
if necessary.
|
|
2. Move to the cell into which you want to enter text.
|
|
3. Type the text.
|
|
4. Press [Enter] to exit enter mode.
|
|
5. Repeat the steps above to enter additional text.
|
f Step-by-Step
Enter text into the cells of a worksheet.
Create a new, blank workbook, if necessary.
|
Steps
|
Practice Data
|
|
1. Move to the cell into which you want to
enter text.
The cell pointer moves to the cell.
|
Click in cell A1, if necessary
|
|
2. Type the text.
The text appears in the formula bar and in the cell.
|
Type Sales Reps
|
|
3. Press [Enter] to exit enter mode.
The text is entered into the cell and the cell pointer moves down to the
next cell.
|
Press [Enter]
|
|
4. Repeat the steps above to enter additional text.
The text appears in the appropriate cells in the worksheet.
|
Fill in the data as shown in the table below
|
Fill in the data as shown in the
table below:
|
|
A
|
|
1
|
Sales Reps
|
|
2
|
Smith, S.
|
|
3
|
Brown, N.
|
|
4
|
Jones, P.
|
|
5
|
Adams, G.
|
|
6
|
Greene, E.
|
d Discussion
After creating a new workbook, you can save it on disk so that
you can retrieve it at another time.
When you save a workbook for the first time, Excel opens the
Save As dialog box in which you enter the desired file name and location. A
file name can consist of up to 255 characters. However, you should give the
workbook a short descriptive name. Excel automatically assigns the .xls extension
when you are saving a file.
Once a workbook has been saved to disk, its file name appears
in the application title bar. Excel updates the existing file each time you
subsequently save the workbook.

Saving a new workbook
|
|
|
|
o
|
You can also select the Save command from the File
menu to save a workbook.
|
|
|
|
|
o
|
You can use the Create New Folder button in the
Save As dialog box to create a new folder without leaving Excel.
|
|
|
|
|
o
|
The following characters cannot be used in filenames:
forward slash (/), backslash (\), greater than symbol (>), less than
symbol (<), asterisk (*), quotation marks (“ ”), pipe symbol ( | ), colon
(:), or semicolon (;).
|
|
|
|
|
o
|
For every file named in Excel 97 that is more than
eight characters in length, there is an eight character file name created in
order for the file to be compatible when used with earlier operating systems.
|
|
|
|
C Procedures
|
1. Click the Save button  . .
|
|
2. Type the desired file name.
|
|
3. Select the Save in list.
|
|
4. Select the drive in which you want to save the document.
|
|
5. Select the folder in which you want to save the document.
|
|
6. Select Save.
|
f Step-by-Step
Save a new workbook.
|
Steps
|
Practice Data
|
|
1. Click the Save button.
The Save As dialog box opens.
|
Click 
|
|
2. Type the desired file name.
The text appears in the File name text box.
|
Type comm
|
|
3. Select the Save in list.
A list of available drives appears.
|
Click Save in 
|
|
4. Select the drive in which you want to save the document.
A list of available folders appears.
|
Click the student data drive
|
|
5. Select the folder in which you want to save the document.
A list of files in the folder appear.
|
Double-click to select the student data folder
|
|
6. Select Save.
The Save As dialog box closes and the workbook is saved to the selected
drive and folder.
|
Click Save
|
Select cell A8, type your name, and press [Enter].
Save the file again. Notice that the Save As dialog box does
not open; the changes are saved to the Comm workbook in the student data
folder.
d Discussion
When you have finished working on a workbook, you can close it to remove it from the workbook
window.
If you close a workbook that has not been saved and changes
were made to it, Excel prompts you to save it. You can choose to save the
changes made to the workbook, or you can close the workbook without saving the
changes.

Closing a workbook
|
|
|
|
o
|
You can also close an open workbook by clicking the Close
button on the workbook window.
|
|
|
|
C Procedures
|
1. Select the File menu.
|
|
2. Select the Close command.
|
f Step-by-Step
Close the current workbook.
|
Steps
|
Practice Data
|
|
1. Select the File menu.
The File menu appears.
|
Click File
|
|
2. Select the Close command.
The workbook closes and the application window remains open.
|
Click Close
|
If a message box opens asking if you want to save the changes
to the current workbook, select No.
d Discussion
You can view or edit an existing workbook by opening it from
disk. You do not need to remember the file name because the Open dialog box
displays a list of folders and files in
the current drive and folder. You can select the desired file from the list, or
you can type the name of the file you want to open.
If the file resides in a different drive or folder, you can use
the Look in list to select the correct location. The folders and files
residing in the selected location appear below the Look in box.
You can also have more than one workbook open at a time.

Opening an existing workbook
|
|
|
|
o
|
The names of the four most recently opened workbooks
appear in a list at the bottom of the File menu. When you click a
workbook name in the list, the appropriate workbook opens.
|
|
|
|
|
o
|
You can also open a workbook by selecting the Open
command from the File menu or by pressing [Ctrl+O].
|
|
|
|
C Procedures
|
1. Click the Open button  . .
|
|
2. Select the Look in list.
|
|
3. Select the drive where the file you want to open is located.
|
|
4. Select the folder where the file you want to open is located.
|
|
5. Select the name of the workbook you want to open.
|
|
6. Select Open.
|
f Step-by-Step
Open an existing workbook from a
specified drive and folder location.
|
Steps
|
Practice Data
|
|
1. Click the Open button.
The Open dialog box opens.
|
Click 
|
|
2. Select the Look in list.
A list of available drives appears.
|
Click Look in 
|
|
3. Select the drive where the file you want to open is located.
A list of available folders appears.
|
Click the student data drive
|
|
4. Select the folder where the file you want to open is located.
A list of available files appears.
|
Double-click to select the student data folder
|
|
5. Select the name of the workbook you want to open.
The file name appears in the File name text box.
|
Click Sales
|
|
6. Select Open.
The Open dialog box closes and the file opens in the worksheet window.
|
Click Open
|
d Discussion
Excel has a default AutoComplete feature that helps speed up entry into a column
containing text. It is common to have to repeat entries when you are entering text into a
column. For example, in a column titled Regions, possible entries might
include North, South, East, and West. These entries
are likely to be repeated more than once. As you type entries into a column,
Excel automatically compiles a list of the entries. When you type the first few
letters of a repeated entry in that column, Excel finishes typing the entry for
you. If you do not want to use the entry that Excel suggests, you simply
continue typing.

Using the AutoComplete feature
|
|
|
|
o
|
The AutoComplete feature works only in columns
containing text entries.
|
|
|
|
|
o
|
If there is a blank row between entries in a column,
the AutoComplete feature for that column must be rebuilt by typing in
the entries again.
|
|
|
|
C Procedures
|
1. Move to the cell in which you want to use the AutoComplete
feature.
|
|
2. Type the first letter(s) of the entry you want to repeat.
|
|
3. Press [Enter].
|
f Step-by-Step
Use the AutoComplete feature to repeat an entry in a column.
|
Steps
|
Practice Data
|
|
1. Move to the cell in which you want to use
the AutoComplete feature.
The cell pointer moves to the selected cell.
|
Click cell A7, if necessary
|
|
2. Type the first letter(s) of the entry you want to repeat.
The completed entry appears in the cell and in the formula bar.
|
Type A
|
|
3. Press [Enter].
The text is entered into the cell.
|
Press [Enter]
|
d Discussion
Excel has a Pick From List feature
that helps speed up entry into a column
containing text. It is common to have to repeat entries when you are entering
text into a column. Excel automatically compiles a list of the entries,
enabling you to pick from a list instead of having to retype each entry. For
example, if you have a column containing a list of department names, you can
use the Pick From List feature to enter repeated department names
quickly. When activated, the Pick From List feature displays a list of
the available entries for the active column in alphabetical order.

Using the Pick From List feature
|
|
|
|
o
|
The Pick From List feature works only in
columns containing text entries.
|
|
|
|
|
o
|
If there is a blank row between entries in a column,
the Pick From List feature for that column must be rebuilt by typing
in the entries again.
|
|
|
|
C Procedures
|
1. Click the right mouse button on the
cell in which you want to use the Pick From List feature.
|
|
2. Select the Pick From List command.
|
|
3. Select the entry you want to appear in the cell.
|
f Step-by-Step
Use the Pick From List feature to repeat
an entry in a column.
|
Steps
|
Practice Data
|
|
1. Click the right mouse button on the cell in
which you want to use the Pick From List feature.
A shortcut menu appears.
|
Click the right mouse button on
cell A8
|
|
2. Select the Pick From List command.
A list of available entries for the active column appears.
|
Click Pick From List...
|
|
3. Select the entry you want to appear in the cell.
The entry appears in the active cell.
|
Click Smith, S.
|
d Discussion
Numeric entries contain only numbers, such as 75,
197, and 206. For example, an address such as 17 Maple Avenue
is considered a text entry even though it begins with a number. You can type a
minus sign before a number or enclose a number in parentheses to
indicate a negative value. You can also type a period to indicate a decimal
point. Numbers can exist as independent values, or they can be used in formulas
to calculate other values.

Entering numbers into cells
|
|
|
|
o
|
Be careful when using dashes and spaces with numbers.
They are considered text and cannot be used in calculations. Dollar signs ($)
and commas (,) are acceptable.
|
|
|
|
C Procedures
|
1. Move to the cell into which you want to enter a number.
|
|
2. Type the number.
|
|
3. Press [Enter] to exit enter mode.
|
|
4. Repeat the steps above to enter additional numbers.
|
f Step-by-Step
Enter numbers into
the cells of a worksheet.
|
Steps
|
Practice Data
|
|
1. Move to the cell into which you want to
enter a number.
The cell pointer moves to the cell.
|
Click in cell C2
|
|
2. Type the number.
The number appears on the formula bar and in the cell.
|
Type 1819.21
|
|
3. Press [Enter] to exit enter mode.
The number is entered in the cell and the cell pointer moves down to the
next cell.
|
Press [Enter]
|
|
4. Repeat the steps above to enter additional numbers.
The numbers appear in the appropriate cells in the worksheet.
|
Fill in the data shown in the table below
|
Fill in the data shown in the
table below:
|
|
A
|
B
|
C
|
|
1
|
Sales Reps
|
|
|
|
2
|
Smith, S.
|
|
1819.21
|
|
3
|
Brown, N.
|
|
1726.38
|
|
4
|
Jones, P.
|
|
2009.69
|
|
5
|
Adams, G.
|
|
1948.99
|
|
6
|
Greene, E.
|
|
|
|
7
|
Adams, G.
|
|
|
|
8
|
Smith, S.
|
|
|
d Discussion
If a cell contains numerous characters,
and you only want to change a few of them, it is more practical to edit the cell and change only
the desired characters than to retype the entire entry. When you double-click a
cell, the cell is placed in edit mode and its contents appear on the formula
bar. You can then edit the contents on the formula bar or in the cell itself
using the keyboard.
You can use the following keys to navigate and edit a cell in a
worksheet:
|
Keys
|
Action
|
|
[Home]
|
Moves
the insertion point to the beginning of the cell entry.
|
|
[End]
|
Moves
the insertion point to the end of the cell entry.
|
|
[Right]
|
Moves
the insertion point one character to the right in the cell entry.
|
|
[Left]
|
Moves
the insertion point one character to the left in the cell entry.
|
|
[Backspace]
|
Deletes
characters or selected text to the left of the insertion point.
|
|
[Delete]
|
Deletes
characters or selected text to the right of the insertion point.
|
You also can use the mouse to position the insertion point and
select text.
If you type data into a cell that already has an entry, the new
entry replaces the old one. You do not have to be in edit mode. You can use
this method when it is easier to replace the entire contents of a cell rather
than editing portions of it.
If you want to delete the entire entry in a cell, you select
the desired cell and press the [Delete] key to remove the entry all at
once. You do not have to be in edit mode. You can also select a range of cells
and use the [Delete] key to delete the contents of several cells at the
same time.
C Procedures
|
1. Double-click the cell you want to edit.
|
|
2. Position the insertion point in the entry on the formula bar or
in the cell.
|
|
3. Edit the entry as desired.
|
|
4. Continue making editing changes as desired.
|
|
5. Press [Enter] to exit edit mode.
|
|
6. Move to the cell containing the entry you want to delete.
|
|
7. Press [Delete] to delete the entire cell entry.
|
f Step-by-Step
Edit a worksheet.
|
Steps
|
Practice Data
|
|
1. Double-click the cell you want to edit.
The cell appears in edit mode.
|
Double-click cell C3
|
|
2. Position the insertion point in the entry on the formula bar or
in the cell.
The insertion point moves to the new location.
|
Click to the right of the 7 in cell C3
|
|
3. Edit the entry as desired.
The changes appear in the cell and on the formula bar.
|
Press [Delete] twice
|
|
4. Continue making editing changes, as necessary.
The changes appear in the cell and on the formula bar.
|
Type 04
|
|
5. Press [Enter] to exit edit mode.
The edited entry is entered into the cell.
|
Press [Enter]
|
|
6. Move to the cell containing the entry you want to delete.
The cell pointer moves to the cell.
|
Click in cell A6
|
|
7. Press [Delete] to delete the entire cell entry.
The cell entry is deleted.
|
Press [Delete]
|
Change 1948.99 in cell C5 to 1948.44. Delete the
entries in cells A7 and A8.
d Discussion
Once a file has been saved
to disk, Excel updates the existing file with any changes each time you
subsequently save the workbook.
However, there may be times when you want to save the current
workbook with a different workbook name or to a different location. This option
allows you to modify a workbook and save the changes, but still keep the
original workbook intact. You can save an existing workbook with a different
file name or location using the Save As dialog box.
C Procedures
|
1. Select the File menu.
|
|
2. Select the Save As command.
|
|
3. Type the desired file name.
|
|
4. Select the Save in list.
|
|
5. Select the drive in which you want to save the new workbook.
|
|
6. Select the folder in which you want to save the new workbook.
|
|
7. Select Save.
|
f Step-by-Step
Rename an existing workbook.
|
Steps
|
Practice Data
|
|
1. Select the File menu.
The File menu appears.
|
Click File
|
|
2. Select the Save As command.
The Save As dialog box opens.
|
Click Save As...
|
|
3. Type the desired file name.
The text appears in the File name text box.
|
Type salesnew
|
|
4. Select the Save in list.
A list of available drives appears.
|
Click Save in 
|
|
5. Select the drive in which you want to save the new workbook.
The folders in the selected drive appear.
|
Click the student data drive
|
|
6. Select the folder in which you want to save the new workbook.
The files in the selected folder appear.
|
Double-click to select the student data folder
|
|
7. Select Save.
The Save As dialog box closes and the file is saved with the new name to
the selected location.
|
Click Save
|
Close SALESNEW.XLS.
e Task
Use basic workbook skills to create a new, blank workbook, move
the cell pointer around the worksheet, scroll the worksheet, enter text and
numbers, and delete cell entries. Save, open, and close workbooks. Use the AutoComplete
and Pick From List features to enter data into cells. Use various
methods to edit data in cells.
|
1. Use the New button to create a new workbook.
|
|
2. Use the keyboard to move the cell pointer around the worksheet.
|
|
3. Use the mouse to move the cell pointer and to scroll the
worksheet vertically and horizontally.
|
|
4. Enter the text and numbers shown in the table below:
|
|
|
A
|
B
|
|
1
|
|
|
|
2
|
Northern
|
50986
|
|
3
|
Southern
|
45284
|
|
4
|
Central
|
42436
|
|
5
|
Western
|
39675
|
|
6
|
Midwest
|
|
|
5. Delete the entry in cell A6.
|
|
6. Save the file to the student data folder under the name Region.
|
|
7. Close Region.
|
|
8. Open Regsales from the student data folder.
|
|
9. Use the AutoComplete feature to enter Jones, P. in
cell A9.
|
|
10. Use the Pick From List feature in cell A10 to enter the
name Banes, M..
|
|
11. Double-click cell C6 to place the cell into edit mode and change
the value from 3952.68 to 3932.68.
|
|
12. Save and close the workbook.
|

In this lesson, you will
learn how to:
·
Work with ranges
·
Select ranges - keyboard
·
Select ranges - mouse
·
Select non-adjacent ranges
·
Enter values into a range
·
Use AutoFill
d Discussion
Many Excel commands are executed after
selecting several cells. The command then affects all the selected cells. A
group of selected cells is called a range. A range can contain adjacent or
non-adjacent cells. A non-adjacent range consists of two or more separate
blocks of cells that can be adjoining, separate, or overlapping.
Ranges are identified by the addresses of the cells in the
upper left and lower right corners of the selected block of cells, separated by
a colon. For example, the range A4:C10 has cell A4 in the upper left corner and
cell C10 in the lower right corner. To identify non-adjacent ranges, you
separate the range addresses with a comma. For example, A4:A10,C4:C10 refers to
the range A4:A10 as well as the range C4:C10.
Selecting a range before executing a command is especially
useful if you are using a toolbar or keyboard shortcut to perform an action.
However, if a dialog box opens when you execute a menu command, you can specify
the desired range in the dialog box. In this case, you do not have to select a
range before you execute the desired command.
A selected range has a heavy black border surrounding it. All
the cells contained in the range are darkened except for the active cell.
|
|
|
|
o
|
Ranges remain selected until you move the cell
pointer.
|
|
|
|
d Discussion
You can select ranges with the keyboard.
Keyboard techniques are useful when you are working with small ranges.

Selecting ranges with the keyboard
|
|
|
|
o
|
You can select a large range of cells quickly by
pressing the [Shift+Page Up] or [Shift+Page Down] key
combination.
|
|
|
|
C Procedures
|
1. Move the cell pointer to the first
cell in the range.
|
|
2. Hold [Shift], press the desired arrow key as necessary to
extend the selection, and release [Shift].
|
f Step-by-Step
From the Student Data directory, open COMM03.XLS.
Select a range using the keyboard.
|
Steps
|
Practice Data
|
|
1. Move the cell pointer to the first cell in
the range.
The cell pointer moves to the cell.
|
Click cell A1, if necessary
|
|
2. Hold [Shift], press the desired arrow key as necessary to
extend the selection, and release [Shift].
The range is selected.
|
Hold [Shift], press [Down] 4 times, and
release [Shift]
|
d Discussion
You can use the mouse to select a range.
This method is especially effective when you are selecting large ranges in
which you must scroll the display in order to see the last cell in the range.

Selecting ranges with the mouse
|
|
|
|
o
|
You can select a large range quickly by clicking the
upper left cell in the range, pressing the [Shift] key, and clicking
the lower right cell in the range. All cells between the two corner cells are
selected.
|
|
|
|
C Procedures
|
1. Drag from the first cell in the range to the
last cell.
|
|
2. Release the mouse button.
|
f Step-by-Step
Select a range using the
mouse.
|
Steps
|
Practice Data
|
|
1. Drag from the first cell in the range to
the last cell.
The range is highlighted as you drag.
|
Drag from cell C2 to cell C5
|
|
2. Release the mouse button.
The range is selected.
|
Release the mouse button
|
d Discussion
You add non-adjacent cells to a
selected range using the mouse in conjunction with the [Ctrl] key. This
method is useful when you want to execute a command that affects ranges in
different sections of a worksheet. For example, you may have titles in row 1
and summary totals in row 10 you want to format. You could select the two
non-adjacent ranges and apply the bold format to both of the rows at once.

Selecting non-adjacent ranges
C Procedures
|
1. Drag from the first cell in the range to
the last cell.
|
|
2. Release the mouse button.
|
|
3. Hold [Ctrl] and drag to select the non-adjacent range.
|
|
4. Release the mouse button and release [Ctrl].
|
f Step-by-Step
Select the non-adjacent ranges.
|
Steps
|
Practice Data
|
|
1. Drag from the first cell in the range to
the last cell.
The range is highlighted as you drag.
|
Drag from cell A1 to cell A5
|
|
2. Release the mouse button.
The range is selected.
|
Release the mouse button
|
|
3. Hold [Ctrl] and drag to select the non-adjacent range.
The range is highlighted as you drag.
|
Hold [Ctrl] and drag C2:C5
|
|
4. Release the mouse button and release [Ctrl].
The additional range is selected.
|
Release the mouse button and release [Ctrl]
|
d Discussion
You can quickly enter data into a selected range using a shortcut method. As
you type each entry into the range and press [Enter], the cell pointer
automatically moves to the next cell in the range, even if the range spans
several columns. When the cell pointer reaches the last selected cell in the
current column, it automatically moves to the first selected cell in the next
column. In a non-adjacent range, when the cell pointer reaches the last cell at
the bottom right corner of the first block of cells, it advances to the first
cell at the top left corner of the next, non-adjacent, block of cells.

Entering values into a range
|
|
|
|
o
|
The active cell in a selected range appears
undarkened. When you enter data, it appears in this cell.
|
|
|
|
C Procedures
|
1. Select the range into which
you want to enter the data.
|
|
2. Type the data in the cell.
|
|
3. Press [Enter].
|
|
4. Repeat the above steps as necessary to fill in the range.
|
f Step-by-Step
Enter values into a range.
|
Steps
|
Practice Data
|
|
1. Drag the range into which you want to enter
the data.
The range is highlighted as you drag.
|
Drag D2:E5
|
|
2. Release the mouse button.
The range is selected.
|
Release the mouse button
|
|
3. Type the data in the cell.
The data appears on the formula bar and in the cell.
|
Type 1766.55
|
|
4. Press [Enter].
The data is entered into the cell and the next cell in the range is activated.
|
Press [Enter]
|
|
5. Repeat the above steps as necessary to fill in the range.
The data is entered into the range.
|
Fill in the data shown in the table below
|
Fill in the data shown in the
table below:
|
|
A
|
B
|
C
|
D
|
E
|
|
1
|
Sales Reps
|
|
|
|
|
|
2
|
Smith, S.
|
|
1819.21
|
1766.55
|
1942.88
|
|
3
|
Brown, N.
|
|
1704.38
|
1809.21
|
1650.28
|
|
4
|
Wallace, F.
|
|
2009.69
|
2195.19
|
2159.29
|
|
5
|
Adams, G.
|
|
1948.44
|
1725.56
|
1870.26
|
d Discussion
You can use the AutoFill feature
in Excel to create a standard series of labels on a worksheet. Examples of
standard series include months of the year, days of the week, and quarter
labels.
When you select a range, a small, black box called the fill
handle displays in the lower right corner of the range. When the mouse pointer
is positioned on the fill handle, it changes to a solid, black plus (+) sign.
When you drag the fill handle to select a range you want to fill, Excel fills
the range based on the contents of the first cell in the range. If the cell
contains a label that Excel recognizes as the first item in a standard series,
the range is filled with the rest of the items in the label series.

Using the AutoFill feature
|
|
|
|
o
|
If Excel does not recognize the label in the first
cell as the beginning of a standard series, the cell contents are copied into
the range.
|
|
|
|
C Procedures
|
1. Select the cell containing the starting
label in the series.
|
|
2. Point to the fill handle at the bottom right corner of the
active cell.
|
|
3. Drag the fill handle to select the range you want to fill.
|
|
4. Release the mouse button.
|
f Step-by-Step
Use the AutoFill feature to create a label series.
Enter Jan in cell C1 and press [Enter] to exit
enter mode.
|
Steps
|
Practice Data
|
|
1. Select the cell containing the starting
label in the series.
The cell pointer moves to the cell.
|
Click cell C1
|
|
2. Point to the fill handle at the bottom right corner of the
active cell.
The mouse pointer changes into a solid, black plus sign (+).
|
Point to the fill handle at the bottom right corner of
cell C1
|
|
3. Drag the fill handle to select the range you want to fill.
An outline of the range and a box indicating the AutoFill entries appear
as you drag.
|
Drag the fill handle to select C1:E1
|
|
4. Release the mouse button.
The label series appears in the selected cells.
|
Release the mouse button
|
Close COMM03.XLS.
e Task
Select ranges using the keyboard and the mouse. Select
non-adjacent ranges.
Enter data into a selected range using the shortcut method. Use
the AutoFill feature to create a standard series.
|
1. Open Region02.
|
|
2. Use the keyboard to select B6:B8.
|
|
3. Use the mouse to select A5:C8.
|
|
4. Select the non-adjacent ranges, A5:A8 and C5:C8.
|
|
5. Select the range D5:E8.
|
|
6. Use the shortcut method to enter the numerical data shown in the
table below:
|
|
|
D
|
E
|
|
5
|
53875
|
57234
|
|
6
|
47122
|
48463
|
|
7
|
47383
|
49872
|
|
8
|
42348
|
45832
|
|
7. Type the text Qtr 1 in cell B4.
|
|
8. Use the fill handle to create a label series by quarter in the
range B4:E4.
|
|
9. Click anywhere in the workbook to deselect the cells.
|
|
10. Save and close the workbook.
|

In this lesson, you will
learn how to:
·
Use formulas
·
Enter formulas
·
Use the AutoSum button
·
Use functions
·
Use Formula AutoCorrect
·
Use Formula Palette to create
·
Use Formula Palette to edit
·
Use the Paste Function button
·
Use AutoCalculate
·
Use Range Finder
d Discussion
Formulas are used to perform calculations on values
entered into the cells of a worksheet. They consist of the addresses of the
cells containing the values and the appropriate mathematical operators.
Formulas begin with an equal sign (=) because they contain cell addresses. This
prevents Excel from interpreting the formula as text, since cell addresses
begin with letters. For example, to add the numbers in cells A1 and A2, you
would type the formula =A1+A2.
You enter the formula in the cell where you want the result to
appear. Because formulas use cell addresses, they automatically recalculate
when the value of a cell used in a formula changes. When a cell containing a
formula is selected, the actual formula appears in the formula bar. The
calculated results of the formula appear in the cell.
The mathematical operators that can be used in a formula are
listed below:
|
Operator
|
Performs
|
|
+ (plus sign)
|
Addition
|
|
- (minus sign)
|
Subtraction
|
|
* (asterisk)
|
Multiplication
|
|
/ (slash)
|
Division
|
|
( )
(parentheses)
|
Controls the order of operation. Calculations within
parentheses are performed first.
|
|
% (percent)
|
Converts the number into a percentage. For example,
when you type 10%, Excel reads the value as .10.
|
|
^ (caret)
|
Exponentiation. For example, when you type 2^3, Excel
reads the value as 2*2*2.
|
When more than one operator appears in a formula, it is
calculated using the standard mathematical order of precedence. This order
determines which operations are carried out first. The order of precedence is
as follows: parentheses, exponentiation, multiplication and division, addition
and subtraction.
For example, the result of (8*7)+2 is 58 and the result of
8*(7+2) is 72.
|
|
|
|
o
|
When multiplication and division or addition and
subtraction appear in the same formula, they are evaluated from left to right
as they appear in the formula.
|
|
|
|
d Discussion
Formulas begin with an equal sign (=)
because they contain cell addresses. This prevents Excel from interpreting the
formula as text, since cell addresses begin with letters. You enter a formula
in the cell where you want the result to appear.

Entering formulas
|
|
|
|
o
|
You can display the actual text entry that was entered
into a cell, whether it is a number, label, or formula. This option is useful
as a teaching tool, or when you are auditing a worksheet for formula errors.
Holding down the [Ctrl] key and pressing the Single Left Quotation
Mark ( ` ) key toggles the worksheet between displaying the actual
text entries in the cells and the results of the formulas. The Single Left
Quotation Mark key is usually located above the [Tab] key and
below the [Esc] key in the upper left corner of most keyboards. You
can also display the actual text entry by selecting the Options
command from the Tools menu and then selecting the Formulas
option on the View tab.
|
|
|
|
|
o
|
When you enter a formula into a cell, you can either
type the cell addresses or use the mouse to select the cells and allow Excel
to enter the cell addresses into the formula automatically.
|
|
|
|
C Procedures
|
1. Select the cell into which you want to enter
the formula.
|
|
2. Begin the formula with an equal sign (=).
|
|
3. Enter the rest of the formula.
|
|
4. Press [Enter].
|
f Step-by-Step
From the Student Data directory, open COMM04.XLS.
Enter a formula into a cell.
|
Steps
|
Practice Data
|
|
1. Select the cell into which you want to
enter the formula.
The cell pointer moves to the cell.
|
Click cell B11
|
|
2. Begin the formula with an equal sign (=).
An equal sign (=) appears in the formula bar and in the
cell.
|
Type =
|
|
3. Enter the rest of the formula.
The formula appears on the formula bar and in the cell.
|
Type B9-B10
|
|
4. Press [Enter].
The result of the formula appears in the cell.
|
Press [Enter]
|
d Discussion
Excel has built-in functions that
are shortcuts for formulas. One of these is the SUM function which
calculates the total of the values in a range of cells. Using this function is
easier than typing a formula and each individual cell address. For example, it
is easier to use the SUM function to add the numbers in cells A1 through
A7 rather than typing the formula =A1+A2+A3+A4+A5+A6+A7.
Since the SUM function is used frequently, there is
an AutoSum button on the toolbar that writes the formula in the active
cell for you. The AutoSum button is an easy way to sum values in a row
or column of a worksheet.
When you click the AutoSum button, a suggested range for
the function is selected. This suggested range can be changed. If you click the
AutoSum button at the end of a row, the row of values to the left of the
active cell is selected. If you click the AutoSum button at the bottom
of a column, the column of values above the active cell is selected. If there
are values both above and to the left of the active cell, the column of values
above the active cell is selected.

Using the AutoSum button
|
|
|
|
o
|
Double-clicking the AutoSum button enters the
result of the formula without having to press the [Enter] key.
|
|
|
|
C Procedures
|
1. Select the cell into which you want
to enter the formula.
|
|
2. Click the AutoSum button  . .
|
|
3. Press [Enter].
|
f Step-by-Step
Use the AutoSum button to total
the values in a column.
|
Steps
|
Practice Data
|
|
1. Select the cell into which you want to
enter the formula.
The cell pointer moves to the cell.
|
Click cell B6
|
|
2. Click the AutoSum button.
A suggested range surrounded by a blinking marquee is selected.
|
Click 
|
|
3. Press [Enter].
The result of the formula appears in the cell.
|
Press [Enter]
|
Use the AutoSum button to total the sales figures for
Feb in cell C6 and Mar in cell D6. Total the Expenses in cell F6 as well.
d Discussion
The AutoSum button assists you in summing up
values in a row or column. This button automatically places the SUM
function into a cell for you. However, there are times when the suggested range
provided by the AutoSum feature is not the range you want because the AutoSum
feature only works with consecutively filled cells. For example, you may want
to place the sum of the numbers contained in cells A1 through A20 in cell A21,
but cells A7 and A12 are blank. The suggested range provided by the AutoSum
feature would not be correct in this case. Therefore, in some cases, you may
find it easier to simply enter the proper function yourself.
Besides the SUM function, you can also enter AVERAGE,
MAX, MIN, and COUNT functions. All the functions are
entered with the same syntax, including beginning the function with an equal
sign (=), typing the name of the function, and entering the first and last
cells in the range enclosed in parentheses. These functions are listed in the
table below:
|
Function
|
Syntax
|
Description
|
|
SUM
|
=SUM(A1:A20)
|
Provides the sum of all the
numbers in a range.
|
|
AVERAGE
|
=AVERAGE(A1:A20)
|
Returns the average of a range of numbers. If a cell
in the range is empty, it is not included in calculating the average. If a
cell in the range contains the number zero, it is included in calculating the
average.
|
|
MAX
|
=MAX(A1:A20)
|
Returns the highest value in a range of numbers.
|
|
MIN
|
=MIN(A1:A20)
|
Returns the lowest value in a range of numbers.
|
|
COUNT
|
=COUNT(A1:A20)
|
Returns the number of cells that contain numbers.
|

Using the Average function
|
|
|
|
o
|
You can enter a period (.) in place of a colon (:)
when you are entering a function into a cell. When you press the [Enter]
key after typing the function, Excel automatically replaces the period (.)
with a colon (:).
|
|
|
|
|
o
|
The name of a function is not case-sensitive. For
example, you can enter SUM, Sum, or sum into a cell.
|
|
|
|
C Procedures
|
1. Select the cell into which
you want to enter the formula.
|
|
2. Type the formula to average a range of cells.
|
|
3. Press [Enter].
|
f Step-by-Step
Use a function to calculate the results of a
formula.
|
Steps
|
Practice Data
|
|
1. Select the cell into which you want to
enter the formula.
The cell pointer moves to the cell.
|
Click cell H2
|
|
2. Type the formula to average a range of cells.
The formula appears on the formula bar and in the cell.
|
Type =AVERAGE(B2:D2)
|
|
3. Press [Enter].
The result of the formula appears in the cell.
|
Press [Enter]
|
d Discussion
Excel 97 includes the AutoCorrect
feature. This feature identifies and offers suggestions on 15 of the most
common mistakes made when entering formulas. Often, when a mistake is made in
entering a formula, a puzzling message appears, making it difficult to
understand how to correct the error. The AutoCorrect feature provides
suggestions on how to correct the mistake, making it easy to enter a formula
even if the proper syntax is not known. For example, if a formula is entered as
=A1+B1+, the AutoCorrect feature will suggest the formula =A1+B1.
If an error is found, you must either accept the correction provided or correct
the formula yourself.
Recommendations made by Excel when a mistake is entered in a
formula are listed in the table below:
|
Formula Entered
|
Error Found
|
Recommendation
|
|
=4 7
|
extra space
|
=47
|
|
=1A
|
inverted cell reference
|
=A1
|
|
=3+*4
|
two mathematical operators next to each other
|
=3+4
|
|
=4//2
|
two mathematical operators next to each other
|
=4/2
|
|
=4=>3
|
Excel accepts more than one combination (previous
versions only accepted one)
|
=4>=3
|
|
=4X7
|
X used instead of * as the symbol for multiplication
|
=4*7
|
|
=777.55.44
|
extra decimal point
|
=777.5544
|
|
=4,567
|
unnecessary comma
|
=4567
|
|
=A1+A2+
|
extra mathematical operator
|
=A1+A2
|
|
=A1+7(B7/50)
|
missing mathematical operator
|
=A1+7*(B7/50)
|
|
=IF(A1>10,"yes","no)
|
missing quotation mark
|
=IF(A1>10,"yes","no")
|
|
=SUM(A:1:A7)
|
misplaced colon
|
=SUM(A1:A7)
|
|
=SUM(A1;A7)
|
semicolon used instead of a colon
|
=SUM(A1:A7)
|
|
=SUM(A 1:A7)
|
extra space
|
=SUM(A1:A7)
|
|
=SUMA1:A7)
|
missing parenthesis
|
=SUM(A1:A7)
|

Using the AutoCorrect feature
d Discussion
Excel provides a Formula Palette, which enables you to both build and
edit your formulas. For example, if you want to enter a formula such as =MAX(B5:C5)
in a cell, the Formula Palette lets you choose the function part of the
formula from a list of functions. It also provides a text box into which you
can insert the range part of the formula. The text box contains a Collapse
Dialog button. When you click this button, the dialog box portion of the
Formula Palette becomes smaller so that you can see the worksheet. You can then
drag to select the desired range, which is placed in the text box when the
operation is resumed.
The Formula Palette also stores the most popular and recently
used formulas in a function list on the formula bar, enabling quick and easy
access to them. The name and description of the function appears, along with
its arguments. The proper syntax for entering a formula, as well as the result
of the formula before it is entered into the worksheet, also appears in the
list.
When you use the Formula Palette, the Office Assistant appears.
You can have the Assistant help you, or you can choose to ignore it. If you do
not request help from the Assistant, it closes automatically when you have
finished using the Formula Palette.

Using the Formula Palette to create a formula
C Procedures
|
1. Select the cell into which you want to enter the
formula.
|
|
2. Click the Edit Formula button  . .
|
|
3. Select the function list on the formula bar.
|
|
4. Select the desired formula from the list.
|
|
5. Select the Number 1 text box Collapse Dialog
button  . .
|
|
6. Select the range you want to include in the formula.
|
|
7. Press [Enter].
|
|
8. Select OK.
|
f Step-by-Step
Use the Formula Palette to calculate a formula.
|
Steps
|
Practice Data
|
|
1. Select the cell into which you want to
enter the formula.
The cell pointer moves to the cell.
|
Click cell E2
|
|
2. Click the Edit Formula button.
The Formula Palette dialog box opens.
|
Click Edit Formula 
|
|
3. Select the function list on the formula bar.
A list of functions appears.
|
Click the function list 
|
|
4. Select the desired function from the list.
The function name appears on the formula bar and the Formula Palette
dialog box expands.
|
Click MAX
|
|
5. Select the Number 1 text box Collapse Dialog
button.
The Formula Palette dialog box reduces in size to enable you to see the
worksheet.
|
Click the Number 1 text box 
|
|
6. Drag the range you want to include in the formula.
An outline of the range appears as you drag and the selected range appears
in the reduced Formula Palette dialog box.
|
Drag B2:D2
|
|
7. Release the mouse button.
The range is selected and the formula appears on the formula bar and in
the cell.
|
Release the mouse button
|
|
8. Press [Enter].
The Formula Palette dialog box expands and the selected
range appears in the Number 1 text box.
|
Press [Enter]
|
|
9. Select OK.
The Formula Palette dialog box closes and the result of the
formula appears in the cell.
|
Click OK
|
d Discussion
The Formula Palette in Excel enables you to edit your
formulas. For example, if you want to edit a formula such as =MAX(B5:C5)
by changing MAX to SUM, the Formula Palette allows you to
replace the function part of the formula using functions from the function list
on the formula bar.
When you use the Formula Palette, the Office Assistant appears.
You can have the Assistant help you, or you can choose to ignore it. If you do
not request help from the Assistant, it closes automatically when you have
finished using the Formula Palette.

Using the Formula Palette to edit a formula
C Procedures
|
1. Select the cell containing the formula
you want to edit.
|
|
2. Click the Edit Formula button  . .
|
|
3. Drag to select the letters of the function in the formula bar.
|
|
4. Release the mouse button.
|
|
5. Select the function list on the formula bar.
|
|
6. Select the desired function from the list.
|
|
7. Select OK.
|
f Step-by-Step
Use the Formula Palette to edit a function.
|
Steps
|
Practice Data
|
|
1. Select the cell containing the formula you
want to edit.
The cell pointer moves to the cell.
|
Click cell E2, if necessary
|
|
2. Click the Edit Formula button.
The Formula Palette dialog box opens.
|
Click Edit Formula 
|
|
3. Drag to select the letters of the function in the formula bar.
The letters are highlighted as you drag.
|
Drag to select the letters MAX in the formula
bar
|
|
4. Release the mouse button.
The letters are selected.
|
Release the mouse button
|
|
5. Select the function list on the formula bar.
A list of functions appears.
|
Click the function list 
|
|
6. Select the desired function from the list.
The function name appears on the formula bar.
|
Click SUM
|
|
7. Select OK.
The Formula Palette dialog box closes and the result of the
formula appears in the cell.
|
Click OK
|
d Discussion
If you are not sure of the proper syntax
of a formula, or you need help in entering a formula, you can click the Paste
Function button for assistance. The Paste Function button allows you
to select a function name and the appropriate arguments. Excel contains several
hundred functions. In order to help narrow the selection, the Paste Function
dialog box has the functions grouped by category. Selecting a category displays
only the functions within that category in the Function name list box.
If you do not know the category, you can select All to display all the
available functions in alphabetical order in the list box. When you select a
function in the Function name list box, a description of the function
appears in the area at the bottom of the dialog box. In the Formula Palette
dialog box, you enter the appropriate arguments for the function you selected.
When you use the Paste Function button, the Office
Assistant appears. If you do not know which function you want to use, there is
a text box in the Assistant in which you can type a brief description of what
you are trying to do. The Assistant offers assistance by directing you
to the Function Name category that suits your needs. If you do not request
help from the Assistant, it closes automatically when you have finished using
the Paste Function dialog box.

The Paste Function dialog box
C Procedures
|
1. Select the cell into which you want to
enter the formula.
|
|
2. Click the Paste Function button  . .
|
|
3. Select a category from the Function category list box.
|
|
4. Select the name of the function from the Function name
list box.
|
|
5. Select OK.
|
|
6. Select the Number 1 text box Collapse Dialog
button  . .
|
|
7. Select the range you want to use in the calculation.
|
|
8. Press [Enter].
|
|
9. Select OK.
|
f Step-by-Step
Use the Paste Function button to calculate the average for the
values in a cell.
|
Steps
|
Practice Data
|
|
1. Select the cell into which you want to
enter the formula.
The cell pointer moves to the cell.
|
Click cell H3
|
|
2. Click the Paste Function button.
The Paste Function dialog box opens.
|
Click 
|
|
3. Select a category from the Function category list box.
The names of the functions in the selected category appear in the Function
name list box.
|
Click Statistical, if necessary
|
|
4. Select the name of the function from the Function name
list box.
The function name is selected.
|
Scroll if necessary and click AVERAGE
|
|
5. Select OK.
The Formula Palette dialog box opens.
|
Click OK
|
|
6. Select the Number 1 text box Collapse Dialog
button.
The Formula Palette dialog box reduces in size to enable you to see the
worksheet.
|
Click the Number 1 text box 
|
|
7. Drag the range you want to use in the calculation.
An outline of the range appears as you drag and the selected range appears
in the reduced Formula Palette dialog box.
|
Drag B3:D3
|
|
8. Release the mouse button.
The range is selected and the formula appears on the formula bar and in
the cell.
|
Release the mouse button
|
|
9. Press [Enter].
The Formula Palette dialog box expands and the selected
range appears in the Number 1 text box.
|
Press [Enter]
|
|
10. Select OK.
The Formula Palette dialog box closes and the result of the formula
appears in the cell.
|
Click OK
|
d Discussion
The AutoCalculate feature performs
a simple calculation on a selected range of cells without making you supply a
formula. The results of the calculation appear on the status bar. These results
are temporary and are not placed in the worksheet. The AutoCalculate
feature is helpful when you want to spot-check your worksheet for accuracy. The
AutoCalculate functions are accessed by clicking the right mouse button
on the AutoCalculate box located on the status bar.
The AutoCalculate functions and their results are listed
below:
|
Function
|
Result
|
|
None
|
Does not display a number in
the AutoCalculate box.
|
|
Average
|
Displays the average of the selected cells in the AutoCalculate
box.
|
|
Count
|
Displays the number of entries made into the selected
cells in the AutoCalculate box.
|
|
Count Nums
|
Displays the number of numeric entries made into the
selected cells in the AutoCalculate box.
|
|
Max
|
Displays the highest value of the selected cells in
the AutoCalculate box.
|
|
Min
|
Displays the lowest value of the selected cells in the
AutoCalculate box.
|
|
Sum
|
Displays the sum of the selected cells in the AutoCalculate
box.
|

Using the AutoCalculate feature
C Procedures
|
1. Select the range you want to use in the
calculation.
|
|
2. Click the right mouse button on the AutoCalculate box on
the status bar.
|
|
3. Select the desired function.
|
f Step-by-Step
Use the AutoCalculate feature to
find the average of a range.
|
Steps
|
Practice Data
|
|
1. Drag the range you want to use in the
calculation.
The range is highlighted as you drag.
|
Drag B2:D5
|
|
2. Release the mouse button.
The range is selected.
|
Release the mouse button
|
|
3. Click the right mouse button on the AutoCalculate box on
the status bar.
A shortcut menu appears.
|
Click the right mouse button on Sum=22600.74
|
|
4. Select the desired function.
The result of the selected function appears in the AutoCalculate
box.
|
Click Average
|
Redisplay the sum of the range in the AutoCalculate box.
Click any cell to deselect the range.
d Discussion
Excel provides the Range Finder feature which
identifies the ranges used in a formula. For example, if you want to edit the
ranges in a particular formula, you can use the Range Finder feature.
When a cell containing the formula you want to edit is selected, the Range
Finder identifies the range references in that formula as well as each
individual cell in the range by displaying them in the same color. Excel
surrounds the cells in the range with a colored range border. You can drag the
range border to include a different group of cells in the range. When you
modify a range border, the relevant formula range reference(s) change
accordingly.

Using the Range Finder feature
C Procedures
|
1. Double-click the cell containing the formula
you want to edit.
|
|
2. Point to the range handle in the lower right corner of the range
border.
|
|
3. Drag the range handle up to include fewer cells in the range.
|
|
4. Release the mouse button.
|
|
5. Press [Enter].
|
f Step-by-Step
Use the Range Finder feature to edit
the range contained in a formula.
|
Steps
|
Practice Data
|
|
1. Double-click the cell containing the
formula you want to edit.
The formula range references and the range border appear in the same
color.
|
Double-click cell F6
|
|
2. Point to the range handle in the lower right corner of the range
border.
The mouse pointer changes into a solid, black plus sign (+).
|
Point to the range handle in the lower right corner of
F2:F5
|
|
3. Drag the range handle up to include fewer cells in the range.
The range border moves as you drag.
|
Drag the range handle up to include only F2:F3
|
|
4. Release the mouse button.
The range border and the formula range references change accordingly.
|
Release the mouse button
|
|
5. Press [Enter].
The result of the formula with the new range appears in the cell.
|
Press [Enter]
|
Edit the formula in cell F6 to include F2:F5.
Close COMM04.XLS.
e Task
Create a formula manually. Use the AutoSum button to sum
rows and columns. Use the Formula Palette to enter and edit a formula. Use the Paste
Function button to enter a formula. Use the AutoCalculate feature to
calculate the values of selected ranges. Use the Range Finder feature to
adjust range references in a formula.
|
1. Open Region03.
|
|
2. In cell C14, create a formula that subtracts the Expenses in
cell C13 from the Total Sales in cell C12.
|
|
3. In cell B9, use the AutoSum button to total the sales for
Qtr 1.
|
|
4. In cell F5, use the AutoSum button to total the sales for
the Northern region.
|
|
5. In cell H5, type a formula that averages the Northern region
sales for the four quarters in B5:E5.
|
|
6. In cell F6, use the Formula Palette to enter a formula that sums
B6:E6.
|
|
7. In cell H5, use the Formula Palette to edit the formula so that
it displays the maximum sales for the range.
|
|
8. In cell H5, use the Formula Palette to edit the formula so that
it displays the average sales for the range again.
|
|
9. In cell H6, use the Paste Function button to average the
Southern region sales for the four quarters in B6:E6.
|
|
10. Use the AutoCalculate feature so that an average of all
sales (all sales includes B5:E8) displays in the AutoCalculate box on
the status bar.
|
|
11. Use the AutoCalculate feature so that a sum of all sales
(all sales includes B5:E8) displays in the AutoCalculate box on the
status bar.
|
|
12. Use the Range Finder feature to edit the formula in cell
B9. Drag the range border to include only B5:B6. Change the formula back to
include the original range of B5:B8.
|
|
13. Close the workbook without saving it.
|

In this lesson, you will
learn how to:
·
Copy/Cut and paste
·
Create an absolute reference
·
Fill cells
·
Use drag-and-drop editing
·
Use Undo and Redo
·
Use the Undo list
d Discussion
When you are creating a worksheet, you can
save time and data entry by copying cell contents from one location to
another. The Copy feature copies the selected cell contents to the
Windows Clipboard. The Paste feature pastes the contents from the
Clipboard into the currently selected range on the worksheet.
When you copy cells that contain text or numbers, Excel creates
an exact copy of the contents when they are pasted to another location. When
you copy cells containing formulas, Excel adjusts the cell references for the
new row or column where the formula is pasted. For example, if the formula
=B1+B2+B3 calculates the total of three cells in column B, and you copy
that formula to the adjacent cell in column C, the adjacent cell will contain
the formula =C1+C2+C3 to calculate the total of the three corresponding
cells in column C.
Excel assumes that the paste range will match the copied range
exactly. For example, if the copied range consists of three cells, Excel
assumes that the paste range consists of three cells. Therefore, you only need
to select the cell in the upper left corner of the paste range for the entire
copied range to be pasted. If the copied area is a single cell and you select a
paste range with multiple cells, the contents of the copied cell are placed in
each cell in the paste range.
If you use the Copy feature to place the contents of a
range on the Clipboard, you can paste the contents to more than one range. The
copied range remains on the Clipboard until you copy or cut another range.
You can also move cell contents on a worksheet using the Cut
and Paste features. The Cut feature cuts the cell contents from
the worksheet and places them on the Clipboard. The Paste feature pastes
the contents from the Clipboard into the currently selected range on the
worksheet. The cell contents from the range that was cut are deleted from the
worksheet.
When you cut and paste cells containing formulas, Excel does
not adjust the cell references in the formulas. The formulas still refer to the
original cells for the calculation.

Copying and pasting data
|
|
|
|
o
|
A blinking marquee remains around the selected range
after it has been pasted to let you know which cells were copied. Pressing
the [Esc] key removes the blinking marquee.
|
|
|
|
|
|
|
|
x
|
Be careful when you paste data into a range because
pasting overwrites any existing cell contents in that range.
|
|
|
|
C Procedures
|
1. Select the cell you want to copy.
|
|
2. Click the Copy button  . .
|
|
3. Select the range into which you want to paste the cell contents.
|
|
4. Click the Paste button  . .
|
|
5. Select the cell you want to cut.
|
|
6. Click the Cut button  . .
|
|
7. Select the range into which you want to paste the cell contents.
|
|
8. Click the Paste button  . .
|
f Step-by-Step
From the Student Data directory, open COMM05.XLS.
Copy the contents from one cell and paste them into a
range. Cut the contents from one cell and paste them into another cell.
|
Steps
|
Practice Data
|
|
1. Select the cell you want to copy.
The cell pointer moves to the cell.
|
Click cell G5
|
|
2. Click the Copy button.
A blinking marquee appears around the selected cell and its contents are
copied to the Windows Clipboard.
|
Click 
|
|
3. Drag the range into which you want to paste the cell contents.
The range is highlighted as you drag.
|
Drag G6:G8
|
|
4. Release the mouse button.
The range is selected.
|
Release the mouse button
|
|
5. Click the Paste button.
The contents on the Clipboard are pasted into the selected range and the
original range remains in its original location.
|
Click 
|
|
6. Select the cell you want to cut.
The cell pointer moves to the cell.
|
Click cell G1
|
|
7. Click the Cut button.
A blinking marquee appears around the selected cell and its contents are
cut to the Clipboard.
|
Click 
|
|
8. Select the range into which you want to paste the cell contents.
The range is selected.
|
Click in cell H1
|
|
9. Click the Paste button.
The contents on the Clipboard are pasted into the selected range.
|
Click 
|
Copy the formula in cell H5 and paste it into the range H6:H8.
Press [Esc] to remove the blinking marquee. Click any
cell to deselect the range.
d Discussion
There are two basic types of cell references in Excel: relative and
absolute. The difference between absolute and relative cell references becomes
apparent when you copy formulas from one cell to another. When you copy a
formula containing relative references, the references are adjusted to reflect
the new location. Absolute references always refer to the same cell, regardless
of where the formula is copied. Relative references are the default.
For example, you create a formula at the bottom of column A to
calculate the total of the numbers in that column. You then copy that formula
to columns B and C. The cell references adjust as necessary to add the values
in the appropriate columns. These are relative cell references. Absolute cell
references are useful when you do not want a cell reference to change when a
formula is copied. For example, you need to create a formula to calculate the
commission for a group of salesmen. The commission rate of 10% is entered into
cell C1. You want the formula that calculates the commission to always refer to
cell C1, even when it is copied to other cells. Making the reference to cell C1
absolute allows you to copy the formula and have the commission calculation always
based on cell C1. If the commission rate changes to 12%, you only have to
change cell C1 from 10% to 12%. The commissions for all the salespeople will
automatically update.
An absolute reference is designated by a dollar sign ($) before
the column letter and row number. You can type the dollar signs ($) when you
create the formula, or you can press the [F4] key after you type the
cell reference and have Excel add the dollar signs ($) to make it absolute.
Pressing the [F4] key repeatedly toggles you through each of the four
types of referencing:
|
Cell Entry
|
Type of Referencing
|
Result
|
|
C1
|
Relative
|
Both the row and column will change when copied to another location.
|
|
$C1
|
Mixed
|
The column will not change when copied to another
location, but the row will.
|
|
C$1
|
Mixed
|
The row will not change when copied to another
location, but the column will.
|
|
$C$1
|
Absolute
|
The column and row will not change when copied to
another location.
|

Creating an absolute reference
|
|
|
|
o
|
If you want to make a cell reference absolute after it
has already been entered, you can enter edit mode, position the insertion
point before the cell reference you want to make absolute, and press the [F4]
key.
|
|
|
|
C Procedures
|
1. Select the cell into which you want to
enter the formula.
|
|
2. Type the formula.
|
|
3. Place the insertion point before the cell reference you want to
make absolute.
|
|
4. Press [F4] as necessary until the desired cell reference
appears.
|
|
5. Press [Enter].
|
f Step-by-Step
Create a formula with an absolute reference.
|
Steps
|
Practice Data
|
|
1. Select the cell into which you want to
enter the formula.
The cell pointer moves to the cell.
|
Click cell I5
|
|
2. Type the formula.
The formula appears on the formula bar and in the cell.
|
Type =E5*I1
|
|
3. Place the insertion point before the cell reference you want to
make absolute.
The insertion point moves to the new location.
|
Click before cell I1
|
|
4. Press [F4] as necessary until the desired cell reference
appears.
Dollar signs ($) appear before the column letter and row number in the
formula.
|
Press [F4]
|
|
5. Press [Enter].
The result of the formula appears in the cell.
|
Press [Enter]
|
Copy the formula from cell I5 to I6:I8. Press [Esc] to
remove the blinking marquee. Click any cell to deselect the range.
Click in cell I8. Notice that in the formula bar the reference
to cell I1 is absolute.
d Discussion
If you want to copy the contents of a
single cell to an adjacent cell(s), you can fill the cells instead of copying
and pasting. Filling cells combines the Copy and Paste features
into one step. If the original cell contains text, the text is copied to the
filled cells. If the original cell contains a formula, the cell references in
the formula adjust to reflect the appropriate cell addresses.
You fill a column or a row by dragging the fill handle of the
selected cell over the cell(s) you want to fill. When you drag the fill handle,
the mouse pointer changes into a solid, black plus sign (+).

Filling cells
|
|
|
|
x
|
Be careful when you fill cells because if the cells
you are filling already contain data, that data will be overwritten.
|
|
|
|
C Procedures
|
1. Select the cell containing the data you
want to copy.
|
|
2. Point to the fill handle at the bottom right corner of the cell
you want to copy.
|
|
3. Drag the fill handle over the range you want to fill.
|
|
4. Release the mouse button.
|
f Step-by-Step
Use the formula in one cell to fill a range.
|
Steps
|
Practice Data
|
|
1. Select the cell containing the data you
want to copy.
The cell pointer moves to the cell.
|
Click cell B9
|
|
2. Point to the fill handle at the bottom right corner of the cell
you want to copy.
The mouse pointer changes into a solid, black plus sign (+).
|
Point to the fill handle at the bottom right corner of
cell B9
|
|
3. Drag the fill handle over the range you want to fill.
An outline of the range appears as you drag.
|
Drag the fill handle over C9:I9
|
|
4. Release the mouse button.
The selected range is filled and the results of the copied formula change
to reflect the appropriate cell addresses.
|
Release the mouse button
|
Click any cell to deselect the range.
d Discussion
Drag-and-drop editing allows
you to move or copy data on the worksheet using
the mouse. The results are the same as cutting and pasting or copying and
pasting, except that nothing is saved to the Clipboard.
The range that you drag and drop must be a single block of
cells. You cannot drag non-adjacent ranges.
When you move cells that contain formulas using drag-and-drop
editing, Excel does not adjust the cell references in the formulas. The
formulas still refer to the original cells for the calculation. However, when
you copy cells that contain formulas using drag-and-drop editing, Excel does adjust
the cell references in the formulas. The formulas change to reflect their new
location.

Using drag-and-drop editing
C Procedures
|
1. Select the range you want to move.
|
|
2. Point to the border of the selected range.
|
|
3. Drag the range to the desired location.
|
|
4. Release the mouse button.
|
|
5. Select the range you want to copy.
|
|
6. Point to the border of the selected range.
|
|
7. Hold [Ctrl] and drag the range to the desired location.
|
|
8. Release the mouse button and then release [Ctrl].
|
f Step-by-Step
Use drag-and-drop editing to move
and copy the cell contents from one range to another.
|
Steps
|
Practice Data
|
|
1. Drag the range you want to move.
The range is highlighted as you drag.
|
Drag A9:I9
|
|
2. Release the mouse button.
The range is selected.
|
Release the mouse button
|
|
3. Point to the border of the selected range.
The mouse pointer changes into a white arrow.
|
Point to the border of A9:I9
|
|
4. Drag the range to the desired location.
An outline of the range appears as you drag.
|
Drag the range to A13:I13
|
|
5. Release the mouse button.
The cell contents move to the new location.
|
Release the mouse button
|
|
6. Drag the range you want to copy.
The range is highlighted as you drag.
|
Drag A4:I4
|
|
7. Release the mouse button.
The range is selected.
|
Release the mouse button
|
|
8. Point to the border of the selected range.
The mouse pointer changes into a white arrow.
|
Point to the border of A4:I4
|
|
9. Hold [Ctrl] and drag the range to the desired location.
An outline of the range appears as you drag.
|
Hold [Ctrl] and drag the range to A12:I12
|
|
10. Release the mouse button and then release [Ctrl].
The cell contents are copied to the new location.
|
Release the mouse button and then release [Ctrl]
|
Use drag-and-drop editing to move the cell contents of A13:I13
back to A9:I9. Delete the cell contents of A12:I12. Click any cell to deselect
the range.
d Discussion
The Undo feature allows you to undo the results
of a previous command or action.
Once you use the Undo feature, the Redo feature becomes available. The Redo
feature allows you to restore the results of the command or action you reversed
with the Undo feature.
A feature related to Redo is the Repeat feature,
which is accessible from the Edit menu. You can
use the Repeat command to duplicate the previous command. Similar to the
Undo or Redo button, the type of task to be duplicated becomes
part of the command. For example, if you delete selected text in a document,
you can select additional text and then use the Repeat Clear command to
delete that text as well.
|
|
|
|
o
|
You can also activate the Undo feature by
selecting the Undo command from the Edit menu.
|
|
|
|
|
|
|
|
x
|
The results of some actions or commands are permanent and
cannot be undone.
|
|
|
|
C Procedures
|
1. Click the Undo button  . .
|
|
2. Click the Redo button  . .
|
f Step-by-Step
Use the Undo and Redo
features to undo and redo an action.
Delete the contents of cell C5.
|
Steps
|
Practice Data
|
|
1. Click the Undo button.
The previous action is undone.
|
Click 
|
|
2. Click the Redo button.
The previous undo is restored.
|
Click 
|
Click the Undo button to restore the contents of cell
C5.
d Discussion
The Undo feature allows you to undo the results of a previous
command or action. You can reverse the last 16 actions. Clicking the Undo
button reverses the last action performed. Selecting the Undo list to
the right of the Undo button provides a list of the actions you can
reverse. Selecting an item from this list will undo not only that item, but all
the items that came before it as well. For example, selecting the fourth item
in the list will undo not only the fourth previous action, but the third,
second, and first previous actions as well.
Once you use the Undo feature, the Redo feature
becomes available. The Redo feature allows you to restore the results of
the command or action you reversed with the Undo feature.

Using the Undo list
C Procedures
|
1. Click the
arrow on the Undo button  . .
|
|
2. Select the
appropriate number of actions you want to undo.
|
f Step-by-Step
Use the Undo list to reverse multiple actions in a
worksheet.
Type Carter into cell A11, Jones in cell A12, and
Hardee in cell A13.
|
Steps
|
Practice Data
|
|
1. Click the arrow on the Undo button.
A list of actions you can undo appears.
|
Click 
|
|
2. Select the appropriate number of actions you want to undo.
The actions are reversed.
|
Click “Typing Jones in A12”
|
Remove the entry in cell A11 using the Undo button.
Close COMM05.XLS.
e Task
Use the Copy and Paste buttons and a fill handle
to copy cell contents. Create an absolute cell reference in a formula and copy
it to other cells. Use the Cut and Paste buttons to move cell
contents. Use drag-and-drop editing to move and copy cell contents. Use the Undo
button to reverse an action. Use the Undo list to reverse multiple
actions.
|
1. Open Region04.
|
|
2. Use the Copy and Paste buttons to copy the formula
in cell H5 to H6:H8.
|
|
3. Use the fill handle to copy the formula in cell I5 to I6:I8.
|
|
4. Use the fill handle to copy the formula in cell C9 to D9:I9.
|
|
5. In cell E15, enter a formula that multiplies the contents in
cell C15 by the commission rate in cell C12. Make cell C12 an absolute cell
reference.
|
|
6. Use the Copy and Paste buttons to copy the
contents in cell E15 to E16:E18.
|
|
7. Change the commission rate in cell C12 from 0.05 to 0.08. Notice
that all the commission values update automatically when you enter the new
value for cell C12.
|
|
8. Use the Cut and Paste buttons to move the cell
contents in E14:E18 to G14:G18.
|
|
9. Use drag-and-drop editing to move the cell contents in G14:G18
back to E14:E18.
|
|
10. Use drag-and-drop editing to copy the cell contents in A14:A18 to
H14:H18.
|
|
11. Delete the cell contents in H14:H18.
|
|
12. Use the Undo button to reverse the previous action.
|
|
13. Delete cells B5, B6, and B7, one at a time.
|
|
14. Use the Undo list to reverse the last three actions. The
three previous deletions appear as three Clear commands at the top of
the list of actions you can undo.
|
|
15. Close the workbook without saving it.
|

In this lesson, you will
learn how to:
·
Preview a worksheet
·
Zoom the preview window
·
Print a worksheet
·
Print a selected range
·
Print multiple copies
·
Print a page range
d Discussion
The Print Preview feature displays the
worksheet in the preview window. This window shows how the worksheet will look
when it is printed, including all aspects of the layout. You can use the
preview window to view the appearance of your worksheet before you print it.
This window enables you to make any changes before printing your worksheet, if
desired.

The preview window
|
|
|
|
o
|
You can print directly from the preview window by
clicking the Print button.
|
|
|
|
C Procedures
|
1. Click the Print Preview
button  . .
|
|
2. Select Close.
|
f Step-by-Step
From the Student Data directory, open COMM07.XLS.
Preview the current worksheet
using the Print Preview button.
|
Steps
|
Practice Data
|
|
1. Click the Print Preview
button.
The worksheet appears in the preview window and the page number is
displayed at the bottom left corner of the status bar.
|
Click 
|
|
2. Select Close.
The preview window closes and the worksheet view appears.
|
Click Close
|
d Discussion
The default view in the preview window
displays the full page, making the print difficult to read. However, you can
increase the magnification of the worksheet by zooming the preview window. This
option makes the data in the preview window easier to read. When the mouse
pointer is positioned over the worksheet, it changes into a magnifying glass.
When you click the worksheet with the magnifying glass, the magnification
increases so that you can read the area of the worksheet you clicked. When you
click the worksheet again, the magnification returns to full page view.

Zooming the preview window
C Procedures
|
1. Click the Print Preview
button  . .
|
|
2. Click the area of the worksheet you want to magnify.
|
|
3. Click anywhere on the worksheet to return to full page view.
|
|
4. Select Close.
|
f Step-by-Step
Zoom the preview window to make the
text on the worksheet easier to read.
|
Steps
|
Practice Data
|
|
1. Click the Print Preview
button.
The worksheet appears in the preview window and the page number is
displayed at the bottom left corner of the status bar.
|
Click 
|
|
2. Click the area of the worksheet you want to magnify.
The worksheet appears larger on the screen.
|
Click an area of the worksheet containing data
|
|
3. Click anywhere on the worksheet to return to full page view.
The entire worksheet appears on the screen.
|
Click anywhere on the worksheet
|
|
4. Select Close.
The preview window closes and the worksheet view appears.
|
Click Close
|
d Discussion
You can print a worksheet quickly using the Print
button on the toolbar. When you use this button, the current worksheet is sent
directly to the printer. The Print button is useful when you need to
print one copy of the worksheet quickly.
|
|
|
|
o
|
You can also print a worksheet by selecting the Print
command from the File menu or by pressing [Ctrl+P]. Both of
these methods open the Print dialog box.
|
|
|
|
C Procedures
|
1. Click the Print button  . .
|
f Step-by-Step
Print the current worksheet.
|
Steps
|
Practice Data
|
|
1. Click the Print button.
Excel prints the worksheet.
|
Click 
|
d Discussion
You can use the Print command
on the File menu to open the Print dialog box. In this
dialog box, you can change a number of printing options, including what part of
the workbook you want to print. For example, you can choose to print a selected
range of a worksheet, the active worksheet, or the entire workbook.

Printing a selected range
|
|
|
|
o
|
You can also print a range in a worksheet by pressing [Ctrl+P]
to open the Print dialog box.
|
|
|
|
C Procedures
|
1. Select the range you want to print.
|
|
2. Select the File menu.
|
|
3. Select the Print command.
|
|
4. Select the Selection option under Print what.
|
|
5. Select OK.
|
f Step-by-Step
Print only a selected range in a worksheet.
|
Steps
|
Practice Data
|
|
1. Drag the range you want to print.
The range is highlighted as you drag.
|
Drag A1:I10
|
|
2. Release the mouse button.
The range is selected.
|
Release the mouse button
|
|
3. Select the File menu.
The File menu appears.
|
Click File
|
|
4. Select the Print command.
The Print dialog box opens.
|
Click Print...
|
|
5. Select the Selection option under Print what.
The option is selected.
|
Click  Selection Selection
|
|
6. Select OK.
The Print dialog box closes and Excel prints the selected range.
|
Click OK
|
Click any cell outside the range to deselect it.
d Discussion
There may be times when you need to print several
copies of a worksheet at once. In Excel, you can select the number of copies
you want to print in the Print dialog box.

Printing multiple copies
|
|
|
|
o
|
You can also print multiple copies of a worksheet by
pressing [Ctrl+P] to open the Print dialog box.
|
|
|
|
C Procedures
|
1. Select the File menu.
|
|
2. Select the Print command.
|
|
3. Type the number of copies you want to print in the Number of
copies text box.
|
|
4. Select OK.
|
f Step-by-Step
Print multiple copies of the current
worksheet.
|
Steps
|
Practice Data
|
|
1. Select the File menu.
The File menu appears.
|
Click File
|
|
2. Select the Print command.
The Print dialog box opens.
|
Click Print...
|
|
3. Type the number of copies you want to print in the Number of
copies text box.
The number appears in the text box.
|
Type 2
|
|
4. Select OK.
The Print dialog box closes and Excel prints the specified number of
copies of the worksheet.
|
Click OK
|
d Discussion
You can choose to print certain pages of a
worksheet in the Print dialog box. This option is useful when you make
corrections to specific pages and you only want to print these corrected pages,
rather than printing the entire worksheet.

Printing a page range
|
|
|
|
o
|
You can also print a page range by pressing [Ctrl+P]
to open the Print dialog box.
|
|
|
|
C Procedures
|
1. Select the File menu.
|
|
2. Select the Print command.
|
|
3. Select the From text box.
|
|
4. Type the page number from which you want to start printing.
|
|
5. Select the To text box.
|
|
6. Type the page number at which you want to stop printing.
|
|
7. Select OK.
|
f Step-by-Step
Print a page range.
|
Steps
|
Practice Data
|
|
1. Select the File menu.
The File menu appears.
|
Click File
|
|
2. Select the Print command.
The Print dialog box opens.
|
Click Print...
|
|
3. Select the From text box.
The insertion point appears in the From text box.
|
Click in the From text box
|
|
4. Type the page number from which you want to start printing.
The page number appears in the From text box.
|
Type 2
|
|
5. Select the To text box.
The insertion point appears in the To text box.
|
Click in the To text box
|
|
6. Type the page number at which you want to stop printing.
The page number appears in the To text box.
|
Type 3
|
|
7. Select OK.
The Print dialog box closes and Excel prints the specified pages of the
worksheet.
|
Click OK
|
Close COMM07.XLS.
e Task
Preview and print an Excel file. Print a selected range,
multiple copies, and specific pages of a worksheet.
|
1. Open District.
|
|
2. Preview the worksheet.
|
|
3. Zoom the preview window. Return to the worksheet view.
|
|
4. Close the preview window.
|
|
5. Use the Print button to print the worksheet.
|
|
6. Select the data for District 1 and 2 from January through June
(A4:G16).
|
|
7. Print two copies of the selected range.
|
|
8. Print only pages 2 and 3 of the worksheet.
|
|
9. Save and close the workbook.
|
In this lesson, you will
learn how to:
·
Change the page margins
·
Center the worksheet
·
Change the page orientation
·
Edit headers and footers
·
Customize headers and footers
·
Print without gridlines
·
Repeat row and column labels
·
Use Page Break Preview
d Discussion
The margins define the printed
area on the page. They control how much blank space
exists between the edge of the paper and the data on the page. There are four
margins: Top, Bottom, Left, and Right. By default,
margins are measured in inches. The larger the margin measurement, the smaller
the printed area. For example, setting all margins to .5 inches creates a
half-inch of blank space around the data on the page. Consequently, setting all
margins to .25 inches creates a quarter-inch of blank space around the data on
the page. The page with half-inch margins has a larger blank border around the
printed data and, therefore, has a smaller printed area.

Changing the page margins
C Procedures
|
1. Select the File menu.
|
|
2. Select the Page Setup command.
|
|
3. Select the Margins tab.
|
|
4. Select the text in the Top text box.
|
|
5. Type the measurement for the top margin.
|
|
6. Press [Tab].
|
|
7. Type the measurement for the bottom margin.
|
|
8. Press [Tab].
|
|
9. Type the measurement for the left margin.
|
|
10. Press [Tab].
|
|
11. Type the measurement for the right margin.
|
|
12. Select OK.
|
f Step-by-Step
From the Student Data directory, open COMM08.XLS.
Change the margins in
a document.
|
Steps
|
Practice Data
|
|
1. Select the File menu.
The File menu appears.
|
Click File
|
|
2. Select the Page Setup command.
The Page Setup dialog box opens.
|
Click Page Setup...
|
|
3. Select the Margins tab.
The Margins page appears.
|
Click the Margins tab
|
|
4. Select the text in the Top text box.
The text in the Top text box is selected and the top margin is
bolded in the preview.
|
Double-click in the Top text box
|
|
5. Type the measurement for the top margin.
The text appears in the Top text box.
|
Type .75
|
|
6. Press [Tab].
The text in the Bottom text box is selected and the bottom margin
is bolded in the preview.
|
Press [Tab]
|
|
7. Type the measurement for the bottom margin.
The text appears in the Bottom text box.
|
Type .75
|
|
8. Press [Tab].
The text in the Left text box is selected and the left margin is
bolded in the preview.
|
Press [Tab]
|
|
9. Type the measurement for the left margin.
The text appears in the Left text box.
|
Type .5
|
|
10. Press [Tab].
The text in the Right text box is selected and the right margin is
bolded in the preview.
|
Press [Tab]
|
|
11. Type the measurement for the right margin.
The text appears in the Right text box.
|
Type .5
|
|
12. Select OK.
The Page Setup dialog box closes and the margins for the current worksheet
are adjusted.
|
Click OK
|
Click the Print Preview button to view the margin
changes. Select Close to exit the preview window.
d Discussion
You can center a worksheet between
the horizontal and vertical margins of the page. This option is useful if the
worksheet you are printing is smaller than the print area on the page. For
example, if the data on a worksheet does fit the entire print area available on
a page, it may not appear centered. You can select options in the Page Setup
dialog box that will horizontally and vertically center the data on the page.

Centering the worksheet on the page
C Procedures
|
1. Select the File menu.
|
|
2. Select the Page Setup command.
|
|
3. Select the Margins tab.
|
|
4. Select the Horizontally option.
|
|
5. Select the Vertically option.
|
|
6. Select OK.
|
f Step-by-Step
Center the current worksheet between the
horizontal and vertical margins on the page.
|
Steps
|
Practice Data
|
|
1. Select the File menu.
The File menu appears.
|
Click File
|
|
2. Select the Page Setup command.
The Page Setup dialog box opens.
|
Click Page Setup...
|
|
3. Select the Margins tab.
The Margins page appears.
|
Click the Margins tab, if necessary
|
|
4. Select the Horizontally option.
The option is selected and the worksheet in the preview adjusts
horizontally.
|
Check  Horizontally Horizontally
|
|
5. Select the Vertically option.
The option is selected and the worksheet in the preview adjusts
vertically.
|
Check  Vertically Vertically
|
|
6. Select OK.
The Page Setup dialog box closes and the current worksheet is centered
horizontally and vertically on the page.
|
Click OK
|
Click the Print Preview button to view the page changes.
Select Close to exit the preview window.
d Discussion
In Excel, you can choose between portrait or landscape orientation for your worksheet. In
portrait orientation, which is the default, the shorter edge of the paper is at the
top of the page. In landscape orientation, the longer edge of the paper is at
the top of the page.
Since worksheets are often wider than they are long, they often
fit better on a page with a landscape orientation.

Changing the page orientation
C Procedures
|
1. Select the File menu.
|
|
2. Select the Page Setup command.
|
|
3. Select the Page tab.
|
|
4. Select the Portrait or Landscape option.
|
|
5. Select OK.
|
f Step-by-Step
Change the page orientation of the worksheet.
|
Steps
|
Practice Data
|
|
1. Select the File menu.
The File menu appears.
|
Click File
|
|
2. Select the Page Setup command.
The Page Setup dialog box opens.
|
Click Page Setup...
|
|
3. Select the Page tab.
The Page page appears.
|
Click the Page tab
|
|
4. Select the Portrait or Landscape option.
The appropriate option is selected.
|
Click  Landscape Landscape
|
|
5. Select OK.
The Page Setup dialog box closes and the paper orientation changes
accordingly.
|
Click OK
|
Click the Print Preview button to view the page
orientation changes. Select Close to exit the preview window.
d Discussion
Headers print at the top and footers print at the bottom of
every page in a printout. Headers and footers contain descriptive text such as
titles, dates, and\or page numbers.
Excel has several built-in headers and footers from which you can
choose. These standard options include the sheet name, date, time, page number,
file name, and preparer’s name. Excel refers to the Author field in the
Summary Info dialog box to determine the preparer’s name.

Editing headers and footers
C Procedures
|
1. Select the File menu.
|
|
2. Select the Page Setup command.
|
|
3. Select the Header/Footer tab.
|
|
4. Select the Header or Footer list.
|
|
5. Select the desired header or footer.
|
|
6. Select OK.
|
f Step-by-Step
Edit the header and footer for the
current worksheet.
|
Steps
|
Practice Data
|
|
1. Select the File menu.
The File menu appears.
|
Click File
|
|
2. Select the Page Setup command.
The Page Setup dialog box opens.
|
Click Page Setup...
|
|
3. Select the Header/Footer tab.
The Header/Footer page appears.
|
Click the Header/Footer tab
|
|
4. Select the Header or Footer list.
A list of headers or footers appears.
|
Click Header 
|
|
5. Select the desired header or footer.
The text or code appears in the header or footer sample area.
|
Click Comm08 or the file indicated by your
instructor
|
|
6. Select OK.
The Page Setup dialog box closes and the header or footer is edited
accordingly.
|
Click OK
|
Edit the footer for the current worksheet by selecting the Page
1 footer. Click the Print Preview button to view the header and
footer changes. Select Close to exit the preview window.
d Discussion
In addition to Excel’s default headers and footers, you can
create your own customized headers and footers. In the Header (or
Footer) dialog box, you can type text, such as a title or name, for the
worksheet. You can also use buttons to change the font of the text, or insert
page numbers, dates, times, file names, and worksheet names. These buttons,
which are found in the Header (or Footer) dialog box, are listed in the table
below:
|
Button
|
Description
|
|

|
Changes the font of the header
or footer text.
|
|

|
Inserts the page number.
|
|

|
Inserts the total number of pages.
|
|

|
Inserts the date.
|
|

|
Inserts the time.
|
|

|
Inserts the file name.
|
|

|
Inserts the sheet tab name.
|
The Header (or Footer) dialog box has three text boxes that
correspond to the left, center, and right sections of the printed page. Text or
button codes entered into these boxes appear appropriately aligned on the page.

Customizing a header
C Procedures
|
1. Select the File menu.
|
|
2. Select the Page Setup command.
|
|
3. Select the Header/Footer tab.
|
|
4. Select Custom Header or Custom Footer.
|
|
5. Select the Center section text box.
|
|
6. Type the desired text or click the appropriate button.
|
|
7. Select the Left section text box.
|
|
8. Type the desired text or click the appropriate button.
|
|
9. Select OK.
|
|
10. Select OK.
|
f Step-by-Step
Create a custom header
or footer for the current worksheet.
|
Steps
|
Practice Data
|
|
1. Select the File menu.
The File menu appears.
|
Click File
|
|
2. Select the Page Setup command.
The Page Setup dialog box opens.
|
Click Page Setup...
|
|
3. Select the Header/Footer tab.
The Header/Footer page appears.
|
Click the Header/Footer tab, if necessary
|
|
4. Select Custom Header or Custom Footer.
The Header (or Footer) dialog box opens.
|
Click Custom Header...
|
|
5. Select the Center section text box.
The text box is selected.
|
Double-click the Center section text box
|
|
6. Type the desired text or click the appropriate button.
The text or code appears in the Center section text box.
|
Type First Quarter Sales Figures
|
|
7. Select the Left section text box.
The insertion point appears in the text box.
|
Double-click the Left section text box,
if necessary
|
|
8. Type the desired text or click the appropriate button.
The text or code appears in the Left section text box.
|
Click 
|
|
9. Select OK.
The Header (or Footer) dialog box closes.
|
Click OK
|
|
10. Select OK.
The Page Setup dialog box closes and the custom header or footer is
created.
|
Click OK
|
Click the appropriate button to insert the file name code in
the Right section text box of the header.
Click the Print Preview button to view the changes. Note
that the date, title, and file name appear at the top of the worksheet. Select Close
to exit the preview window.
d Discussion
By default, gridlines between the cells appear on the worksheet when
you print it. Gridlines make a worksheet easier to
read because they separate the rows and columns. You can print a worksheet
without gridlines, if desired.

Printing without gridlines
C Procedures
|
1. Select the File menu.
|
|
2. Select the Page Setup command.
|
|
3. Select the Sheet tab.
|
|
4. Deselect the Gridlines option.
|
|
5. Select OK.
|
f Step-by-Step
Set the current worksheet to print without gridlines.
|
Steps
|
Practice Data
|
|
1. Select the File menu.
The File menu appears.
|
Click File
|
|
2. Select the Page Setup command.
The Page Setup dialog box opens.
|
Click Page Setup...
|
|
3. Select the Sheet tab.
The Sheet page appears.
|
Click the Sheet tab
|
|
4. Deselect the Gridlines option.
The option is deselected.
|
Click  Gridlines to deselect it Gridlines to deselect it
|
|
5. Select OK.
The Page Setup dialog box closes and the Gridlines option is
disabled.
|
Click OK
|
Click the Print Preview button to view the changes.
Notice that the gridlines do not appear. Select Close to exit the
preview window. Set the Gridlines option back to the default.
d Discussion
When printing multiple pages of a worksheet, you may want the column or
row labels on every page. For example, if you have the months of the year as
row labels on a worksheet and columns of numbers that expand more than one page
on a worksheet, you may want the months of the year to print on every page.
Excel can print the row labels to repeat at the top of every page or the column
labels to repeat on the left side of every page.

Repeating row labels
C Procedures
|
1. Select the File menu.
|
|
2. Select the Page Setup command.
|
|
3. Select the Sheet tab.
|
|
4. Select the Collapse Dialog button  under Print titles. under Print titles.
|
|
5. Click anywhere in the column or row containing the label you
want to print on each page or, if necessary, drag from the first column or
row containing the label you want to print to the last column or row
containing the label you want to print on every page.
|
|
6. Release the mouse button.
|
|
7. Press [Enter].
|
|
8. Select OK.
|
f Step-by-Step
Repeat row labels at the top of each page.
|
Steps
|
Practice Data
|
|
1. Select the File menu.
The File menu appears.
|
Click File
|
|
2. Select the Page Setup command.
The Page Setup dialog box opens.
|
Click Page Setup...
|
|
3. Select the Sheet tab.
The Sheet page appears.
|
Click the Sheet tab
|
|
4. Select the Collapse Dialog button under Print titles.
The Page Setup dialog box reduces in size so that you can view the
worksheet.
|
Click Rows to repeat at top 
|
|
5. Click anywhere in the column or row containing the label you
want to print on each page or, if necessary, drag from the first column or
row containing the label you want to print to the last column or row
containing the label you want to print on every page.
An outline of the columns or rows appears as you drag.
|
Drag from row 1 to row 4
|
|
6. Release the mouse button.
The row(s) or column(s) are selected.
|
Release the mouse button
|
|
7. Press [Enter].
The Page Setup dialog box expands and the range appears in the appropriate
text box.
|
Press [Enter]
|
|
8. Select OK.
The Page Setup dialog box closes and the row labels appear at the top of
each worksheet.
|
Click OK
|
Click
the Print Preview button and scroll through the pages using Next in
the preview window. Notice that the months of the year appear at the top of
each page.
d Discussion
You can use the Print Preview button to
view the worksheet before you print it. After viewing the information in the
preview window, you may want to change where the automatic page breaks occur.
The Page Break Preview feature allows you to manipulate where the page
breaks occur, and automatically scales the data to fit on the designated page
and on each subsequent page. For example, pages 1 and 2 of a 7 page worksheet
may have related information. Using Page Break Preview, you can condense
page 1 and 2 to fit on one page, and have the remaining pages print in the
normal fashion.

Using Page Break Preview
|
|
|
|
o
|
When you use the Page Break Preview feature,
the Welcome to Page Break Preview dialog box opens. You can select the Do
not show this dialog again option so that this dialog box does not open
in the future.
|
|
|
|
C Procedures
|
1. Select the Print Preview
button  . .
|
|
2. Select Page Break Preview.
|
|
3. Select OK to close the Welcome to Page Break Preview
dialog box, if necessary.
|
|
4. Scroll to display the desired page break.
|
|
5. Point to the page break line.
|
|
6. Drag the page break line to the desired position.
|
|
7. Release the mouse button.
|
|
8. Select the Print Preview button  . .
|
|
9. Select Normal View.
|
f Step-by-Step
Use the Page Break Preview feature to change the
page break on a worksheet.
|
Steps
|
Practice Data
|
|
1. Select the Print Preview button.
The worksheet appears in the preview window.
|
Click  ,
if necessary ,
if necessary
|
|
2. Select Page Break Preview.
The Welcome to Page Break Preview dialog box opens.
|
Click Page Break Preview
|
|
3. Select OK to close the Welcome to Page Break Preview
dialog box, if necessary.
The Welcome to Page Break Preview dialog box closes.
|
Click OK, if necessary
|
|
4. Scroll to display the desired page break.
The desired break appears.
|
Scroll until the first page break is in view
|
|
5. Point to the page break line.
The mouse pointer changes into a black, double-headed arrow.
|
Point to the page break line between rows 40 and 41
|
|
6. Drag the page break line to the desired position.
A gray line indicating the position of the page break moves as you drag.
|
Drag the page break line until it is between districts
5 and 6
|
|
7. Release the mouse button.
The page break is positioned.
|
Release the mouse button
|
|
8. Select the Print Preview button.
The worksheet appears in the preview window.
|
Click 
|
|
9. Select Normal View.
The worksheet appears in the normal view with the new page break.
|
Click Normal View
|
Scroll
as necessary to view the new page break. Change the other page breaks in the
worksheet so that only 5 districts appear on each page.
Close COMM08.XLS.
e Task
Change the margins, centering, orientation, and gridlines
display of an Excel file. Use a built-in footer. Create custom headers and
footers. Use page breaks to designate what data will be printed on each page.
|
1. Open District.
|
|
2. Change the top and bottom margins to .75 and the left and right
margins to .5.
|
|
3. Center the sheet on the page horizontally and vertically.
|
|
4. Change the orientation to landscape.
|
|
5. Select the built-in footer Page 1 of ?.
|
|
6. Create a custom header with the title District Sales Report in
the Center section.
|
|
7. Create a custom footer with the file name in the Left section
and the date in the Right section.
|
|
8. Set the appropriate option so that the gridlines do not print.
|
|
9. Set the option to have the months of the year print at the top
of each page (row 4).
|
|
10. Set the page breaks so that only four districts print on each
page.
|
|
11. Print only page 2 of the report.
|
|
12. Save and close the workbook.
|
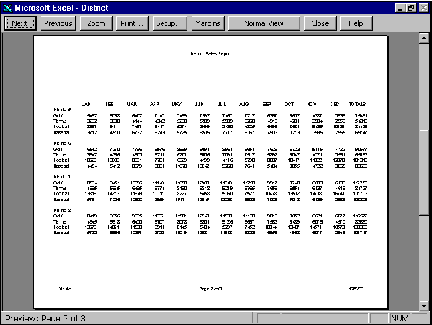
In this lesson, you will
learn how to:
·
Format numbers
·
Use the Currency style
·
Use the Percent style
·
Use the Comma style
·
Increase decimal places
·
Decrease decimal places
d Discussion
You can format cells to change the way a number appears in a cell. Formatting
does not change the underlying value. The underlying value is still used in
calculations. It appears on the formula bar when the cell is selected.
Formatting improves the overall appearance of the worksheet and
makes numbers easier to read. Using formatting, you can add features such as
dollar signs ($), percent symbols (%), commas (,), and a fixed number of
decimal places.
The default format for a cell with a numeric entry is the General
style. This style displays the number to the greatest precision possible with
no additional formatting, such as commas (,) or dollar signs ($).
You can apply formats to a cell before or after you enter data.
Once applied, a format is attached to the cell and any number entered into that
cell appears with the format. Formatting can be applied to one cell, a range of
cells, columns, rows, or the entire worksheet.
|
|
|
|
o
|
Formatted numbers that are too wide to fit into a cell
appear as a series of pound signs (#). To view the number, you can increase
the column width or change the formatting of the cell.
|
|
|
|
|
o
|
You can remove number formatting by selecting the Clear
command from the Edit menu.
|
|
|
|
d Discussion
You can display numbers with dollar
signs ($) and commas (,) using the Currency style. For example, you may
want the number 7496.31 to appear as $7,496.31. By default, the Currency
style has two decimal places and uses commas (,) where appropriate in the
number.
The Currency style
|
|
|
|
o
|
You can also apply the Currency style to a
range by selecting the Cells command from the Format menu.
|
|
|
|
C Procedures
|
1. Select the range you want
to format.
|
|
2. Click the Currency Style button  . .
|
f Step-by-Step
From the Student Data directory, open FRMAT01.XLS.
Use the Currency Style button to format
a range.
|
Steps
|
Practice Data
|
|
1. Drag to select the range you want to
format.
The range is highlighted as you drag.
|
Drag B6:H6
|
|
2. Release the mouse button.
The range is selected.
|
Release the mouse button
|
|
3. Click the Currency Style button.
The range is formatted with the Currency style.
|
Click 
|
Click in any cell to deselect the range.
d Discussion
You can display numbers as percents
using the Percent style. For example, you may want the value 0.56 to
appear as 56%. The Percent style multiplies the value in the cell by
100, adds a percent sign (%), and displays the number with no decimal places.
The Percent style
|
|
|
|
o
|
You can also apply the Percent style to cells
by selecting the Cells command from the Format menu.
|
|
|
|
C Procedures
|
1. Select the range you want
to format.
|
|
2. Click the Percent Style button  . .
|
f Step-by-Step
Use the Percent Style button to format
a range.
Scroll to view cell I2, if necessary.
|
Steps
|
Practice Data
|
|
1. Drag to select the range you want to
format.
The range is highlighted as you drag.
|
Drag I2:I5
|
|
2. Release the mouse button.
The range is selected.
|
Release the mouse button
|
|
3. Click the Percent Style button.
The range is formatted with the Percent style.
|
Click 
|
Click in any cell to deselect the range.
d Discussion
You can display numbers with commas (,) in the correct
location using the Comma style. For example, you may want the number
3456087.08 to appear as 3,456,087.08. If you format a number with the Comma style,
the number appears with two decimal places.
The Comma style
|
|
|
|
o
|
You can also apply commas to numbers by selecting the Cells
command from the Format menu, selecting the Number category on
the Number page, and selecting the Use 1000 Separator (,)
option.
|
|
|
|
C Procedures
|
1. Select the range you want to format.
|
|
2. Click the Comma Style button  . .
|
f Step-by-Step
Use the Comma Style button to format a range.
Scroll to view cell B2, if necessary.
|
Steps
|
Practice Data
|
|
1. Drag to select the range you want to
format.
The range is highlighted as you drag.
|
Drag B2:H5
|
|
2. Release the mouse button.
The range is selected.
|
Release the mouse button
|
|
3. Click the Comma Style button.
The range is formatted with the Comma style.
|
Click 
|
Click in any cell to deselect the range.
d Discussion
You can increase the number of decimal places displayed in a
number. For example, with one decimal place displayed, the number 34.5432 would appear as
34.5. With two decimal places displayed, the number would appear as 34.54.
Increasing the number of decimal places only changes the display. The original
number, 34.5432, is still used in calculations.

Increasing decimal places
|
|
|
|
o
|
You can also increase the number of decimal places in
cells by selecting the Cells command from the Format menu.
|
|
|
|
|
|
|
|
x
|
Because the stored number is used in calculations,
results displayed in the worksheet may appear to be incorrect.
|
|
|
|
C Procedures
|
1. Select the range you want to format.
|
|
2. Click the Increase Decimal button  as desired. as desired.
|
f Step-by-Step
Increase the decimal places in a range using the Increase
Decimal button.
Scroll to view cell I2, if necessary.
|
Steps
|
Practice Data
|
|
1. Drag to select the range you want to
format.
The range is highlighted as you drag.
|
Drag I2:I5
|
|
2. Release the mouse button.
The range is selected.
|
Release the mouse button
|
|
3. Click the Increase Decimal button as desired.
The desired number of decimal places is applied to the range.
|
Click 
|
Click in any cell to deselect the range.
d Discussion
You can decrease the number of decimal places displayed in a
number. For example, with two decimal places displayed, the number 34.5432 would appear as
34.54. With one decimal place displayed, the number would appear as 34.5.
Decreasing the number of decimal places only changes the display. The original
number, 34.5432, is still used in calculations.
|
|
|
|
o
|
You can also decrease the number of decimal places in
cells by selecting the Cells command from the Format menu.
|
|
|
|
|
|
|
|
x
|
Because the stored number is used in calculations,
results displayed in the worksheet may appear to be incorrect.
|
|
|
|
C Procedures
|
1. Select the range you want to format.
|
|
2. Click the Decrease Decimal button  as desired. as desired.
|
f Step-by-Step
Decrease the decimal places in a range using the Decrease
Decimal button.
Scroll to view cell F2, if necessary.
|
Steps
|
Practice Data
|
|
1. Drag to select the range you want to
format.
The range is highlighted as you drag.
|
Drag F2:F6
|
|
2. Release the mouse button.
The range is selected.
|
Release the mouse button
|
|
3. Click the Decrease Decimal button as desired.
The desired number of decimal places is removed from the range.
|
Click  twice twice
|
Click in any cell to deselect the range.
Close FRMAT01.XLS.
e Task
Format the numbers in a worksheet with the Currency, Comma, and
Percent styles. Increase and decrease the number of decimal places.
|
1. Open Region06.
|
|
2. Use the Comma Style button to format B2:E6 with a comma.
|
|
3. Use the Decrease Decimal button to decrease the number of
decimal places in B2:E6 to zero.
|
|
4. Use the Comma Style button to format G2:I7 with a comma
(,).
|
|
5. Use the Decrease Decimal button to decrease the number of
decimal places in G2:I7 to zero.
|
|
6. Use the Currency Style button to format F2:F6 with a
dollar sign ($).
|
|
7. Use the Decrease Decimal button to decrease the number of
decimal places in F2:F6 to zero.
|
|
8. Use the Currency Style button to format B7:F7 with a
dollar sign ($).
|
|
9. Use the Decrease Decimal button to decrease the number of
decimal places in B7:F7 to zero.
|
|
10. Use the Percent Style button to format J2:J6 with a
percent symbol (%).
|
|
11. Use the Increase Decimal button to increase the number of
decimal places in J2:J6 to one.
|
|
12. Close the workbook without saving it.
|
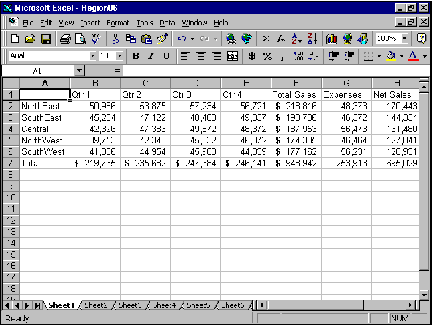
In this lesson, you will
learn how to:
·
Change text appearance
·
Use the Font list
·
Use the Font Size list
·
Use the Bold/Italic buttons
·
Use the Underline button
·
Use the Font Color button
·
Rotate text in a cell
·
Wrap text in a cell
·
Shrink text in a cell
·
Merge cells into one cell
·
Increase the indent of text
·
Decrease the indent of text
d Discussion
You can format the text in cells in various ways. You can
change the font itself, which determines the overall appearance of the
characters in the cells; the font size, which controls the amount of space the
font occupies on the printed page; and the font style, which determines whether
or not the font will be bolded, italicized, or both.
In addition to the above three options, you can also add underlining,
color, and special effects to text. Special effects include changing the
orientation of text, wrapping text in a cell, shrinking text to fit in a cell,
and having text merge in a selected number of cells. These options can greatly
enhance the overall appearance of the worksheet.
|
|
|
|
o
|
You can remove text formatting by selecting the Clear
command from the Edit menu.
|
|
|
|
d Discussion
Changing the font changes the appearance of the characters in
selected cells. For example, you can change the font from Arial
to Times New Roman. Since font changes are attached to the cell and not
to the entry, you can change the font before or after you enter information
into a cell.
The Font list on the Formatting toolbar allows
you to change the font of selected text quickly.

Using the Font list
|
|
|
|
o
|
The default font can vary depending on your system
setup.
|
|
|
|
C Procedures
|
1. Select the range you want to format.
|
|
2. Click the Font list on the Formatting toolbar.
|
|
3. Select the desired font.
|
f Step-by-Step
From the Student Data directory, open FRMAT02.XLS.
Use the Font list to apply a new font to a range.
|
Steps
|
Practice Data
|
|
1. Drag to select the range you want to
format.
The range is highlighted as you drag.
|
Drag A1:I7
|
|
2. Release the mouse button.
The range is selected.
|
Release the mouse button
|
|
3. Click the Font list on the Formatting toolbar.
A list of available fonts appears.
|
Click Font 
|
|
4. Select the desired font.
The font is applied to the selected range.
|
Scroll as necessary and click Times New Roman
|
Click in any cell to deselect the range.
d Discussion
The size of the font determines how small or large the
characters will appear on the worksheet. The larger the font size, the larger
the characters will appear. For
example, characters with a font size of 14 appear larger than those with a font
size of 12. Font sizes are measured in points. For purposes of comparison, 72
points equals 1" in height, while 36 points equals 1/2" in height.
Since font sizes are attached to the cell and not the entry, you can change the
font size before or after you enter data into a cell. You can use different
font sizes to emphasize titles, de-emphasize notes, or improve the readability
of a worksheet.
The Font Size list on the Formatting toolbar
allows you to change the font size of selected text quickly.

Using the Font Size list
C Procedures
|
1. Select the range you want to format.
|
|
2. Click the Font Size list on the Formatting toolbar.
|
|
3. Select the desired font size.
|
f Step-by-Step
Use the Font Size list to change the font size in a range.
|
Steps
|
Practice Data
|
|
1. Drag to select the range you want to
format.
The range is highlighted as you drag.
|
Drag A1:I7
|
|
2. Release the mouse button.
The range is selected.
|
Release the mouse button
|
|
3. Click the Font Size list on the Formatting toolbar.
A list of available font sizes appears.
|
Click Font Size 
|
|
4. Select the desired font size.
The font size of the selected range changes accordingly.
|
Scroll as necessary and click 12
|
Click in any cell to deselect the range.
d Discussion
You can format cells quickly with the Bold and Italic
buttons located on the Formatting toolbar. Bolding emphasizes cell entries by
making the characters darker. For example, you may want to bold the name of
your company. After you bold a cell, any data entered into that cell appears
with the bold format.
Italicizing emphasizes cell entries by slanting the characters
to the right. For example, you may want to italicize the column or row headings
of a worksheet. After you italicize a cell, any data entered into that cell
appears in italics.

The bold and italic formats
|
|
|
|
o
|
The Bold and Italic buttons are toggles.
If you select a cell that contains one of these formats and click the Bold
or Italic button, the format is removed.
|
|
|
|
C Procedures
|
1. Select the range you want to format.
|
|
2. Click the Bold button  or the Italic button or the Italic button  . .
|
f Step-by-Step
Use the Bold and Italic buttons to bold and italicize the entries in
cells.
|
Steps
|
Practice Data
|
|
1. Drag to select the range you want to
format.
The range is highlighted as you drag.
|
Drag A1:I2
|
|
2. Release the mouse button.
The range is selected.
|
Release the mouse button
|
|
3. Click the Bold button or the Italic button.
The data in the selected range is bolded or italicized.
|
Click 
|
Click in any cell to deselect the range. Use the Italic
button to italicize the entries in A1:A7.
Click in any cell to deselect the range.
d Discussion
Underlining emphasizes words and numbers in cells.
For example, you may want to emphasize a title or the headings in a row or
column. Underlining adds a line under the characters in a cell, not under the
cell itself. After you underline entries in a cell, any data entered into that
cell is underlined.
|
|
|
|
o
|
The Underline button is a toggle. If you select
a cell that is underlined and click the Underline button, the
underlining is removed.
|
|
|
|
|
o
|
You can also apply Single, Double, Single
Accounting, or Double Accounting underlining from the Font
page of the Format Cells dialog box.
|
|
|
|
C Procedures
|
1. Select the range you want to format.
|
|
2. Click the Underline button  . .
|
f Step-by-Step
Use the Underline button to underline the entries in a
range.
|
Steps
|
Practice Data
|
|
1. Drag to select the range you want to
format.
The range is highlighted as you drag.
|
Drag B6:I6
|
|
2. Release the mouse button.
The range is selected.
|
Release the mouse button
|
|
3. Click the Underline button.
The data in the selected range is underlined.
|
Click 
|
Click in any cell to deselect the range.
d Discussion
Color emphasizes words and numbers in cells. For example, the
color red may be used to emphasize all the cells that contain negative values.
Although color displays on the screen, it will not print unless you have a
color printer. Colors will print as shades of gray on a black and white
printer. You can change the font color in a single cell or a range of cells.
After you change the font color in a
cell, any data entered into that cell appears with the selected color.
The Font Color button has two parts. You use the list to
display the color palette and choose a desired color. The display on the button
changes to display the currently selected color. To apply the currently
selected color to other cells, you only have to click the button.

Changing the font color
C Procedures
|
1. Select the range you want to format.
|
|
2. Click the arrow on the Font Color button  on the Formatting toolbar. on the Formatting toolbar.
|
|
3. Select the desired color.
|
f Step-by-Step
Use the Font Color button to change the color of the font
in a range.
|
Steps
|
Practice Data
|
|
1. Drag to select the range you want to
format.
The range is highlighted as you drag.
|
Drag A1:I2
|
|
2. Release the mouse button.
The range is selected.
|
Release the mouse button
|
|
3. Click the arrow on the Font Color button on the Formatting
toolbar.
A color palette appears.
|
Click the arrow on 
|
|
4. Select the desired color.
The color of the data in the selected range changes accordingly.
|
Click dark blue (first row, sixth color)
|
Click in any cell to deselect the range. Select A3:A7. Click
the Font Color button to change the text color in the range to dark
blue. Click in any cell to deselect the range.
d Discussion
The orientation of text in a cell can be changed to enhance the
appearance of a worksheet. Text can be rotated in one-degree
increments, anywhere from +90 degrees to -90 degrees.

Rotating text in a cell
|
|
|
|
o
|
You can also rotate the text in a cell by clicking a
degree point in the Orientation box or by dragging the text indicator
to the desired position.
|
|
|
|
C Procedures
|
1. Select the cell that contains the text you want to rotate.
|
|
2. Select the Format menu.
|
|
3. Select the Cells command.
|
|
4. Select the Alignment tab.
|
|
5. Select the Degrees text box under Orientation.
|
|
6. Type the degree value by which you want to rotate the text.
|
|
7. Select OK.
|
f Step-by-Step
Rotate the text in a cell.
|
Steps
|
Practice Data
|
|
1. Select the cell that contains the text you
want to rotate.
The cell pointer moves to the cell.
|
Click cell A1
|
|
2. Select the Format menu.
The Format menu appears.
|
Click Format
|
|
3. Select the Cells command.
The Format Cells dialog box opens.
|
Click Cells…
|
|
4. Select the Alignment tab.
The Alignment page appears.
|
Click the Alignment tab, if necessary
|
|
5. Select the Degrees text box under Orientation.
The text in the Degrees text box is selected.
|
Double-click in the Degrees text box
|
|
6. Type the number of degrees by which you want to rotate the text.
The number appears in the Degrees text box and a preview of the
text appears in the Orientation box.
|
Type 45
|
|
7. Select OK.
The Format Cells dialog box closes and the text rotates the designated
number of degrees in the cell.
|
Click OK
|
Restore the text in cell A1 to its original format of 0
degrees.
d Discussion
When text does not fit in a cell, you can change the column
width to accommodate the text. However, this increases the total width of the
worksheet and takes up extra space. As an alternative to changing the column width, you can wrap the text
in the cell. This option enables you to view all the text in the cell without
altering the column width.

Wrapping text in a cell
C Procedures
|
1. Select the cell that contains the text you want to wrap.
|
|
2. Select the Format menu.
|
|
3. Select the Cells command.
|
|
4. Select the Alignment tab.
|
|
5. Select the Wrap text option under Text control.
|
|
6. Select OK.
|
f Step-by-Step
Wrap the text in a cell.
|
Steps
|
Practice Data
|
|
1. Select the cell that contains the text you
want to wrap.
The cell pointer moves to the cell.
|
Click cell A1
|
|
2. Select the Format menu.
The Format menu appears.
|
Click Format
|
|
3. Select the Cells command.
The Format Cells dialog box opens.
|
Click Cells…
|
|
4. Select the Alignment tab.
The Alignment page appears.
|
Click the Alignment tab, if necessary
|
|
5. Select the Wrap text option under Text control.
The option is selected.
|
Click  Wrap text Wrap text
|
|
6. Select OK.
The Format Cells dialog box closes and the text wraps in the cell.
|
Click OK
|
Restore the text in cell A1 to its original format by
deselecting the Wrap text option.
d Discussion
When text does not fit in a cell, the column width or row
height often has to be changed to accommodate the text. However, this change
increases the total width or length of the worksheet and takes up extra space.
As an alternative to changing the
column width or row height, you can shrink the text to fit the cell. This
option reduces the size of the text and enables you to view all the text in the
cell without altering the column width or height.

Shrinking text in a cell
C Procedures
|
1. Select the cell that contains the text you
want to shrink.
|
|
2. Select the Format menu.
|
|
3. Select the Cells command.
|
|
4. Select the Alignment tab.
|
|
5. Select the Shrink to fit option under Text control.
|
|
6. Select OK.
|
f Step-by-Step
Shrink text to fit in a cell.
|
Steps
|
Practice Data
|
|
1. Select the cell that contains the text you
want to shrink.
The cell pointer moves to the cell.
|
Click cell A1
|
|
2. Select the Format menu.
The Format menu appears.
|
Click Format
|
|
3. Select the Cells command.
The Format Cells dialog box opens.
|
Click Cells…
|
|
4. Select the Alignment tab.
The Alignment page appears.
|
Click the Alignment tab, if necessary
|
|
5. Select the Shrink to fit option under Text control.
The option is selected.
|
Click  Shrink to fit Shrink to fit
|
|
6. Select OK.
The Format Cells dialog box closes and the text shrinks to fit in the
cell.
|
Click OK
|
Restore the text in cell A1 to its original format by
deselecting the Shrink to fit option.
d Discussion
There may be times when you want to enter text in one large
cell. For example, you may want to enter a large heading and have it centered
on the worksheet. To accomplish this task, Excel enables you to merge multiple
cells into one large cell. Any text entered in the merged cell can be aligned to the
left, right, or center of the cell.

Merging cells into one cell
|
|
|
|
o
|
The Merge and Center button on the Formatting
toolbar allows you to merge and center selected cells in one step.
|
|
|
|
C Procedures
|
1. Select the cells you want to merge.
|
|
2. Select the Format menu.
|
|
3. Select the Cells command.
|
|
4. Select the Alignment tab.
|
|
5. Select the Merge cells option under Text control.
|
|
6. Select OK.
|
f Step-by-Step
Merge a range into one cell.
|
Steps
|
Practice Data
|
|
1. Drag to select the cells you want to merge.
The range is highlighted as you drag.
|
Drag A1:I1
|
|
2. Release the mouse button.
The range is selected.
|
Release the mouse button
|
|
3. Select the Format menu.
The Format menu appears.
|
Click Format
|
|
4. Select the Cells command.
The Format Cells dialog box opens.
|
Click Cells…
|
|
5. Select the Alignment tab.
The Alignment page appears.
|
Click the Alignment tab, if necessary
|
|
6. Select the Merge cells option under Text control.
The option is selected.
|
Click  Merge cells Merge cells
|
|
7. Select OK.
The Format Cells dialog box closes and the selected cells are merged into
one cell.
|
Click OK
|
d Discussion
Excel allows you to indent subtopics under major topics in a
column. You can indent up to 15 levels, if necessary. For example, you may want
to indent text in a cell for emphasis.

Increasing the indent of text
C Procedures
|
1. Select the range containing the text you want
to indent.
|
|
2. Select the Increase Indent button  as desired. as desired.
|
f Step-by-Step
Increase the indent of the text in a range.
|
Steps
|
Practice Data
|
|
1. Drag to select the range containing the
text you want to indent.
The range is highlighted as you drag.
|
Drag A3:A6
|
|
2. Release the mouse button.
The range is selected.
|
Release the mouse button
|
|
3. Select the Increase Indent button as desired.
The text is indented accordingly.
|
Click  twice twice
|
Click in any cell to deselect the range.
d Discussion
You can decrease the indent of text that has been indented, or
you can restore the indented text all the way to the left edge of the cell. For
example, you may have a subtopic under a major topic heading that has become a major topic. You
can decrease the indent of the subtopic and restore it to the left edge of the
cell to make the subtopic a major topic heading.
C Procedures
|
1. Select the range containing the text for
which you want to decrease the indent.
|
|
2. Select the Decrease Indent button  as desired. as desired.
|
f Step-by-Step
Decrease the indent of the text in a range.
|
Steps
|
Practice Data
|
|
1. Drag to select the range containing the
text for which you want to decrease the indent.
The range is highlighted as you drag.
|
Drag A3:A6
|
|
2. Release the mouse button.
The range is selected.
|
Release the mouse button
|
|
3. Select the Decrease Indent button as desired.
The indent of the text is decreased accordingly.
|
Click 
|
Click in any cell to deselect the range.
Close FRMAT02.XLS.
e Task
Format the text in a worksheet. Change the font and font size.
Apply the bold, italic, and underline formats. Change the color of text and
then apply the same color to additional text. Rotate, wrap, and shrink text.
Merge cells. Increase and decrease indents.
|
1. Open Region07.
|
|
2. Use the Font list to change the font in A1:J8 to MS
Serif.
|
|
3. Use the Font Size list to change the size of the font in
A1:J2 to 12.
|
|
4. Use the Bold button to bold the text in A1:J2 and A3:A8.
|
|
5. Use the Italic button to italicize the text in J3:J7.
|
|
6. Use the Underline button to underline the text in B7:I7.
|
|
7. Use the Font Color list to change the color of the font
in B2:J2 to red (third row, first color).
|
|
8. Use the Font Color button to apply the selected font
color to A3:A8.
|
|
9. Rotate the text in cell A1 forty-five degrees. Restore the text
to its original format.
|
|
10. Wrap the text in cell A1. Restore the text to its original
format.
|
|
11. Shrink the text in cell A1. Restore the text to its original
format.
|
|
12. Merge cells A1:J1.
|
|
13. Increase the indent three times for the text in cell A8.
|
|
14. Decrease the indent twice for the text in cell A8.
|
|
15. Close the workbook without saving it.
|

In this lesson, you will
learn how to:
·
Select columns and rows
·
Change the width of columns
·
Change the height of rows
·
Adjust columns automatically
·
Hide columns/rows
·
Unhide columns/rows
·
Insert a column
·
Insert a row
·
Delete a column
·
Delete a row
d Discussion
Selecting a column selects the entire column, from row 1 to row
65,536, while selecting a row selects the entire row, from column A to column
IV. You can select columns and rows when you want to perform functions such
as formatting, changing the width of more than one column at a time or the
height of more than one row at a time, hiding columns or rows, and inserting
and deleting columns or rows. When a column or row is selected, every cell in
the column or row is highlighted, except for the first cell. This cell is the
active or current cell.

Selecting columns
|
|
|
|
o
|
You can also select adjacent rows and columns by
clicking the first row or column, holding the [Shift] key, and
clicking the last row or column.
|
|
|
|
C Procedures
|
1. To select a single column or row, click the
desired column or row heading.
|
|
2. To select a range of adjacent columns or rows, drag across the
desired column or row headings.
|
|
3. Release the mouse button.
|
|
4. To select a non-adjacent range of columns or rows, select the
first column(s) or row(s) to be included in the range.
|
|
5. Hold [Ctrl], select the remaining column(s) or row(s) in
the range, and release [Ctrl].
|
|
6. To select all the columns and rows in a worksheet, click the Select
All button located to the left of the first column and above the first
row.
|
f Step-by-Step
From the Student Data directory, open COMN07.XLS.
Select columns and rows in a worksheet.
|
Steps
|
Practice Data
|
|
1. To select a single column or row, click the
desired column or row heading.
The column or row is selected.
|
Click the row 2 heading
|
|
2. To select a range of adjacent columns or rows, drag across the
desired column or row headings.
The columns or rows in the adjacent range are highlighted as you drag.
|
Drag column headings B through D
|
|
3. Release the mouse button.
The columns or rows in the adjacent range are selected.
|
Release the mouse button
|
|
4. To select a non-adjacent range of columns or rows, select the
first column(s) or row(s) to be included in the range.
The first column(s) or row(s) are selected.
|
Click the column A heading
|
|
5. Hold [Ctrl], select the remaining column(s) or row(s) in
the range and release [Ctrl].
The remaining column(s) or row(s) are selected.
|
Hold [Ctrl], click the column E heading, and
release [Ctrl]
|
|
6. To select all the columns and rows in a worksheet, click the Select
All button located to the left of the first column and above the first
row.
All the columns and rows in the worksheet are selected.
|
Click the Select All button
|
Click in any cell to deselect the range.
d Discussion
When you create a new worksheet, the columns are set to a
default width of approximately eight characters. You may need to adjust the
column width to accommodate changes in the font size, increases or decreases in
cell values, or to save worksheet space. If you change
the font or number format in a worksheet, the text or numbers may become too
wide to fit in the column. Text can spill over into the next cell to the right,
as long as that cell is empty. However, pound signs (#) appear in a cell if it
contains a numeric entry that is larger than the column width. In other words,
numeric entries do not spill over. If there is an entry in the adjacent cell of
a long text entry, the long text entry becomes truncated, requiring you to
increase the column width. However, you may also want to decrease the width of
some of the other columns to save space on the worksheet.
When you increase or decrease column width, the column size
appears in a ScreenTip to the right of the column you are resizing.
|
|
|
|
o
|
You can display the width of a column in a ScreenTip
by clicking the line to the right of the column heading.
|
|
|
|
|
o
|
If you are adjusting the width of a single column, it
is not necessary to select the column first.
|
|
|
|
C Procedures
|
1. Select the column(s) with the width
you want to change.
|
|
2. Position the mouse pointer on the line to the right of the
desired column heading.
|
|
3. Drag the line to the right to increase or to the left to
decrease the width of the selected columns.
|
|
4. Release the mouse button.
|
f Step-by-Step
Change the width of columns.
|
Steps
|
Practice Data
|
|
1. Drag to select the columns with the width
you want to change.
The columns are highlighted as you drag.
|
Drag columns A through I
|
|
2. Release the mouse button.
The columns are selected.
|
Release the mouse button
|
|
3. Position the mouse pointer on the line to the right of the
desired column heading.
The mouse pointer changes into a black, double-headed arrow with a
vertical bar.
|
Position the mouse pointer on the line to the right of
column I
|
|
4. Drag the line to the right to increase or to the left to
decrease the width of the selected columns.
A line indicating the column width appears as you drag.
|
Drag the line to the left until the width displayed in
the ScreenTip to the right of the column is 12.00
|
|
5. Release the mouse button.
The width of the selected columns changes.
|
Release the mouse button
|
Click in any cell to deselect the range. Scroll to the left, if
necessary, to view the new column widths.
d Discussion
The height of rows in a worksheet automatically adjusts to fit
the largest font in that row. The standard row height is 12.75 points. However, you can
manually increase or decrease row height as needed. When you increase or
decrease row height, the height appears in a ScreenTip to the right of the row
you are resizing. You can increase row height to emphasize headings or totals.
You also can decrease the height of a blank row to use it as a narrow separator
row.

Changing the height of rows
|
|
|
|
o
|
You can display the height of a row in a ScreenTip by
clicking the line below the row heading.
|
|
|
|
|
o
|
If you are adjusting the height of a single row, it is
not necessary to select the row first.
|
|
|
|
C Procedures
|
1. Select the row(s) with the height you want to change.
|
|
2. Position the mouse pointer on the line below
the desired row heading.
|
|
3. Drag the line down to increase or up to decrease the height of
the selected rows.
|
|
4. Release the mouse button.
|
f Step-by-Step
Change the height of rows.
|
Steps
|
Practice Data
|
|
1. Drag to select the rows with the height you
want to change.
The rows are highlighted as you drag.
|
Drag rows 1 through 6
|
|
2. Release the mouse button.
The rows are selected.
|
Release the mouse button
|
|
3. Position the mouse pointer on the line below the desired row
heading.
The mouse pointer changes into a black, double-headed arrow with a
horizontal bar.
|
Position the mouse pointer on the line below row 2
|
|
4. Drag the line down to increase or up to decrease the height of
the selected rows.
A line indicating the row height appears as you drag.
|
Drag the line down until the height displayed in the
ScreenTip to the right of the row is 18.75
|
|
5. Release the mouse button.
The height of the selected rows changes.
|
Release the mouse button
|
Click in any cell to deselect the range.
d Discussion
You can automatically adjust the column
width to fit the widest entry using the Autofit feature. This feature is
useful when you want your columns and rows to expand or contract to neatly fit
the column or row labels in large worksheets. You save time because you do not
have to adjust each column or row individually.
|
|
|
|
o
|
Be careful when you are automatically adjusting
columns that contain very wide entries, such as long worksheet titles. The
column width will adjust to display the entire title in the column.
|
|
|
|
|
o
|
If you are adjusting the width of a single column, it
is not necessary to select the column first.
|
|
|
|
C Procedures
|
1. Select the column(s) you want to adjust.
|
|
2. Position the mouse pointer on the line to the right of the
desired column heading.
|
|
3. Double-click the line in the column heading.
|
f Step-by-Step
Adjust a column automatically to fit the cell
entries.
Scroll to view column H, if necessary.
|
Steps
|
Practice Data
|
|
1. Position the mouse pointer on the line to
the right of the desired column heading.
The mouse pointer changes into a black, double-headed arrow with a
vertical bar.
|
Position the mouse pointer on
the line to the right of column H
|
|
2. Double-click the line in the column heading.
The column width is adjusted to the width of the widest cell entry.
|
Double-click the line in the column heading
|
d Discussion
You can hide columns or rows to conceal the entries in them.
For example, you may want to hide columns or rows that contain
salary data. Hidden columns and rows do not appear in the worksheet and do not
print. Any number in a hidden column or row is still calculated while the
column or row is hidden.

Hiding rows
|
|
|
|
o
|
When you are dragging to select columns or rows you
want to hide, make sure that the mouse pointer is a white cross and not a
black, double-headed arrow. The double-headed arrow is used for adjusting
column width and row height.
|
|
|
|
C Procedures
|
1. Select the column(s) or row(s) you want to hide.
|
|
2. Click the right mouse button on one of the selected column(s) or
row(s).
|
|
3. Select the Hide command.
|
f Step-by-Step
Hide columns or rows in a worksheet.
|
Steps
|
Practice Data
|
|
1. Drag to select the column(s) or row(s) you
want to hide.
The column(s) or row(s) are highlighted as you drag.
|
Drag rows 2 through 5
|
|
2. Release the mouse button.
The column(s) or row(s) are selected.
|
Release the mouse button
|
|
3. Click the right mouse button on one of the selected column(s) or
row(s).
A shortcut menu appears.
|
Click the right mouse button on one of the selected
rows
|
|
4. Select the Hide command.
The column(s) or row(s) are hidden and a wide, black line indicating their
location appears.
|
Click Hide
|
d Discussion
You can redisplay hidden columns and rows. For example,
after making a presentation in which confidential
information was hidden, you can unhide the columns or rows to continue your
normal worksheet process. Unhidden columns and rows are reset to the column
width or row height prior to being hidden.

Unhiding rows
|
|
|
|
o
|
When you are dragging to select columns or rows you
want to unhide, make sure that the mouse pointer is a white cross and not a
black, double-headed arrow. The double-headed arrow is used for adjusting the
column width and row height.
|
|
|
|
C Procedures
|
1. Select the column(s) or row(s) on either side of the hidden
columns or rows.
|
|
2. Click the right mouse button on one of the
selected column(s) or row(s).
|
|
3. Select the Unhide command.
|
f Step-by-Step
Unhide rows in a worksheet.
|
Steps
|
Practice Data
|
|
1. Drag to select the column(s) or row(s) on
either side of the hidden column(s) or row(s).
The column(s) or row(s) are highlighted as you drag.
|
Drag rows 1 and 6
|
|
2. Release the mouse button.
The column(s) or row(s) are selected.
|
Release the mouse button
|
|
3. Click the right mouse button on one of the selected column(s) or
row(s).
A shortcut menu appears.
|
Click the right mouse button on one of the selected
rows
|
|
4. Select the Unhide command.
The hidden column(s) or row(s) appear.
|
Click Unhide
|
Click in any cell to deselect the range.
d Discussion
You can insert columns into an existing worksheet to add new
information or to create logical divisions within worksheet data. Since columns
are inserted from row 1 to row 65,536, you should verify that inserting a new
column will not adversely affect any data above or below the current data. For
example, you may have data in A1:G10 and A50:G60. If you insert a column
between columns E and F, a blank column is inserted not only between the data
in A1:G10, but also between the data in A50:G60.
When you insert a column, any formulas with ranges that include
cells on both sides of the new column expand automatically to include the new
column. For example, if you insert a new column between columns B and C, the SUM
function =SUM(B2:F2) adjusts to =SUM(B2:G2).
Columns are inserted to the left of the currently selected
column. By selecting an entire column before you insert a new one, Excel
automatically moves the selected column to the right and inserts a new, blank
one. If you select multiple columns, Excel inserts the same number of columns
into the worksheet.

Inserting a column
|
|
|
|
o
|
Inserted columns adopt the formatting of the cells in
the column directly to the left of the inserted columns.
|
|
|
|
|
o
|
You can also insert columns by selecting the Columns
command from the Insert menu.
|
|
|
|
C Procedures
|
1. Click the right mouse button on the column heading
to the left of which you want to insert a column.
|
|
2. Select the Insert command.
|
f Step-by-Step
Insert a column in a worksheet.
Scroll to view column H, if necessary.
|
Steps
|
Practice Data
|
|
1. Click the right mouse button on the column
heading to the left of which you want to insert a column.
A shortcut menu appears.
|
Click the right mouse button on
the heading for column H
|
|
2. Select the Insert command.
The column is inserted to the left of the selected column.
|
Click Insert
|
Click in any cell to deselect the range.
d Discussion
You can insert rows into an existing worksheet to add new
information or to create logical divisions within worksheet data. Since rows
are inserted from column A to column IV, you should verify that inserting a new
row will not adversely affect any data to the left or right of the current
data. For example, you may have data in A1:G10 and P1:T10. If you insert a row
between rows 5 and 6, a blank row is inserted not only between the data in
A1:G10, but also between the data in P1:T10.
When you insert a row, any formulas with ranges that include
cells above and below the new row expand automatically to include the new row.
For example, if you insert a new row between rows 4 and 5, the SUM
function =SUM(C3:C8) adjusts to =SUM(C3:C9).
Rows are inserted above the currently selected row. By
selecting an entire row before you insert a new one, Excel automatically moves
the selected row down and inserts a new, blank one. If you select multiple
rows, Excel inserts the same number of rows into the worksheet.

Inserting a row
|
|
|
|
o
|
Inserted rows adopt the formatting of the cells in the
row directly above the inserted rows.
|
|
|
|
|
o
|
You can also insert rows by selecting the Rows
command from the Insert menu.
|
|
|
|
C Procedures
|
1. Click the right mouse button on the row heading above which you
want to insert a row.
|
|
2. Select the Insert command.
|
f Step-by-Step
Insert a row in a worksheet.
Scroll to view cell A1, if necessary.
|
Steps
|
Practice Data
|
|
1. Click the right mouse button on the row
heading above which you want to insert a row.
A shortcut menu appears.
|
Click the right mouse button on
the heading for row 1
|
|
2. Select the Insert command.
The row is inserted above the selected row.
|
Click Insert
|
Click in any cell to deselect the range. Type District Sales
Report in cell A1. Insert a row above row 7. Click in any cell to deselect
the range.
d Discussion
You can delete unwanted columns from a worksheet. When you
delete a column, the entire column and its contents are removed from row 1
through 65,536. You should make sure that the column does not contain any
unseen data you do not want to delete. If you inadvertently delete a column,
you can use the Undo button to undo the deletion.
When you delete a column, any formulas with ranges that include
that column adjust automatically. For example, if you delete column C, the SUM
function =SUM(B2:G2) adjusts to =SUM(B2:F2).
When deleting a column, you should select the entire column.
Otherwise, a message box opens in which you must indicate exactly what you want
to delete.

Deleting a column
|
|
|
|
x
|
Formulas that refer to specific cells in a deleted
column display the error message #REF!. The formula must be edited to
remove the reference to the cells in the deleted column.
|
|
|
|
C Procedures
|
1. Click the right mouse button on the heading of the column you
want to delete.
|
|
2. Select the Delete command.
|
f Step-by-Step
Delete a column from a worksheet.
Scroll to view column H, if necessary.
|
Steps
|
Practice Data
|
|
1. Click the right mouse button on the heading
of the column you want to delete.
A shortcut menu appears.
|
Click the right mouse button on
the heading for column H
|
|
2. Select the Delete command.
The selected column is deleted.
|
Click Delete
|
Click in any cell to deselect the range.
d Discussion
You can delete unwanted rows from a worksheet. When you delete
a row, the entire row and its contents are removed from column A through IV.
You should make sure that the row does not contain any unseen data you do not
want to delete. If you inadvertently delete a row, you can use the Undo
button to undo the deletion.
When you delete a row, any formulas with ranges that include
that row will adjust automatically. For example, if you delete row 5, the SUM
function =SUM(C2:C9) adjusts to =SUM(C2:C8).
When deleting rows, you should select the entire row.
Otherwise, a message box opens in which you must indicate exactly what you want to
delete.
|
|
|
|
x
|
Formulas that refer to specific cells in a deleted row
display the error message #REF!. The formula must be edited to remove
the reference to the cells in the deleted row.
|
|
|
|
C Procedures
|
1. Click the right mouse button on the heading of the
row you want to delete.
|
|
2. Select the Delete command.
|
f Step-by-Step
Delete a row from a worksheet.
|
Steps
|
Practice Data
|
|
1. Click the right mouse button on the heading
of the row you want to delete.
A shortcut menu appears.
|
Click the right mouse button on
the heading for row 7
|
|
2. Select the Delete command.
The selected row is deleted.
|
Click Delete
|
Click in any cell to deselect the range.
Close COMN07.XLS.
e Task
Change column widths and row heights. Use the Autofit feature
to adjust column width. Hide and unhide columns. Insert and delete rows and
columns.
|
1. Open Region08.
|
|
2. Select columns B through E. Change the width to 8.00.
|
|
3. Select rows 2 through 7. Change the height to 14.25.
|
|
4. Select column I. Use the Autofit feature to make the
column wide enough to display the text in cell I1.
|
|
5. Select columns B through E and hide them from the view.
|
|
6. Unhide columns B through E.
|
|
7. Insert a blank column before column I.
|
|
8. Insert three blank rows at the top of the worksheet. Select cell
A1 and type Worldwide Sporting Goods. Select cell A2 and type Regional
Sales.
|
|
9. Insert two blank rows before row 10.
|
|
10. Delete the blank row 10.
|
|
11. Delete the blank column I.
|
|
12. Close the workbook without saving it.
|

In this lesson, you will
learn how to:
·
Change cell appearance
·
Use the Align Right button
·
Use the Center button
·
Use the Align Left button
·
Use the Merge and Center button
·
Use the Borders button
·
Use the Fill Color button
·
Use the Format Painter button
·
Copy to non-adjacent cells
·
Clear formats
·
Use conditional formatting
·
Change a conditional format
·
Add a conditional format
·
Delete a conditional format
d Discussion
When you enter information into cells, text is automatically
aligned with the left edge of the cell and numbers are automatically aligned
with the right edge of the cell. You can change the alignment of text and
numbers to improve the appearance of your worksheet. For example, you may want
to right align text at the top of a column of numbers to match the alignment of
the numbers. Alignment changes are attached to the cell and affect any data
entered into it.
Certain number formats control the alignment of
numbers. Therefore, you may not be able to change the way some formatted
numbers are aligned. For example, if you format a number using the Currency
Style or Comma Style button, you will not be able to change the
alignment of that number. However, you can change the alignment of all text,
regardless of formatting.
You can add borders and fills to cells to enhance the
appearance of the worksheet or to emphasize certain data. You can then copy the
formatting of a cell or range of cells to another cell or range for improved
formatting consistency.
You can also format cells based on certain conditions. For
example, if you want to emphasize any sales in a month that are below $2000.00,
you can format those cells to appear in red. All cells that contain sales of
$2000.00 or more would appear in the default color of black.
d Discussion
Right alignment is the default alignment for numeric data. It
aligns numbers with the right edge of the cell. You can change the alignment of
text (by default, text is left aligned) so that it is right-aligned. You can
right align text at the top of a column of
numbers to match the alignment of the numbers below it.
A right-aligned cell

Aligning cells to the right
C Procedures
|
1. Select the range containing the entries you want
to right align.
|
|
2. Click the Align Right button  . .
|
f Step-by-Step
From the Student Data directory, open FORMCEL.XLS.
Use the Align Right button to right
align the text in a range.
|
Steps
|
Practice Data
|
|
1. Drag to select the range containing the
entries you want to right align.
The range is highlighted as you drag.
|
Drag A2:A7
|
|
2. Release the mouse button.
The range is selected.
|
Release the mouse button
|
|
3. Click the Align Right button.
The entries are right-aligned.
|
Click 
|
Click in any cell to deselect the range.
d Discussion
You can center text or numbers in cells to separate
the text or numbers from entries in surrounding cells. For example, you may
want the months of the year to be centered as column headings or row headings.
A centered cell

Aligning cells to the center
C Procedures
|
1. Select the range containing the entries you want
to center.
|
|
2. Click the Center button  . .
|
f Step-by-Step
Use the Center button to center
the text in a range.
|
Steps
|
Practice Data
|
|
1. Drag to select the range containing the
entries you want to center.
The range is highlighted as you drag.
|
Drag B2:D2
|
|
2. Release the mouse button.
The range is selected.
|
Release the mouse button
|
|
3. Click the Center button.
The entries are centered.
|
Click 
|
Click in any cell to deselect the range.
d Discussion
Left alignment is the default for text entries. It aligns text
with the left edge of the cell. You can change the alignment of numbers (by
default, numbers are right-aligned) so that they are left-aligned. For example,
you can left align numeric data that is not calculated, such as zip codes, to
match the alignment of text entries.
A left-aligned cell

Aligning cells to the left
C Procedures
|
1. Select the range containing the entries
you want to left align.
|
|
2. Click the Align Left button  . .
|
f Step-by-Step
Use the Align Left button to left align the numbers in a range.
Scroll to view cell I3, if necessary.
|
Steps
|
Practice Data
|
|
1. Drag to select the range containing the
entries you want to left align.
The range is highlighted as you drag.
|
Drag I3:I7
|
|
2. Release the mouse button.
The range is selected.
|
Release the mouse button
|
|
3. Click the Align Left button.
The entries are left-aligned.
|
Click 
|
Click in any cell to deselect the range.
d Discussion
You can select several cells, merge them into one cell, and center
the entry in that cell over the columns in a worksheet. This option is useful
when you want to center a title above specified columns in a worksheet.

Merging and centering text in a cell
|
|
|
|
o
|
When you merge and center cells, the actual text is
still located in the cell in which it was entered, even though it appears to
have moved.
|
|
|
|
C Procedures
|
1. Select the cells you want to merge and center.
|
|
2. Release the mouse button.
|
|
3. Click the Merge and Center button  . .
|
f Step-by-Step
Use the Merge and Center button to merge a range and center the title in the merged
cell A1.
Scroll to view cell A1, if necessary.
|
Steps
|
Practice Data
|
|
1. Drag to select the cells you want to merge
and center.
The range is highlighted as you drag.
|
Drag A1:I1
|
|
2. Release the mouse button.
The range is selected.
|
Release the mouse button
|
|
3. Click the Merge and Center button.
The cells are merged and the entry is centered across the selected
columns.
|
Click 
|
d Discussion
Cell borders are lines you can place on the edges of the cells
in a worksheet. For example, you may want the column headings, row titles, and
row totals of a worksheet to appear with wider lines to emphasize these cells.
Excel contains twelve border styles that place lines of varying widths at
different edges of the cells. In addition, you can add cell borders to an
entire range of cells. Borders are
attached to the cells and appear regardless of the cell entry.
The Borders button has two parts. You can use the list
to display a list of border styles and choose a desired border style. The
display on the button changes to display the currently selected border. To
apply the currently selected border to other cells, you can click the button.

Using the Borders button
|
|
|
|
o
|
You can clear any cell borders by selecting the cell
containing the border you want to clear and choosing the upper left option in
the list of border styles.
|
|
|
|
C Procedures
|
1. Select the range to which you want to add a border.
|
|
2. Click the arrow on the Borders button  on the Formatting toolbar. on the Formatting toolbar.
|
|
3. Select the desired border style.
|
f Step-by-Step
Use the Borders button to add borders to a range.
|
Steps
|
Practice Data
|
|
1. Drag to select the range to which you want
to add a border.
The range is highlighted as you drag.
|
Drag A7:I7
|
|
2. Release the mouse button.
The range is selected.
|
Release the mouse button
|
|
3. Click the arrow on the Borders button on the Formatting
toolbar.
A list of border styles appears.
|
Click the arrow on 
|
|
4. Select the desired border style.
The border style appears around the selected range.
|
Click 
|
Click in any cell to deselect the range. Select A2:I2. Click
the Borders button to repeat the border in the selected cells. Click in
any cell to deselect the range.
d Discussion
You can add shading to the background of cells using the Fill
Color button. For example, you can use shading to make the column headings distinct from
the rest of the worksheet. Although color displays on the screen, it will not
print unless you have a color printer. Colors will print as shades of gray on a
black and white printer.
The Fill Color button has two parts. You can use
the list to display the color palette and choose the desired color. The display
on the button changes to display the currently selected color. To apply the
currently selected color to other cells, you can click the button.

Using the Fill Color button
|
|
|
|
o
|
You can clear any cell shading by selecting the cell
containing the shading you want to clear and choosing the No Fill
option on the color palette.
|
|
|
|
C Procedures
|
1. Select the range to which you want to add a
color.
|
|
2. Click the arrow on the Fill Color button  on the Formatting toolbar. on the Formatting toolbar.
|
|
3. Select the desired color.
|
f Step-by-Step
Use the Fill Color button to add colors to A2:I2.
|
Steps
|
Practice Data
|
|
1. Drag the range to which you want to add a
color.
The range is highlighted as you drag.
|
Drag A2:I2
|
|
2. Release the mouse button.
The range is selected.
|
Release the mouse button
|
|
3. Click the arrow on the Fill Color button on the Formatting
toolbar.
A color palette appears.
|
Click the arrow on 
|
|
4. Select the desired color.
The fill color appears as background shading in the selected range.
|
Click yellow (fourth row, third color)
|
Click in any cell to deselect the range. Select A3:A7. Click
the Fill Color button to repeat the shading in the selected cells. Click
in any cell to deselect the range.
d Discussion
The Format Painter button copies formats from a cell or
range to another cell or range. This button
prevents you from having to individually apply the formats to each cell or
range every time you want to format cells. For example, if you apply bolding,
italics, underlining, and shading to a cell, you can apply all of these
formats, at one time, using the Format Painter button.
C Procedures
|
1. Select the cell containing the format you want to copy.
|
|
2. Click the Format Painter button  . .
|
|
3. Select the range to which you want to apply the format.
|
f Step-by-Step
Use the Format Painter button to copy formatting from a cell to a range.
|
Steps
|
Practice Data
|
|
1. Select the cell containing the format you
want to copy.
The cell pointer moves to the cell.
|
Click cell A7
|
|
2. Click the Format Painter button.
A blinking marquee appears around the selected cell.
|
Click 
|
|
3. Drag to select the range to which you want to apply the format.
The range is highlighted as you drag.
|
Drag B7:I7
|
|
4. Release the mouse button.
The format is applied to the selected range and the blinking marquee is
removed from the original range.
|
Release the mouse button
|
Click in any cell to deselect the range.
Select cell I7, align the data to the left and apply the Percent
style.
d Discussion
You can use the Format Painter button to copy cell formatting to
several non-adjacent cells or ranges at once. You do not have to reselect the Format
Painter button each time you want to
format a non-adjacent cell or range. For example, you may want to copy all the
formats from range A1:A5 to both A10:A15 and A20:A25.
C Procedures
|
1. Select the cell containing the format you want to copy.
|
|
2. Double-click the Format Painter button  . .
|
|
3. Select the cells to which you want to apply the format.
|
|
4. Select any additional cells to which you want to apply the
format.
|
|
5. Click the Format Painter button  to deselect it. to deselect it.
|
f Step-by-Step
Copy formatting to non-adjacent cells using the Format
Painter button.
|
Steps
|
Practice Data
|
|
1. Select the cell containing the format you
want to copy.
The cell pointer moves to the cell.
|
Click cell A4
|
|
2. Double-click the Format Painter button.
A blinking marquee appears around the selected cell.
|
Double-click 
|
|
3. Drag to select the cells to which you want to apply the format.
The cells are highlighted as you drag.
|
Scroll, if necessary, and drag A10:I10
|
|
4. Release the mouse button.
The format is applied to the selected range and the blinking marquee
remains around the original range.
|
Release the mouse button
|
|
5. Drag to select any additional cells to which you want to apply
the format.
The cells are highlighted as you drag.
|
Scroll, if necessary, and drag A11:A15
|
|
6. Release the mouse button.
The format is applied to the selected range and the blinking marquee
remains around the original range.
|
Release the mouse button
|
|
7. Click the Format Painter button to deselect it.
The blinking marquee is removed from the original range.
|
Click 
|
Click in any cell to deselect the range.
d Discussion
You can clear all the formats in a cell or range all at once.
Clearing formats removes all formatting attached to the cell or range,
including number formats, font formats, cell borders, and shading. If you only
want to clear a single format, such as bolding, you should remove that format
individually.

Clearing formats
|
|
|
|
o
|
If you clear a cell format unintentionally, you can
use the Undo button to undo the clear.
|
|
|
|
C Procedures
|
1. Select the cells containing the formats you
want to clear.
|
|
2. Select the Edit menu.
|
|
3. Point to the Clear command.
|
|
4. Select the Formats command.
|
f Step-by-Step
Clear the formats in a range.
Scroll to view cell A10, if necessary.
|
Steps
|
Practice Data
|
|
1. Drag to select the cells containing the
formats you want to clear.
The range is highlighted as you drag.
|
Drag A10:I10
|
|
2. Release the mouse button.
The range is selected.
|
Release the mouse button
|
|
3. Select the Edit menu.
The Edit menu appears.
|
Click Edit
|
|
4. Point to the Clear command.
The Clear submenu appears.
|
Point to Clear
|
|
5. Select the Formats command.
The formats are removed from the selected cells.
|
Click Formats
|
Clear the formats in A11:A15. Click in any cell to deselect the
range.
d Discussion
You can use the Conditional Formatting feature to emphasize data that meets
certain conditions in cells or formulas. For example, you can set up the Conditional
Formatting feature so that all sales that are greater than or equal to a
certain value will appear in a different color. You can change the formatting
option that is used to emphasize data which meets a condition.
The Conditional Formatting feature has two options, the Cell
Value Is and Formula Is. The Cell Value Is option allows you
to compare the values of selected cells to conditions, such as greater than or
less than. The Formula Is option allows you to compare the results of a
logical formula to a selected range of cells, where the formula produces either
a true or false result indicated by the selected formatting.

Applying conditional formatting
C Procedures
|
1. Select the range to which you want to apply
conditional formatting.
|
|
2. Select the Format menu.
|
|
3. Select the Conditional Formatting command.
|
|
4. Select the first list under Condition 1 to choose the
criteria on which you want to apply the conditional formatting.
|
|
5. Select the desired option.
|
|
6. Select the second list under Condition 1 to choose the
desired condition.
|
|
7. Select the desired condition.
|
|
8. Select the text box under Condition 1.
|
|
9. Type the value to be used as the formatting criteria.
|
|
10. Select Format.
|
|
11. Select the Color list.
|
|
12. Select the color you want to apply to the values that meet the
specified condition.
|
|
13. Select OK.
|
|
14. Select OK.
|
f Step-by-Step
Use the Conditional
Formatting feature.
|
Steps
|
Practice Data
|
|
1. Drag to select the range to which you want
to apply conditional formatting.
The range is highlighted as you drag.
|
Drag B3:D6
|
|
2. Release the mouse button.
The range is selected.
|
Release the mouse button
|
|
3. Select the Format menu.
The Format menu appears.
|
Click Format
|
|
4. Select the Conditional Formatting command.
The Conditional Formatting dialog box opens.
|
Click Conditional Formatting...
|
|
5. Select the first list under Condition 1 to choose the
criteria on which you want to apply the conditional formatting.
A list containing Cell Value Is and Formula Is appears.
|
Click the first 
|
|
6. Select the desired option.
The option is selected.
|
Click Cell Value Is, if necessary
|
|
7. Select the second list under Condition 1 to choose the
desired condition.
A list of conditions appears.
|
Click the second 
|
|
8. Select the desired condition.
The condition is selected.
|
Click greater than
|
|
9. Select the text box under Condition 1.
The insertion point appears in the text box.
|
Click in the text box
|
|
10. Type the value to be used as the formatting criteria.
The value appears in the text box.
|
Type 2000
|
|
11. Select Format.
The Format Cells dialog box opens.
|
Click Format...
|
|
12. Select the Color list.
A color palette appears.
|
Click Color 
|
|
13. Select the color you want to apply to the values that meet the
specified condition.
The color is selected.
|
Click red (third row, first color)
|
|
14. Select OK.
The Format Cells dialog box closes and the format appears in the preview
under Condition 1.
|
Click OK
|
|
15. Select OK.
The Conditional Formatting dialog box closes and the conditional
formatting is applied to those cells that meet the specified condition.
|
Click OK
|
Click in any cell to
deselect the range. Notice that the cells with values greater than $2000
display in red.
d Discussion
You can change a conditional format. For example, you may have
a worksheet that displays cells with values less than $4000 in red. You can change the condition to
recognize a different value.

Changing a conditional format
C Procedures
|
1. Select the range containing the conditional format you want
to change.
|
|
2. Select the Format menu.
|
|
3. Select the Conditional Formatting command.
|
|
4. Select the second list under Condition 1 to choose the
desired condition.
|
|
5. Select the desired condition.
|
|
6. Select the text box under Condition 1.
|
|
7. Type the value to be used as the new formatting criteria.
|
|
8. Select OK.
|
f Step-by-Step
Change the conditional format of a range.
|
Steps
|
Practice Data
|
|
1. Drag to select the range containing the
conditional format you want to change.
The range is highlighted as you drag.
|
Drag B3:D6
|
|
2. Release the mouse button.
The range is selected.
|
Release the mouse button
|
|
3. Select the Format menu.
The Format menu appears.
|
Click Format
|
|
4. Select the Conditional Formatting command.
The Conditional Formatting dialog box opens.
|
Click Conditional Formatting...
|
|
5. Select the second list under Condition 1 to choose the
desired condition.
A list of conditions appears.
|
Click the second 
|
|
6. Select the desired condition.
The condition is selected.
|
Click less than
|
|
7. Double-click the text box under Condition 1.
The text box is selected.
|
Double-click in the text box
|
|
8. Type the value to be used as the new formatting criteria.
The value appears in the text box.
|
Type 1800
|
|
9. Select OK.
The Conditional Formatting dialog box closes and the changed conditional
format is applied to those cells that meet the specified condition.
|
Click OK
|
Click in any cell to deselect the range. Notice that the cells
with values less than $1800 display in red.
d Discussion
You can have more than one conditional format for a range of cells. For
example, you can have a worksheet that displays cells with values less than
$4000 in red and cells with values greater than $8000 in blue.

Adding a conditional format
C Procedures
|
1. Select the range containing the conditional
format to which you want to add another condition.
|
|
2. Select the Format menu.
|
|
3. Select the Conditional Formatting command.
|
|
4. Select Add.
|
|
5. Select the second list under Condition 2 to choose the
desired condition.
|
|
6. Select the desired condition.
|
|
7. Select the text box under Condition 2.
|
|
8. Type the value to be used as the new formatting criteria.
|
|
9. Select Format under Condition 2.
|
|
10. Select the Color list.
|
|
11. Select the color you want to apply to the values that
meet the specified condition.
|
|
12. Select OK.
|
|
13. Select OK.
|
f Step-by-Step
Add a second conditional format to a
range.
|
Steps
|
Practice Data
|
|
1. Drag to select the range containing the
conditional format to which you want to add another condition.
The range is highlighted as you drag.
|
Drag B3:D6
|
|
2. Release the mouse button.
The range is selected.
|
Release the mouse button
|
|
3. Select the Format menu.
The Format menu appears.
|
Click Format
|
|
4. Select the Conditional Formatting command.
The Conditional Formatting dialog box opens.
|
Click Conditional Formatting...
|
|
5. Select Add.
The Conditional Formatting dialog box expands to display a section for Condition
2.
|
Click Add
|
|
6. Select the second list under Condition 2 to choose the
desired condition.
A list of conditions appears.
|
Click the second  under Condition 2 under Condition 2
|
|
7. Select the desired condition.
The condition is selected.
|
Click greater than
|
|
8. Select the text box under Condition 2.
The insertion point appears in the text box.
|
Click the text box under Condition 2
|
|
9. Type the value to be used as the new formatting criteria.
The value appears in the text box.
|
Type 2000
|
|
10. Select Format under Condition 2.
The Format Cells dialog box opens.
|
Click Format... under Condition 2
|
|
11. Select the Color list.
A color palette appears.
|
Click Color 
|
|
12. Select the color you want to apply to the values that meet the
specified condition.
The color is selected.
|
Click dark blue (first row, sixth color)
|
|
13. Select OK.
The Format Cells dialog box closes and the format appears in the preview
under Condition 2.
|
Click OK
|
|
14. Select OK.
The Conditional Formatting dialog box closes and the Condition 2
formatting is applied to those cells that meet the specified condition.
|
Click OK
|
Click in any cell to deselect the range. Notice that the cells
with values greater than $2000 display in dark blue and cells with values less
than $1800 display in red.
d Discussion
You can delete one or more conditions from a conditionally
formatted range. For example, you may have a worksheet that displays cells with values
less than $4000 in red and cells with values greater than $8000 in blue. You
may want to delete the condition which displays values in blue so that only one
condition is emphasized.

Deleting a conditional format
C Procedures
|
1. Select the range containing the conditional format you want
to delete.
|
|
2. Select the Format menu.
|
|
3. Select the Conditional Formatting command.
|
|
4. Select Delete.
|
|
5. Select the check box of the condition you want to delete.
|
|
6. Select OK.
|
|
7. Select OK.
|
f Step-by-Step
Delete the conditional format of a range.
|
Steps
|
Practice Data
|
|
1. Drag to select the range containing the
conditional format you want to delete.
The range is highlighted as you drag.
|
Drag B3:D6
|
|
2. Release the mouse button.
The range is selected.
|
Release the mouse button
|
|
3. Select the Format menu.
The Format menu appears.
|
Click Format
|
|
4. Select the Conditional Formatting command.
The Conditional Formatting dialog box opens.
|
Click Conditional Formatting...
|
|
5. Select Delete.
The Delete Conditional Format dialog box opens.
|
Click Delete...
|
|
6. Select the check box of the condition you want to delete.
The appropriate check box is selected.
|
Click  Condition 2 Condition 2
|
|
7. Select OK.
The Delete Conditional Format dialog box closes and the Condition 2
section is removed from the Conditional Formatting dialog box.
|
Click OK
|
|
8. Select OK.
The Conditional Formatting dialog box closes and the Condition 2
formatting is removed from the cells in the range.
|
Click OK
|
Click in any cell to deselect the range. Notice that the cells
with values greater than $2000 no longer appear in dark blue.
Close FORMCEL.XLS.
e Task
Improve the appearance of a worksheet by aligning cell entries,
adding borders, shading cells, copying formats, and centering text across
columns. Apply conditional formatting to cells. Change, add, and delete
conditional formatting.
|
1. Open Region09.
|
|
2. Use the Align Right button to right align the text in
B4:E4.
|
|
3. Use the Center button to center the text in A5:A11.
|
|
4. Use the Align Left button to left align the numbers in
J5:J9.
|
|
5. Use the Borders list to add a thick border style (second
row, second column) to A4:J4.
|
|
6. Use the Borders button to repeat the thick border style
in A10:J10.
|
|
7. Use the Fill Color list to shade A4:A11 with
turquoise (fourth row, fifth color).
|
|
8. Use the Fill Color button to repeat the turquoise shading
in B4:J4.
|
|
9. Use the Format Painter button to copy the formatting from
cell A7 to cell A1.
|
|
10. Use the Merge and Center button to center the text in cell
A1 across A1:J1.
|
|
11. Clear the formats in I4:J4.
|
|
12. Apply conditional formatting to B5:E9 so that the cells with
values greater than $45000 display in red.
|
|
13. Change the conditional formatting of B5:E9 so that the cells with
values less than $45000 display in red.
|
|
14. Add a conditional format to B5:E9 so that in addition to
displaying cells with values less than $45000 in red, you also display cells
with values greater than $50000 in dark blue (first row, sixth color).
|
|
15. Delete the conditional formatting from B5:E9 that displays cells
with values less that $45000 in red.
|
|
16. Close the workbook without saving it.
|

In this lesson, you will
learn how to:
·
Apply an AutoFormat
·
Change AutoFormat options
d Discussion
You can use the AutoFormat feature to assign preset formats to a range of cells.
AutoFormats create attractive, professional-looking table designs in a
worksheet. AutoFormats include border styles, number formats, shading, font
changes, and changes in column width and row height.
AutoFormats are designed to format worksheet data that contains
certain features, such as column and row headings, total rows, and detailed
data. AutoFormats may not work properly with other types of worksheet layouts.
When applying an AutoFormat, you can either select a range of cells or a single
cell in a range.

Applying an AutoFormat
|
|
|
|
x
|
If you do not like an applied AutoFormat, you can
remove it using the Undo button.
|
|
|
|
C Procedures
|
1. Select the range you want to format.
|
|
2. Select the Format menu.
|
|
3. Select the AutoFormat command.
|
|
4. Select the desired format from the Table Format list box.
|
|
5. Select OK.
|
f Step-by-Step
From the Student Data directory, open AUTOFMT.XLS.
Apply an AutoFormat to a range.
|
Steps
|
Practice Data
|
|
1. Drag to select the range you want to
format.
The range is highlighted as you drag.
|
Drag A2:I7
|
|
2. Release the mouse button.
The range is selected.
|
Release the mouse button
|
|
3. Select the Format menu.
The Format menu appears.
|
Click Format
|
|
4. Select the AutoFormat command.
The AutoFormat dialog box opens.
|
Click AutoFormat...
|
|
5. Select the desired format from the Table Format list box.
A sample of the selected AutoFormat appears in the Sample box.
|
Click Classic 1
|
|
6. Select OK.
The AutoFormat dialog box closes and the AutoFormat is applied to the selected
range.
|
Click OK
|
Click in any cell to deselect the range.
d Discussion
If you do not want to apply all the formatting in an AutoFormat
table, you can select which options you want to disable. By default, all the
options are enabled. These options include Number, Border,
Font, Patterns, Alignment, and Width/Height. If you
disable an option, any formatting associated with that option is not applied to
the selected range when you apply the AutoFormat table.

Changing AutoFormat options
C Procedures
|
1. Select the range you want to format.
|
|
2. Select the Format menu.
|
|
3. Select the AutoFormat command.
|
|
4. Select the desired format from the Table
Format list box.
|
|
5. Select Options.
|
|
6. Deselect the check box of the option you do not want to apply.
|
|
7. Deselect the check boxes of any other options you do not want to
apply.
|
|
8. Select OK.
|
f Step-by-Step
Change AutoFormat options.
|
Steps
|
Practice Data
|
|
1. Drag to select the range you want to
format.
The range is highlighted as you drag.
|
Drag A2:I7
|
|
2. Release the mouse button.
The range is selected.
|
Release the mouse button
|
|
3. Select the Format menu.
The Format menu appears.
|
Click Format
|
|
4. Select the AutoFormat command.
The AutoFormat dialog box opens.
|
Click AutoFormat...
|
|
5. Select the desired format from the Table Format list box.
A sample of the selected AutoFormat appears in the Sample box.
|
Click Accounting 2
|
|
6. Select Options.
A list of available options appears at the bottom of the AutoFormat dialog
box.
|
Click Options
|
|
7. Deselect the check box of the option you do not want to apply.
The check box is deselected.
|
Click  Number Number
|
|
8. Deselect the check box of any other options you do not want to
apply.
The check boxes are deselected.
|
Click  Width/Height Width/Height
|
|
9. Select OK.
The AutoFormat dialog box closes and the AutoFormat is applied to the
selected range without the deselected options.
|
Click OK
|
Click in any cell to deselect the range.
Close AUTOFMT.XLS.
e Task
Format a range using the AutoFormat feature. Change the table.
Deselect AutoFormat options and reapply an AutoFormat.
|
1. Open Region10.
|
|
2. Format A1:J7 with the Accounting 1 AutoFormat.
|
|
3. Reformat the range using the Colorful 1 AutoFormat.
|
|
4. Disable the Number and Border options and reapply
the Colorful 1 AutoFormat.
|
|
5. Close the workbook without saving it.
|

In this lesson, you will
learn how to:
·
Increase the magnification
·
Decrease the magnification
·
Change range magnification
·
Switch to Full Screen view
·
Split the window
·
Remove panes
·
Freeze panes
·
Unfreeze panes
d Discussion
You can increase the magnification of cells. Magnifying the
display is similar to using a magnifying glass; it makes the cells and their
contents appear larger. This option is useful when you want to view a small
portion of the worksheet in greater detail. For example, with a worksheet
containing annual sales, you may want to view only sales for the current
quarter.
The default magnification is 100%. The larger the percentage, the larger the cells
appear. For example, with a magnification of 200%, the cells appear twice as
large as with a magnification of 100%.

A worksheet zoomed to 200%
|
|
|
|
o
|
Changing the magnification affects the display only.
It does not affect printing.
|
|
|
|
|
o
|
You can also use the Zoom list on the Standard
toolbar to change the magnification.
|
|
|
|
C Procedures
|
1. Select the View menu.
|
|
2. Select the Zoom command.
|
|
3. Under Magnification, select the desired option.
|
|
4. Select OK.
|
f Step-by-Step
From the Student Data directory, open COMM09.XLS.
Increase the magnification of a worksheet.
|
Steps
|
Practice Data
|
|
1. Select the View menu.
The View menu appears.
|
Click View
|
|
2. Select the Zoom command.
The Zoom dialog box opens.
|
Click Zoom...
|
|
3. Under Magnification, select the desired option.
The Magnification option is selected.
|
Click  200% 200%
|
|
4. Select OK.
The Zoom dialog box closes and the magnification of the worksheet
increases accordingly.
|
Click OK
|
Change the magnification back to 100%.
d Discussion
You can decrease the magnification of
cells. Decreasing the magnification makes the cells appear smaller and allows
more cells to appear in the window. This option is useful when you want to view
a larger portion of the worksheet. For example, with a worksheet containing
annual sales, you may want to view the sales for the entire year, or you may
want to review the formatting or layout of the entire worksheet.
The default magnification is 100%. The smaller the magnification, the smaller the cells
appear. For example, with a magnification of 50%, the cells appear half as
large as with a magnification of 100%.

A worksheet zoomed to 75%
|
|
|
|
o
|
Changing the magnification affects the display only.
It does not affect printing.
|
|
|
|
|
o
|
You can also use the Zoom list on the Standard
toolbar to change the magnification.
|
|
|
|
C Procedures
|
1. Select the View menu.
|
|
2. Select the Zoom command.
|
|
3. Under Magnification, select the desired option.
|
|
4. Select OK.
|
f Step-by-Step
Decrease the magnification of a worksheet.
|
Steps
|
Practice Data
|
|
1. Select the View menu.
The View menu appears.
|
Click View
|
|
2. Select the Zoom command.
The Zoom dialog box opens.
|
Click Zoom...
|
|
3. Under Magnification, select the desired option.
The Magnification option is selected.
|
Click  75% 75%
|
|
4. Select OK.
The Zoom dialog box closes and the magnification of the worksheet
decreases accordingly.
|
Click OK
|
Change the magnification back to 100%.
d Discussion
You can magnify a selected range so
that its size adjusts as needed to fit the worksheet window. It is useful to zoom selections when you need to view all the
cells in a range at the same time. For example, with a worksheet containing
annual sales figures, you may want to zoom in on the numbers that make up the
annual sales.

A range zoomed to fit the screen
C Procedures
|
1. Select the range for which you want to change
the magnification.
|
|
2. Select the View menu.
|
|
3. Select the Zoom command.
|
|
4. Select the Fit Selection option.
|
|
5. Select OK.
|
f Step-by-Step
Change the magnification of a range to fit the screen.
|
Steps
|
Practice Data
|
|
1. Drag to select the range for which you want
to change the magnification.
The range is highlighted as you drag.
|
Drag A1:E7
|
|
2. Release the mouse button.
The range is selected.
|
Release the mouse button
|
|
3. Select the View menu.
The View menu appears.
|
Click View
|
|
4. Select the Zoom command.
The Zoom dialog box opens.
|
Click Zoom...
|
|
5. Select the Fit Selection option.
The option is selected.
|
Click  Fit Selection Fit Selection
|
|
6. Select OK.
The Zoom dialog box closes and the magnification of the range changes to
fit the screen.
|
Click OK
|
Change the magnification of the selection back to 100%.
Deselect the range.
d Discussion
You can view a worksheet without viewing screen elements such
as toolbars and title bars using the Full Screen view. This allows you
to display a large portion of a large worksheet. For example, you can
use Full Screen view to display as much of an annual worksheet as
possible without changing the magnification.

Full Screen view
|
|
|
|
o
|
When viewing the worksheet in Full Screen view,
a Full Screen toolbar appears. If you close the Full Screen toolbar,
you must select the Full Screen command from the View
menu to return to the Normal view.
|
|
|
|
C Procedures
|
1. Select the View menu.
|
|
2. Select the Full Screen command.
|
|
3. To return to Normal view, click the
Close Full Screen button on the Full Screen toolbar.
|
f Step-by-Step
Switch to Full Screen view to
view more of a worksheet.
|
Steps
|
Practice Data
|
|
1. Select the View menu.
The View menu appears.
|
Click View
|
|
2. Select the Full Screen command.
The worksheet appears in Full Screen view.
|
Click Full Screen
|
|
3. To return to Normal view, click the Close Full Screen
button on the Full Screen toolbar.
The worksheet appears in Normal view.
|
Click Close Full Screen
|
d Discussion
If you need to view two or more areas of a
large worksheet at the same time, you can split the workbook window into panes.
Panes display different areas of the same worksheet. You can use panes to view
different areas of the workbook that do not normally appear on the screen at
the same time. For example, in a large worksheet containing sales for many
regions, you can view the totals of each region in a separate pane.
You can split the workbook window into two or four panes. With
two panes, you can have either horizontal or vertical panes. With four panes,
the display is divided into four sections.
To split the window, you use the horizontal and vertical split
boxes. The horizontal split box is located at the top of the vertical scroll
bar. The vertical split box is located at the right end of the horizontal
scroll bar. When you drag the split boxes, a line appears in the worksheet
indicating where the split is located. You can drag the line to readjust the
size of the panes.
When the window is split into panes, you can use the scroll
bars to view different areas of the same worksheet. Horizontal panes have
separate vertical scroll bars and share the same horizontal scroll bar. As a
result, horizontal panes can scroll up and down independently but they scroll
left and right simultaneously. Vertical panes have separate horizontal scroll
bars and share the same vertical scroll bar. As a result, vertical panes can
scroll right and left independently but they scroll up and down simultaneously.
When you split the window into four panes, the vertical panes share a vertical
scroll bar and the horizontal panes share a horizontal scroll bar.

A window split into four panes
C Procedures
|
1. To split the workbook window into horizontal panes, position the
cell pointer in the row below the desired split.
|
|
2. Double-click the split box.
|
|
3. To view different areas of the worksheet in the horizontal
panes, click either vertical scroll bar.
|
|
4. To split the workbook window into vertical panes,
position the cell pointer in the column to the right of the desired split.
|
|
5. Double-click the vertical split box.
|
|
6. To view different areas of the worksheet in the vertical panes,
click either horizontal scroll bar.
|
f Step-by-Step
Split the window into four panes to view different areas of the
worksheet.
|
Steps
|
Practice Data
|
|
1. To split the workbook window into
horizontal panes, position the cell pointer in the row below the desired
split.
The cell is selected.
|
Click cell A9
|
|
2. Double-click the split box.
The worksheet window is split horizontally.
|
Double-click the horizontal split box
|
|
3. To view different areas of the worksheet in the horizontal
panes, click either vertical scroll bar.
The horizontal panes display different areas of the worksheet.
|
Click the lower pane vertical scroll bar  until the third quarter data appears until the third quarter data appears
|
|
4. To split the workbook window into vertical panes, position the
cell pointer in the column to the right of the desired split.
The cell is selected.
|
Click cell E4
|
|
5. Double-click the vertical split box.
The window is split vertically.
|
Double-click the vertical split box
|
|
6. To view different areas of the worksheet in the vertical panes,
click either horizontal scroll bar.
The vertical panes display different areas of the worksheet.
|
Click the right pane horizontal scroll bar  three times three times
|
d Discussion
You can remove the panes from a workbook window by
double-clicking the horizontal or vertical split bar. You can remove the panes
when you no longer need to view distant areas of the worksheet. For example,
after you have viewed the regional totals in a large sales worksheet, you may
want to view only the figures for one region.
C Procedures
|
1. To remove horizontal panes, double-click the horizontal split
bar.
|
|
2. To remove vertical panes, double-click the vertical split bar.
|
f Step-by-Step
Remove the panes in the workbook window.
|
Steps
|
Practice Data
|
|
1. To remove horizontal panes, double-click
the horizontal split bar.
The horizontal panes are removed.
|
Double-click the horizontal
split bar
|
|
2. To remove vertical panes, double-click the vertical split bar.
The vertical panes are removed.
|
Double-click the vertical split bar
|
d Discussion
Occasionally a worksheet is so large you cannot view the column
or row headings and all the data at the same time. When this happens, it is
difficult to view the headings for the data in the worksheet. For example, in a
worksheet containing sales figures for several hundred sales representatives,
you cannot view the column headings and the representatives at the bottom of
the list at the same time. To solve this problem, you can freeze worksheet
titles in panes. Freezing panes prevents the row and column headings from
scrolling out of view as you navigate the worksheet. Frozen panes are indicated
by a line below a row and a line to the right of a column.

Frozen row and column headings
C Procedures
|
1. To freeze both row and column headings, place the cell pointer
in the cell directly below the column headings you want to freeze
and to the right of the row headings you want to freeze.
|
|
2. Select the Window menu.
|
|
3. Select the Freeze Panes command.
|
f Step-by-Step
Freeze panes in a worksheet in order to view both the column
and row headings at the same time.
|
Steps
|
Practice Data
|
|
1. To freeze both row and column headings,
place the cell pointer in the cell directly below the column headings you
want to freeze and to the right of the row headings you want to freeze.
The cell is selected.
|
Click cell B3
|
|
2. Select the Window menu.
The Window menu appears.
|
Click Window
|
|
3. Select the Freeze Panes command.
The rows above and the columns to the left of the cell pointer are frozen.
|
Click Freeze Panes
|
Move to I24. Notice that rows 1 and 2 and column A do not
scroll.
d Discussion
After you have frozen headings in a large worksheet, you can
unfreeze the panes. Unfreezing removes the panes so that title rows
or columns are no longer frozen on the screen.
C Procedures
|
1. Select the Window menu.
|
|
2. Select the Unfreeze Panes command.
|
f Step-by-Step
Unfreeze panes in a worksheet so that the row
and column headings are no longer frozen.
|
Steps
|
Practice Data
|
|
1. Select the Window menu.
The Window menu appears.
|
Click Window
|
|
2. Select the Unfreeze Panes command.
The headings are no longer frozen.
|
Click Unfreeze Panes
|
Move to I24. Notice that the row and column headings are no
longer frozen.
Close COMM09.XLS.
e Task
Increase and decrease the magnification of a worksheet, change
the magnification of a selection, split the window, and freeze and remove
panes.
|
1. Open Region11.
|
|
2. Zoom the worksheet to 75% so that you can view more of it on the
screen.
|
|
3. Zoom the range A1:E11 to fit the selection.
|
|
4. Return the view to 100%.
|
|
5. Display the document in Full Screen view.
|
|
6. Return to Normal view.
|
|
7. Split the screen into two vertical panes so that you can view
both the Total Sales and the Percent of Total columns.
|
|
8. Remove the panes.
|
|
9. Freeze the row headings in column A and the column headings in
row 4.
|
|
10. Scroll to display the Avg. Sales and Percent of Total columns.
|
|
11. Unfreeze the panes.
|
|
12. Close the workbook without saving it.
|

In this lesson, you will
learn how to:
·
Use multiple worksheets
·
Navigate between worksheets
·
Select worksheets
·
Rename worksheets
·
Select multiple worksheets
·
Insert worksheets
·
Delete worksheets
·
Print selected worksheets
d Discussion
Workbook files can contain multiple worksheets. Using multiple
worksheets is a convenient way to manage related data in the same workbook. For
example, you can enter sales data for individual months, quarters, or regions
in separate worksheets. You also can create summary worksheets that add
numbers from each of the worksheets in a workbook. In addition, you can group
worksheets to apply consistent formatting, as well as to print all the
worksheets as a group.
By default, a new workbook contains three worksheets. The name
of each worksheet appears on a tab above the status bar. The default name is Sheet
followed by a number. You can change the name to indicate the type of
information on the worksheet (Expenses, for example). A workbook can
contain up to 255 worksheets. Worksheets can be moved and copied within the
current workbook.

Using multiple worksheets
|
|
|
|
o
|
To change the number of default worksheets, select the
General page in the Options dialog box.
|
|
|
|
d Discussion
You can display a worksheet by clicking its tab. However, by
default, only six worksheet tabs appear in the workbook window. If you have
more than six worksheets, you cannot see all the worksheet tabs at
one time. For example, in a workbook that contains worksheets for every month
of the year, the tabs for the last few months of the year would be hidden,
depending on how the months are named. If the worksheet tab you want to view is
not visible, you can use the tab scrolling buttons to display hidden tabs.
|
Button
|
Function
|
|

|
Displays the next worksheet tab to the right.
|
|

|
Displays the previous worksheet tab to the left.
|
|

|
Displays the last worksheet tab in the workbook.
|
|

|
Displays the first worksheet tab in the workbook.
|
|
|
|
|
o
|
You can drag the tab split box located to the left of
the horizontal scroll bar as desired to display more or fewer tabs. You can
double-click the tab split box to return the tab display to the default
number of tabs.
|
|
|
|
C Procedures
|
1. To view the next tab to the right, click the Next Tab button
 . .
|
|
2. To view the next tab to the left, click the Previous
Tab button  . .
|
|
3. To view the last worksheet tab, click the Last Tab button
 . .
|
|
4. To view the first worksheet tab, click the First Tab
button  . .
|
|
5. To view the contents of a worksheet, click the desired worksheet
tab.
|
f Step-by-Step
From the Student Data directory, open MONTH1.XLS.
Navigate worksheet tabs.
|
Steps
|
Practice Data
|
|
1. To view the next tab to the right, click
the Next Tab button.
The next tab to the right appears.
|
Click 
|
|
2. To view the next tab to the left, click the Previous Tab
button.
The next tab to the left appears.
|
Click 
|
|
3. To view the last worksheet tab, click the Last Tab
button.
The last worksheet tab appears.
|
Click 
|
|
4. To view the first worksheet tab, click the First Tab
button.
The first worksheet tab appears.
|
Click 
|
|
5. To view the contents of a worksheet, click the desired worksheet
tab.
The worksheet appears.
|
Click the February tab
|
d Discussion
You can select a worksheet at any time by displaying the sheet
list. The sheet list contains the name of all the worksheets in a workbook. It
is a convenient tool when using a workbook with a large number of worksheets.
For example, in an annual workbook containing monthly worksheets, you can use
the sheet list to quickly select and view the third month in each quarter, one
at a time.

The sheet list
C Procedures
|
1. Click the right mouse button on any tab scrolling
button.
|
|
2. Select the desired worksheet.
|
f Step-by-Step
Select a worksheet using the sheet list.
|
Steps
|
Practice Data
|
|
1. Click the right mouse button on any tab
scrolling button.
The sheet list appears.
|
Click the right mouse button on

|
|
2. Select the desired worksheet.
The worksheet appears.
|
Click Sheet 11
|
d Discussion
You can replace the default worksheet names with descriptive
names. For example, a worksheet containing January sales figures can be named January.
Worksheet names can be up to 31 characters long, but cannot include
colons (:), slash marks (/), backslashes (\), question marks (?), or asterisks
(*). In addition, the name cannot be enclosed in square brackets ([]). Each
worksheet name in a workbook must be unique.
C Procedures
|
1. Double-click the worksheet tab you want to rename.
|
|
2. Type the desired worksheet name.
|
|
3. Press [Enter].
|
f Step-by-Step
Rename a worksheet.
Go to Sheet 11, if necessary.
|
Steps
|
Practice Data
|
|
1. Double-click the worksheet tab you want to
rename.
The worksheet name is selected.
|
Double-click the Sheet11 tab
|
|
2. Type the desired worksheet name.
The worksheet name appears on the tab.
|
Type November
|
|
3. Press [Enter].
The worksheet name changes.
|
Press [Enter]
|
Rename Sheet 12 to December.
d Discussion
Before you can apply a command to a worksheet, you must select
it. If you select multiple worksheets, you can
apply a command to all the worksheets at the same time. For example, you can
copy, move, delete and print all the worksheets in a selected group at the same
time. In addition, when you insert new sheets, the number of sheets you select
determines the number of sheets inserted.

Selecting multiple worksheets
|
|
|
|
o
|
To deselect a selected worksheet without deselecting
the group, hold the [Ctrl] key and click the worksheet tab, and release
the [Ctrl] key.
|
|
|
|
|
o
|
When multiple worksheets are selected, the word [Group]
appears next to the title of the workbook.
|
|
|
|
|
o
|
To deselect worksheet tabs, you click an unselected
worksheet tab.
|
|
|
|
C Procedures
|
1. Click the tab of the first worksheet you want to select.
|
|
2. Hold [Shift], click the tab of the last adjacent
worksheet you want to select, and release [Shift].
|
|
3. To add non-adjacent worksheets to the group, hold [Ctrl],
click the tab of the worksheet you want to add, and release [Ctrl].
|
f Step-by-Step
Select multiple worksheets.
|
Steps
|
Practice Data
|
|
1. Click the tab of the first worksheet you
want to select.
The worksheet appears and the tab is selected.
|
Scroll as necessary and click
the January tab
|
|
2. Hold [Shift], click the tab of the last adjacent
worksheet you want to select, and release [Shift].
The worksheet tabs are selected.
|
Hold [Shift], click the March tab, and
release [Shift]
|
|
3. To add non-adjacent worksheets to the group, hold [Ctrl],
click the tab of the worksheet you want to add, and release [Ctrl].
The worksheet tab is selected.
|
Hold [Ctrl], click the June tab, and
release [Ctrl]
|
Deselect the worksheet tabs by clicking the unselected April
tab.
d Discussion
You can insert new worksheets into a workbook. For example, in
a workbook containing worksheets for each month of the year, you can add
worksheets for each quarter of the year. New worksheets are inserted to the left of
the current worksheet. Excel gives new worksheets a default worksheet name,
which you can change, if desired.

Inserting worksheets
|
|
|
|
o
|
If you select multiple adjacent worksheets, multiple
worksheets are inserted. You cannot insert non-adjacent worksheets.
|
|
|
|
C Procedures
|
1. Select the worksheet to the right of which you want to insert
a new worksheet.
|
|
2. Select the Insert menu.
|
|
3. Select the Worksheet command.
|
f Step-by-Step
Insert a worksheet before another worksheet.
|
Steps
|
Practice Data
|
|
1. Select the worksheet to the right of which
you want to insert a new worksheet.
The worksheet is selected.
|
Click the April tab
|
|
2. Select the Insert menu.
The Insert menu appears.
|
Click Insert
|
|
3. Select the Worksheet command.
The inserted worksheet appears to the left of the current worksheet.
|
Click Worksheet
|
Rename the new worksheet Qtr 1.
d Discussion
You can delete unwanted worksheets. For example, you can delete
a worksheet used for temporary calculations. When you delete a worksheet, the
entire worksheet and the data it holds are permanently removed from the workbook.

Deleting worksheets
|
|
|
|
o
|
If you select multiple worksheets, multiple worksheets
are deleted.
|
|
|
|
C Procedures
|
1. Click the right mouse button on the tab of the
worksheet you want to delete.
|
|
2. Select the Delete command.
|
|
3. Select OK.
|
f Step-by-Step
Delete a worksheet.
Scroll to display the last worksheet in the workbook.
|
Steps
|
Practice Data
|
|
1. Click the right mouse button on the tab of
the worksheet you want to delete.
A shortcut menu appears.
|
Click the right mouse button on
the Annual tab
|
|
2. Select the Delete command.
A Microsoft Excel message box opens.
|
Click Delete
|
|
3. Select OK.
The Microsoft Excel message box closes and the worksheet is deleted.
|
Click OK
|
d Discussion
You can print some or all the worksheets in a workbook. For
example, in an annual workbook containing monthly
worksheets, you may want to print only the worksheets for the most recent
months.
When printing one or more worksheets instead of the entire
workbook, you must select the worksheets you want to print prior to opening the
Print dialog box.

Print selected worksheets
|
|
|
|
o
|
You can print the entire workbook by selecting the Entire
Workbook option in the Print dialog box.
|
|
|
|
C Procedures
|
1. Select the first worksheet you want to print.
|
|
2. Hold [Shift], click the tab of the last adjacent
worksheet you want to print, and release [Shift].
|
|
3. Select the File menu.
|
|
4. Select the Print command.
|
|
5. Select the Active Sheet(s) option, if necessary.
|
|
6. Select OK.
|
f Step-by-Step
Print selected worksheets.
|
Steps
|
Practice Data
|
|
1. Select the first worksheet you want to
print.
The worksheet is selected.
|
Click the January tab
|
|
2. Hold [Shift], click the tab of the last adjacent
worksheet you want to print, and release [Shift].
The worksheets are selected.
|
Hold [Shift], click the March tab, and
release [Shift]
|
|
3. Select the File menu.
The File menu appears.
|
Click File
|
|
4. Select the Print command.
The Print dialog box opens.
|
Click Print...
|
|
5. Select the Active Sheet(s) option, if necessary.
The option is selected.
|
Click  Active Sheet(s), if necessary Active Sheet(s), if necessary
|
|
6. Select OK.
The Print dialog box closes and Excel prints the selected worksheets.
|
Click OK
|
Close MONTH1.XLS.
e Task
Insert and rename new worksheets for two regions. In addition,
print two existing worksheets and delete a worksheet.
|
1. Open Region12.
|
|
2. Display the Totals worksheet.
|
|
3. Select the Totals and By Week worksheets.
|
|
4. Keeping both sheets selected, insert two new worksheets.
|
|
5. Rename the first inserted worksheet NorthWest.
|
|
6. Rename the second inserted worksheet SouthWest.
|
|
7. Delete the By Week worksheet.
|
|
8. Print the NorthEast and SouthEast worksheets.
|
|
9. Close the workbook without saving it.
|

In this lesson, you will
learn how to:
·
Copy worksheets
·
Move worksheets
·
Use grouped worksheets
·
Move data between sheets
·
Copy data between sheets
·
Create 3-D formulas
·
Use functions in worksheets
d Discussion
You can copy a worksheet and its contents to a new location.
This option is useful after you have designed a framework for a worksheet
(e.g., monthly column headings, row headings, formatting, and formulas) and you
want to use that framework for
several similarly structured worksheets.
When you copy a worksheet, the new copy is given the name of
the original worksheet followed by a sequential number. You can also copy
multiple grouped worksheets. After the worksheets have been copied, they are
automatically ungrouped.

A copied worksheets
|
|
|
|
o
|
When copying multiple worksheets, you must drag the
tab for the first worksheet in the group, which appears in bold type.
Otherwise, if you hold the [Ctrl] key and click the tab of another
worksheet in the selected group, that worksheet is deselected.
|
|
|
|
|
o
|
If you cannot view the destination location for the
copied worksheet, drag the copy beyond the edge of the displayed worksheet
tabs. The tabs scroll to display additional worksheets.
|
|
|
|
C Procedures
|
1. Select the tab of each worksheet you want to copy.
|
|
2. Hold [Ctrl] and drag the selected worksheet tab(s) to the
desired location.
|
|
3. When the indicator arrow is in the desired position, release the
mouse button and release [Ctrl].
|
f Step-by-Step
From the Student Data directory, open MONTH2.XLS.
Copy a worksheet.
|
Steps
|
Practice Data
|
|
1. Select the tab of each worksheet you want
to copy.
The worksheet tab(s) are selected.
|
Scroll as necessary and click
the Qtr 3 tab
|
|
2. Hold [Ctrl] and drag the selected worksheet tab(s) to the
desired location.
A worksheet with a plus sign (+) appears as you drag.
|
Hold [Ctrl] and drag the Qtr 3 tab to
the right of the December tab
|
|
3. When the indicator arrow is in the desired position, release the
mouse button and release [Ctrl].
A copy of the worksheet(s) appear in the new location.
|
When the indicator arrow is to the right of the December
tab, release the mouse button and release [Ctrl]
|
Rename the copied worksheet Qtr 4.
d Discussion
You can move a worksheet to a new location in a workbook and
still have it retain the same name and contents. Moving worksheets allows you
to rearrange them or to place new worksheets in a desired location in the workbook. For
example, in an annual workbook containing monthly worksheets, you may want to
reorder the worksheets so that the first, second, and third months in each
quarter are adjacent.
You can also move multiple grouped worksheets. After multiple
grouped worksheets have been moved, they are automatically ungrouped.
C Procedures
|
1. Select the tab of each worksheet you want to move.
|
|
2. Drag the selected worksheet tabs to the desired location.
|
|
3. When the indicator arrow is in the desired location, release the
mouse button.
|
f Step-by-Step
Move a worksheet.
Display the Annual worksheet tab.
|
Steps
|
Practice Data
|
|
1. Select the tab of each worksheet you want
to move.
The worksheet tab(s) are selected.
|
Click the Annual tab
|
|
2. Drag the selected worksheet tab(s) to the desired location.
A worksheet with a plus sign (+) appears as you drag and the worksheet
tabs scroll.
|
Drag the Annual tab to the left end of the
horizontal scroll bar
|
|
3. When the indicator arrow is in the desired location, release the
mouse button.
The worksheet(s) appear in the new location.
|
When the indicator arrow is to the right of the Qtr
4 worksheet, release the mouse button
|
d Discussion
When multiple worksheets are selected, the worksheets are
grouped. If you type, edit, create formulas, or format entries in one of the grouped
worksheets, entries in the same cell in all the grouped worksheets change.
Grouping is useful when you want to create the same structure
and appearance in all the worksheets in a workbook. For example, when creating
monthly worksheets in a workbook, you can group the worksheets so that you can
enter and format all the column headings, row headings, and formulas in the
group at one time.
C Procedures
|
1. Select the first worksheet you want to group.
|
|
2. Hold [Ctrl], click the tab of any additional worksheets
you want to add to the group, and release [Ctrl].
|
|
3. Select the cell in which you want to enter information.
|
|
4. Type the desired entry.
|
|
5. Press [Enter].
|
|
6. Select the cell to which you want to apply formatting.
|
|
7. Apply the desired formatting.
|
f Step-by-Step
Group worksheets and edit and format entries in the worksheets in
the group.
Scroll as necessary to display the Qtr 1 and Qtr 2
tabs.
|
Steps
|
Practice Data
|
|
1. Select the first worksheet you want to
group.
The worksheet is selected.
|
Click the Qtr 1 tab
|
|
2. Hold [Ctrl], click the tab of any additional worksheets
you want to add to the group, and release [Ctrl].
The worksheets are selected.
|
Hold [Ctrl], click the Qtr 2 tab, and
release [Ctrl]
|
|
3. Select the cell in which you want to enter information.
The cell is selected.
|
Click cell A1, if necessary
|
|
4. Type the desired entry.
The entry appears in the cell and on the formula bar.
|
Type WSG Quarterly Report
|
|
5. Press [Enter].
The text, numbers, or formulas are entered into the corresponding cell in
each of the selected worksheets.
|
Press [Enter]
|
|
6. Select the cell to which you want to apply formatting.
The cell is selected.
|
Click cell A1
|
|
7. Apply the desired formatting.
The corresponding cell is formatted in each of the selected worksheets.
|
Click 
|
Click the June tab to deselect the worksheets. View the Qtr
1 and the Qtr 2 worksheets to verify the changes.
Replace the text in cell A1 in the Qtr 3 and Qtr 4
worksheets with WSG Quarterly Report. Ungroup the worksheets.
d Discussion
If a worksheet contains data that can be better utilized on another
worksheet, you can move data from one worksheet to the other.
The most common reason for
moving data is to break up a single large worksheet into several smaller ones.
For example, if a workbook consists of one large worksheet containing data for
each month of the year, you can move the monthly data to separate worksheets.
|
|
|
|
o
|
You can move data between worksheets using
drag-and-drop editing by holding the [Alt] key as you drag.
|
|
|
|
C Procedures
|
1. Select the worksheet containing the data you want to move.
|
|
2. Select the range you want to move.
|
|
3. Click the Cut button  . .
|
|
4. Select the destination worksheet.
|
|
5. Select the first cell in the paste range.
|
|
6. Click the Paste
button  . .
|
f Step-by-Step
Move data from one worksheet to
its own worksheet.
|
Steps
|
Practice Data
|
|
1. Select the worksheet containing the data
you want to move.
The worksheet appears.
|
Click the October tab
|
|
2. Drag to select the range you want to move.
The range is highlighted as you drag.
|
Drag A11:I16
|
|
3. Release the mouse button.
The range is selected.
|
Release the mouse button
|
|
4. Click the Cut button.
A dashed border appears around the selected range.
|
Click 
|
|
5. Select the destination worksheet.
The worksheet appears.
|
Click the November tab
|
|
6. Select the first cell in the paste range.
The cell is selected.
|
Click cell A2
|
|
7. Click the Paste button.
The range appears in the destination worksheet.
|
Click 
|
Select the December data in the range A20:I25 on the October
worksheet and move it to cell A2 in the December worksheet. On the October
worksheet, delete the headings in A10 and A19.
d Discussion
You can copy data between worksheets using the same techniques
you use to copy and move data within a worksheet. For example, if one worksheet
contains information you want to include on each
worksheet in the workbook, you can copy the information as needed.
When copying data between worksheets, formulas update to the
new locations just as they do when you copy information within a worksheet.
|
|
|
|
o
|
You can also copy data to another worksheet by
selecting the data, pressing the [Ctrl] and [Alt] keys, and
dragging the selection to the desired worksheet and location.
|
|
|
|
C Procedures
|
1. Select the worksheet containing the data you want to copy.
|
|
2. Select the range you want to copy.
|
|
3. Click the Copy button  . .
|
|
4. Select the destination worksheet.
|
|
5. Select the first cell in the paste range.
|
|
6. Click the Paste
button  . .
|
f Step-by-Step
Copy data from one worksheet
to another worksheet.
|
Steps
|
Practice Data
|
|
1. Select the worksheet containing the data
you want to copy.
The worksheet appears.
|
Click the August tab
|
|
2. Drag to select the range you want to copy.
The cells are highlighted as you drag.
|
Drag H2: I7
|
|
3. Release the mouse button.
The cells are selected.
|
Release the mouse button
|
|
4. Click the Copy button.
A blinking dashed border appears around the selection.
|
Click 
|
|
5. Select the destination worksheet.
The corresponding worksheet appears.
|
Click the September tab
|
|
6. Select the first cell in the paste range.
The cell is selected.
|
Click cell H2
|
|
7. Click the Paste button.
The copied cells appear in the paste range.
|
Click 
|
d Discussion
You can create formulas on one worksheet that refer to numbers
on other worksheets in the same or different workbooks. You can use 3-D
formulas to summarize data from all the worksheets in a workbook. For example, you
can create quarterly worksheets in an annual workbook that summarize data from
each month. Like all formulas, 3-D formulas update whenever the data used in
the formula changes.
In 3-D formulas, the worksheet names are separated from the
cell address by an exclamation point (!). For example, the following
formula adds the number in cell E3 in each of four quarterly worksheets:
=Qtr 1!E3+Qtr 2!E3+Qtr 3!E3+Qtr
4!E3

Creating a 3-D formula
C Procedures
|
1. Select the worksheet in which you
want to enter the formula.
|
|
2. Select the cell in which you want to enter the formula.
|
|
3. Type =.
|
|
4. Select the worksheet containing information you want to use in
the formula.
|
|
5. Select the cell containing the information you want to use in
the formula.
|
|
6. Type the desired mathematical operator.
|
|
7. Select the worksheet containing the next piece of information
you want to use in the formula.
|
|
8. Select the cell containing the information you want to use in
the formula.
|
|
9. Continue adding mathematical operators and cell addresses as
needed to complete the formula.
|
|
10. Press [Enter].
|
f Step-by-Step
Create 3-D formulas in a worksheet.
|
Steps
|
Practice Data
|
|
1. Select the worksheet in which you want to
enter the formula.
The worksheet is selected.
|
Click the Qtr 1 tab
|
|
2. Select the cell in which you want to enter the formula.
The cell is selected.
|
Click cell B3
|
|
3. Type =.
An equal sign (=) appears on the cell and in the formula bar.
|
Type =
|
|
4. Select the worksheet containing information you want to use in
the formula.
The worksheet name appears on the formula bar followed by an exclamation
point (!) and the worksheet appears.
|
Click the January worksheet
|
|
5. Select the cell containing the information you want to use in
the formula.
The cell address appears after the worksheet name in the formula.
|
Click cell E3
|
|
6. Type the desired mathematical operator.
The operator appears in the formula.
|
Type +
|
|
7. Select the worksheet containing the next piece of information
you want to use in the formula.
The worksheet name appears in the formula and the worksheet appears.
|
Click the February worksheet
|
|
8. Select the cell containing the information you want to use in
the formula.
The cell address appears after the worksheet name in the formula.
|
Click cell E3
|
|
9. Continue adding mathematical operators and cell addresses as
needed to complete the formula.
The formula is completed.
|
Complete the formula as indicated below
|
|
10. Press [Enter].
The result of the formula appears in the cell containing the formula.
|
Press [Enter]
|
Type a plus sign (+) and then click cell E3 on the March sheet to
complete the formula. The completed formula should be:
=January!E3+February!E3+March!E3.
Copy the formula to the range B4:B6.
d Discussion
You can perform calculations on cells in multiple, adjacent
worksheets by creating functions that use 3-D ranges. For example, you can use
a 3-D range to sum the monthly totals that appear at the same cell address in
multiple adjacent worksheets. Since the function refers to the same cell
address in adjacent worksheets, you can group the worksheets and then create the function. This technique can
save time in creating functions such as SUM and AVERAGE.
In formulas that contain 3-D ranges, the worksheet names are
separated from the cell address by an exclamation point (!). For example, in
the following formula, the SUM function adds the numbers in cell F3 in
four quarterly worksheets:
=SUM(Qtr 1:Qtr 4!F3)

Using functions in worksheets
C Procedures
|
1. Select the worksheet in which you want to enter the function.
|
|
2. Select the cell in which you want to enter the formula.
|
|
3. Type =, followed by the function name and an open
parenthesis ( ( ).
|
|
4. Select the first worksheet containing the information you want
to use in the function.
|
|
5. Select the cell that contains the information you want to use in
the function.
|
|
6. Hold [Shift], select the last worksheet you want to
include in the 3-D range, and
release [Shift].
|
|
7. Type the closing parenthesis ( ) ).
|
|
8. Press [Enter].
|
f Step-by-Step
Use a function in a worksheet.
|
Steps
|
Practice Data
|
|
1. Select the worksheet in which you want to
enter the function.
The worksheet appears.
|
Click the Qtr 1 tab, if
necessary
|
|
2. Select the cell in which you want to enter the formula.
The cell is selected.
|
Click cell C3
|
|
3. Type =, followed by the function name and an open
parenthesis ( ( ).
An equal sign (=) and the function name appear in the cell
and on the formula bar.
|
Type =sum(
|
|
4. Select the first worksheet containing the information you want
to use in the function.
The worksheet name appears on the formula bar followed by an exclamation
point (!) and the worksheet appears.
|
Click the January worksheet
|
|
5. Select the cell that contains the information you want to use in
the function.
The cell address appears after the worksheet name in the formula.
|
Click cell F3
|
|
6. Hold [Shift], select the last worksheet you want to
include in the 3-D range, and release [Shift].
The 3-D range appears in the formula.
|
Hold [Shift], click the March tab, and
release [Shift]
|
|
7. Type the closing parenthesis ( ) ).
The closing parenthesis ( ) ) appears in the formula.
|
Type )
|
|
8. Press [Enter].
The result of the formula appears in the cell containing the formula.
|
Press [Enter]
|
Copy the formula to the range C4:C6.
Close MONTH2.XLS.
e Task
Complete a workbook by copying and moving data. Then, group
worksheets in order to format them at one time. Copy and move a worksheet.
Create 3-D formulas to add weekly totals to a summary sheet.
|
1. Open Region13.
|
|
2. Select the NorthEast worksheet. Move the data in A12:E20
to cell A1 in the SouthEast worksheet.
|
|
3. Copy the title in cell A1 in the NorthEast worksheet to
cell A1 in the Central worksheet.
|
|
4. Group the worksheets NorthEast through By Week.
|
|
5. Display the NorthEast worksheet. Select A1:E9. Change the
font to Arial. Deselect the range.
|
|
6. Ungroup the worksheets and view the change.
|
|
7. Copy the NorthEast worksheet and place it after the Totals
worksheet. Rename the copy Expenses.
|
|
8. Display the By Week worksheet.
|
|
9. In cell B5, create a formula that adds the total sales of all
five regions for Jan, Week 1. The values are located in cell B5
on each of the five regional worksheets. (The answer should be 41,325). Copy
the formula to B6:B8.
|
|
10. In cell C5, use a 3-D =SUM() function to add the values in
cell C5 on each of the five regional worksheets. (The answer should be
42,435). Copy the function to C5:D8.
|
|
11. Close all open files without saving them.
|

In this lesson, you will
learn how to:
·
Use Paste Special
·
Copy formats between sheets
·
Copy values between sheets
·
Copy formulas between sheets
·
Perform mathematical operations
d Discussion
When you copy the contents of a cell or a range of cells to the
Windows Clipboard, any formatting that has been applied is copied as well as
the cell contents. When you subsequently paste the contents of the Clipboard to
a new location, an exact copy of both the contents and the formatting is
pasted.
There may be times when you want to paste only certain aspects
of the copied cells (such as formulas, values, or formats). For example, you
may want to copy the formats of an entire worksheet to another worksheet but
not the data or values. The Paste Special command allows you to specify
what you want to paste into the new
location. You can paste all cell attributes or only selected ones. In addition,
you can combine the values of the copied cells with the values of existing
cells in the pasted area.

Using Paste Special
d Discussion
Once you have formatted a worksheet with the desired fonts,
colors, numeric styles, and borders, you can use the Paste Special command
to copy all the formats at one time to another worksheet. This option gives all
the worksheets a consistent look. For example, if an annual sales workbook contains
monthly worksheets, you can format the data in the first worksheet and then
copy the formats to the other worksheets in the workbook.

Copying formats between worksheets
C Procedures
|
1. Select the worksheet containing the formats you want to copy.
|
|
2. Select the range containing the formats you want to copy.
|
|
3. Click the Copy button  . .
|
|
4. Select the worksheet to which you want to copy the formats.
|
|
5. Select the cell in the upper left corner of the paste range.
|
|
6. Select the Edit menu.
|
|
7. Select the Paste Special command.
|
|
8. Under Paste, select the Formats option.
|
|
9. Select OK.
|
f Step-by-Step
From the Student Data directory, open ADDSAL1.XLS.
Copy formats from one worksheet to another
worksheet.
|
Steps
|
Practice Data
|
|
1. Select the worksheet containing the formats
you want to copy.
The worksheet appears.
|
Click the Qtr 3 tab
|
|
2. Drag to select the range containing the formats you want to
copy.
The range is highlighted as you drag.
|
Drag A1:I7
|
|
3. Release the mouse button.
The range is selected.
|
Release the mouse button
|
|
4. Click the Copy button.
A blinking marquee appears around the selection.
|
Click 
|
|
5. Select the worksheet to which you want to copy the formats.
The worksheet appears.
|
Click the Qtr 4 tab
|
|
6. Select the cell in the upper left corner of the paste range.
The cell is selected.
|
Click cell A1
|
|
7. Select the Edit menu.
The Edit menu appears.
|
Click Edit
|
|
8. Select the Paste Special command.
The Paste Special dialog box opens.
|
Click Paste Special...
|
|
9. Under Paste, select the Formats option.
The option is selected.
|
Click  Formats Formats
|
|
10. Select OK.
The Paste Special dialog box closes and the formats are applied to the
worksheet.
|
Click OK
|
d Discussion
There may be times when you want to copy the results of a
formula but not the formula itself. For example, you may need to copy the
quarterly totals to a summary worksheet. In the quarterly worksheets, each quarterly
total is the result of a formula. In the summary worksheet, however, you want
to paste only the result of the formula, not the formula itself. To perform
this task, you can use the Values option in the Paste Special dialog
box.

Copying values between worksheets
C Procedures
|
1. Select the worksheet containing the values you want
to copy.
|
|
2. Select the range containing the values you want to copy.
|
|
3. Click the Copy button  . .
|
|
4. Select the worksheet in which you want to paste the values.
|
|
5. Select the cell in the upper left corner of the paste range.
|
|
6. Select the Edit menu.
|
|
7. Select the Paste Special command.
|
|
8. Under Paste, select the Values option.
|
|
9. Select OK.
|
f Step-by-Step
Copy the values from one worksheet to another worksheet.
|
Steps
|
Practice Data
|
|
1. Select the worksheet containing the values
you want to copy.
The worksheet appears.
|
Click the Qtr 1 tab
|
|
2. Drag to select the range containing the values you want to copy.
The range is highlighted as you drag.
|
Drag E7:G7
|
|
3. Release the mouse button.
The range is selected.
|
Release the mouse button
|
|
4. Click the Copy button.
A blinking marquee appears around the selection.
|
Click 
|
|
5. Select the worksheet in which you want to paste the values.
The worksheet appears.
|
Click the Annual tab
|
|
6. Select the cell in the upper left corner of the paste range.
The cell is selected.
|
Click cell B3
|
|
7. Select the Edit menu.
The Edit menu appears.
|
Click Edit
|
|
8. Select the Paste Special command.
The Paste Special dialog box opens.
|
Click Paste Special...
|
|
9. Under Paste, select the Values option.
The option is selected.
|
Click  Values Values
|
|
10. Select OK.
The Paste Special dialog box closes and the values appear in the paste
range.
|
Click OK
|
Copy the range E7:G7 from the Qtr 2, Qtr 3, and Qtr
4 worksheets to the corresponding cells in the Annual worksheet.
d Discussion
You can paste just the formula from the Windows Clipboard. This
option is useful if you do not want the copied formats to be pasted to the new
location, or you do not want to overwrite the formatting already existing in
the range to which you are pasting.
When you paste a formula, the relative cell references in
the formula adjust to the new location. Absolute cell references, however, do
not adjust, but always refer to the same cell address.

Copying formulas between worksheets
C Procedures
|
1. Select the worksheet containing the formulas you want to copy.
|
|
2. Select the range containing the formulas you want to copy.
|
|
3. Click the Copy button  . .
|
|
4. Select the worksheet into which you want to paste the formulas.
|
|
5. Select the upper left corner of the paste range.
|
|
6. Select the Edit menu.
|
|
7. Select the Paste Special command.
|
|
8. Under Paste, select the Formulas option.
|
|
9. Select OK.
|
f Step-by-Step
Copy formulas from one worksheet to another
worksheet.
|
Steps
|
Practice Data
|
|
1. Select the worksheet containing the
formulas you want to copy.
The worksheet appears.
|
Click the Qtr 1 tab
|
|
2. Drag to select the range containing the formulas you want to
copy.
The range is highlighted as you drag.
|
Drag E7:G7
|
|
3. Release the mouse button.
The range is selected.
|
Release the mouse button
|
|
4. Click the Copy button.
A blinking marquee appears around the range.
|
Click 
|
|
5. Select the worksheet into which you want to paste the formulas.
The worksheet appears.
|
Click the Annual tab
|
|
6. Select the upper left corner of the paste range.
The range is selected.
|
Click cell B7
|
|
7. Select the Edit menu.
The Edit menu appears.
|
Click Edit
|
|
8. Select the Paste Special command.
The Paste Special dialog box opens.
|
Click Paste Special...
|
|
9. Under Paste, select the Formulas option.
The option is selected.
|
Click  Formulas Formulas
|
|
10. Select OK.
The Paste Special dialog box closes and the formula appears in the paste
range.
|
Click OK
|
d Discussion
You can use the Paste Special command to perform
mathematical operations. When you paste values or formulas, you can add to,
subtract from, multiply by, or divide by the existing values. This option is a
good way to consolidate figures.
For example, in an annual workbook, you can create an annual total that
consolidates the numbers from all the quarterly worksheets.

Adding values
|
|
|
|
o
|
Unlike formulas, the consolidated figures do not
update automatically.
|
|
|
|
C Procedures
|
1. Select the worksheet containing the values or formulas you want to copy.
|
|
2. Select the range you want to copy.
|
|
3. Click the Copy button  . .
|
|
4. Select the worksheet into which you want to paste the values or
formulas.
|
|
5. Select the upper left corner of the paste range.
|
|
6. Select the Edit menu.
|
|
7. Select the Paste Special command.
|
|
8. Under Paste, select the Values option.
|
|
9. Select OK.
|
|
10. Select the worksheet containing the values you want to add to
those in the paste area.
|
|
11. Select the range you want to copy.
|
|
12. Click the Copy button  . .
|
|
13. Select the worksheet in which you want to paste and add the
values or formulas.
|
|
14. Select the paste range.
|
|
15. Select the Edit menu.
|
|
16. Select the Paste Special command.
|
|
17. Under Paste, select the Values option.
|
|
18. Under Operation, select the Add option.
|
|
19. Select OK.
|
f Step-by-Step
Perform a mathematical operation using the Paste Special command.
|
Steps
|
Practice Data
|
|
1. Select the worksheet containing the values
or formulas you want to copy.
The worksheet appears.
|
Click the Qtr 1 tab
|
|
2. Drag to select the range you want to copy.
The range is highlighted as you drag.
|
Drag G3:G6
|
|
3. Release the mouse button.
The range is selected.
|
Release the mouse button
|
|
4. Click the Copy button.
A blinking marquee appears around the selection .
|
Click 
|
|
5. Select the worksheet in which you want to paste the values or
formulas.
The worksheet appears.
|
Click the By Rep tab
|
|
6. Select the upper left corner of the paste range.
The cell is selected.
|
Click cell C3
|
|
7. Select the Edit menu.
The Edit menu appears.
|
Click Edit
|
|
8. Select the Paste Special command.
The Paste Special dialog box opens.
|
Click Paste Special...
|
|
9. Under Paste, select the Values option.
The option is selected.
|
Click  Values Values
|
|
10. Select OK.
The Paste Special dialog box closes and the values are pasted in the
worksheet.
|
Click OK
|
|
11. Select the worksheet containing the values you want to add to
those in the paste area.
The worksheet appears.
|
Click the Qtr 2 tab
|
|
12. Drag to select the range you want to copy.
The range is highlighted as you drag.
|
Drag G3:G6
|
|
13. Release the mouse button.
The range is selected.
|
Release the mouse button
|
|
14. Click the Copy button.
A blinking marquee appears around the selection .
|
Click 
|
|
15. Select the worksheet in which you want to paste and add the
values or formulas.
The worksheet appears.
|
Click the By Rep tab
|
|
16. Select the paste range.
The range is selected.
|
Click cell C3
|
|
17. Select the Edit menu.
The Edit menu appears.
|
Click Edit
|
|
18. Select the Paste Special command.
The Paste Special dialog box opens.
|
Click Paste Special...
|
|
19. Under Paste, select the Values option.
The option is selected.
|
Click  Values Values
|
|
20. Under Operation, select the Add option.
The option is selected.
|
Click  Add Add
|
|
21. Select OK.
The Paste Special dialog box closes and the values are added to the
existing values in the paste range.
|
Click OK
|
Add the values in G3:G6 on the Qtr 3 and Qtr 4 worksheets
to the paste range.
Close ADDSAL1.XLS.
e Task
Use the Paste Special command to copy formats, values,
and formulas. In addition, use the Paste Special command to add values.
|
1. Open Region16.
|
|
2. Copy A1:E9 in the NorthEast worksheet.
|
|
3. Paste the formats only to cell A1 on the Totals worksheet.
|
|
4. Copy B9:D9 on the NorthEast worksheet.
|
|
5. Paste the values only to B5:D5 on the Totals worksheet.
|
|
6. Copy B9:D9 on the SouthEast worksheet.
|
|
7. Paste the values only to B6:D6 on the Totals worksheet.
|
|
8. Copy B9:D9 on the Central worksheet.
|
|
9. Paste the values only to B7:D7 on the Totals worksheet.
|
|
10. Copy cell E5 on the Central worksheet.
|
|
11. Paste the formula only to E5:E7 on the Totals worksheet.
|
|
12. Copy D5:D8 on the NorthEast worksheet.
|
|
13. Paste the values only to D5:D8 on the By Week worksheet.
|
|
14. Copy D5:D8 on the SouthEast worksheet.
|
|
15. Paste and add the values to D5:D8 on the By Week
worksheet.
|
|
16. Repeat steps 14 and 15 for the
Central worksheet.
|
|
17. Close the workbook without saving it.
|

In this lesson, you will
learn how to:
·
Use range names
·
Jump to a named range
·
Assign names
·
Use range names in formulas
·
Create names from headings
·
Apply range names
·
Delete range names
·
Use names in 3-D formulas
·
Name 3-D ranges
·
Reference 3-D range names
d Discussion
You can assign a name to a cell or a range in a worksheet.
Once a name has been assigned, the name can be used in any instance where you
can use a cell address. For example, you can use names for ranges in dialog
boxes and formulas.
Advantages to using names instead of cell addresses include:
|
1. Names reduce the chance of error in formulas. It is easy to
recognize if the name EXPENSES is typed incorrectly. If a cell or
range address is typed incorrectly, it is harder to detect.
|
|
2. Names adapt to changes within a range (for example, when rows
and columns are added to or removed from the range).
|
|
3. Names are easy to recognize and maintain in formulas. For
example, the formula =TOTALSALES-EXPENSES is easier to understand than
the formula =E3-F3.
|
|
4. You can easily move the cell pointer to a named cell or range
using the Name box.
|
|
5. Names created in one worksheet are available to all other
worksheets in the workbook.
|
|
6. Names can refer to non-contiguous ranges or to ranges that
contain blank cells, columns, or rows.
|
|
7. Names are absolute. If you use a range name in a formula, the
formula always refers to that range even if you copy or move the formula.
|
You can use names to refer to cells, ranges, multiple ranges,
and ranges in other worksheets.
d Discussion
You can use a name to move quickly to a cell or a range. Since
a name assigned in a worksheet is available in all worksheets in the workbook,
you can use names to move easily between the worksheets. For example, in a
workbook containing worksheets for
different products, you can quickly jump to the desired product worksheet using
the name assigned to it.
You use the Name box to jump to a named range. The Name
box is located at the left end of the formula bar and displays all the assigned
names in a workbook. When you choose a name from the Name box, the cell
pointer appears in the first cell of the range and the entire range is
selected.

Jumping to a named range
|
|
|
|
o
|
If the formula bar is not displayed, you can use the View
menu to view it.
|
|
|
|
C Procedures
|
1. Click the Name arrow on the formula bar.
|
|
2. Select the name of the desired range.
|
f Step-by-Step
From the Student Data directory, open NAME1.XLS.
Jump to the named range.
|
Steps
|
Practice Data
|
|
1. Click the Name arrow on the formula
bar.
A list of named ranges appears.
|
Click Name 
|
|
2. Select the name of the desired range.
The range appears and is selected.
|
Click Qtr4_NetProfits
|
Use the Qtr1_NetProfits range name to return to the Qtr
1 worksheet.
d Discussion
You can use names instead of cell references in formulas and
dialog boxes. For example, if you are summing totals from several worksheets,
you can assign names to the totals in each worksheet and use the range names
instead of the cell addresses.
You can use the Name box
to assign range names. The following rules apply to naming ranges:
|
1. Names must start with a letter or an underscore. The remainder
of the name can contain any character except a space or a hyphen. Avoid using
the dollar sign ($) since it may be confused with an absolute
reference.
|
|
2. Names can be up to 255 characters long. You should keep them
short to make them easy to use and to conserve space in formulas (which also
have a maximum length of 255 characters).
|
|
3. Names can be typed in either uppercase or lowercase.
|
|
4. You should not use names that resemble cell references (such as
A1).
|
C Procedures
|
1. Select the cell or range you want to name.
|
|
2. Click in the Name box on the formula bar.
|
|
3. Type the desired range name.
|
|
4. Press [Enter].
|
f Step-by-Step
Assign a name to a range.
Go to the Qtr 1 worksheet, if necessary.
|
Steps
|
Practice Data
|
|
1. Select the cell or range you want to name.
The range is selected.
|
Click cell E8
|
|
2. Click in the Name box on the formula bar.
The text in the Name box is selected.
|
Click in the Name box
|
|
3. Type the desired range name.
The text appears in the Name box.
|
Type Qtr1_Total
|
|
4. Press [Enter].
The range name is saved and appears in the Name box.
|
Press [Enter]
|
d Discussion
You can use a range name rather than a cell address in a
formula. Using a range name in a formula makes the formula easier to read and
understand. For example, it is easy to understand what information the following
formula calculates; =INCOME-EXPENSES. If the named cells change, the
formula automatically updates.
Since range names are absolute, you can use a name in place of
an absolute cell reference in a formula. For example, if you are calculating a
percentage of Total, the formula always refers to Total if you
use the range name rather than the cell address, no matter where you move or
copy the formula.

Using range names in a formula
C Procedures
|
1. Select the cell in which you want the result of the formula to appear.
|
|
2. Start typing the formula or function.
|
|
3. Type the desired range name at the appropriate location in the
formula.
|
|
4. Complete the formula as necessary.
|
|
5. Press [Enter].
|
f Step-by-Step
Use a range name in a
formula.
Go to the Qtr 1 worksheet, if necessary.
|
Steps
|
Practice Data
|
|
1. Select the cell in which you want the
result of the formula to appear.
The cell is selected.
|
Click cell I4
|
|
2. Start typing the formula or function.
The formula appears in the cell and on the formula bar.
|
Type =E4/
|
|
3. Type the desired range name at the appropriate location in the
formula.
The range name appears in the cell and on the formula bar.
|
Type Qtr1_Total
|
|
4. Press [Enter].
The result of the formula appears in the cell.
|
Press [Enter]
|
Copy the formula to the range I5:I7. Click cells I5, I6, and
I7. Notice that the range name did not change when you copied the cell.
d Discussion
You can create range names for rows and columns using text
entered into the first or last cell of the row or the top or bottom cell of the
column. This option is a quick way to create names that correspond directly to
worksheet entries. For example, in a worksheet containing the quantity of
products sold each month, you can use the product names in the row headings to
name the rows of quantities sold.
When Excel names rows and columns, it uses the text in the
indicated location (i.e. the top, bottom, right or left cell) to name the
selected range. The cells containing the text are not included in the named
range. You can create multiple names at the same time by selecting a range that
spans several columns or rows.

Creating range names from headings
|
|
|
|
o
|
Although the text in the header columns and rows is
not included in the named range, it must be included in the range you select
prior to performing the command in order for Excel to determine the range
name.
|
|
|
|
C Procedures
|
1. Select both the range you want to name
and the row or column heading containing the desired range name.
|
|
2. Select the Insert menu.
|
|
3. Point to the Name command.
|
|
4. Select the Create command.
|
|
5. Under Create names in, select the option corresponding to
the location of the desired name.
|
|
6. Select OK.
|
f Step-by-Step
Create range names from headings.
Go to the Qtr 1 worksheet, if necessary.
|
Steps
|
Practice Data
|
|
1. Drag to select both the range you want to
name and the row or column heading containing the desired range name.
The range is highlighted as you drag.
|
Drag B3:G7
|
|
2. Release the mouse button.
The range is selected.
|
Release the mouse button
|
|
3. Select the Insert menu.
The Insert menu appears.
|
Click Insert
|
|
4. Point to the Name command.
The Name submenu appears.
|
Point to Name
|
|
5. Select the Create command.
The Create Names dialog box opens.
|
Click Create...
|
|
6. Under Create names in, select the option corresponding to
the location of the desired name.
The option is selected.
|
Click  Top Row, if necessary Top Row, if necessary
|
|
7. Select OK.
The Create Names dialog box closes and the range names for the headings
are created.
|
Click OK
|
Display the Name box to verify that the range names have
been created.
d Discussion
After you have created a range name, you can use it in existing
formulas. For example, after you have created formulas in a worksheet, you may decide
that using range names in the formulas will make it easier for others to
analyze the worksheet. Since Excel does not automatically replace cell
references in existing formulas when you assign range names, you must replace
the cell addresses in existing formulas with range names as desired. This
technique is called applying range names.

Applying range names
|
|
|
|
o
|
If you want to apply range names throughout a
worksheet, you can select a single cell in the worksheet.
|
|
|
|
|
o
|
Applied range names work within a worksheet but not in
multiple worksheets.
|
|
|
|
|
o
|
Excel uses an underscore ( _ ) for blank spaces
in a range name. For example, the heading Total Sales will be assigned
the range name Total_Sales.
|
|
|
|
C Procedures
|
1. Select the range in which you want to apply range names.
|
|
2. Select the Insert menu.
|
|
3. Point to the Name command.
|
|
4. Select the Apply command.
|
|
5. Under Apply names, select the range names you want to
apply, if necessary.
|
|
6. Select OK.
|
f Step-by-Step
Apply range names to formulas.
Go to the Qtr 1 worksheet, if necessary.
|
Steps
|
Practice Data
|
|
1. Drag to select the range in which you want
to apply range names.
The range is highlighted as you drag.
|
Drag B8:G8
|
|
2. Release the mouse button.
The range is selected.
|
Release the mouse button
|
|
3. Select the Insert menu.
The Insert menu appears.
|
Click Insert
|
|
4. Point to the Name command.
The Name submenu appears.
|
Point to Name
|
|
5. Select the Apply command.
The Apply Names dialog box opens and any suggested range names are
highlighted.
|
Click Apply...
|
|
6. Under Apply names, select the range names you want to
apply, if necessary.
The range names are selected.
|
Select the range names listed below
|
|
7. Select OK.
The Apply Names dialog box closes and the range names replace the cell
addresses in all formulas in the selected range.
|
Click OK
|
Under Apply names, select Expenses, Feb, Jan,
Mar, Net_Profits, and Total_Sales, if necessary.
Select each cell in the range B8:G8. Notice that the cell
addresses have been replaced by range names in each formula.
d Discussion
You can delete range names you no longer use. For example, if
you change the name of a range,
you can delete the old name.
Deleting a range name permanently removes it from the workbook.
If you accidentally delete a range name that is still referred to in a formula,
the formula can no longer calculate correctly, and the error message #NAME?
appears in the cell instead of the result of the formula.

Deleting range names
|
|
|
|
o
|
If you inadvertently delete a name used in a formula,
you can redefine the name to make the formula accurate again.
|
|
|
|
C Procedures
|
1. Select the Insert menu.
|
|
2. Point to the Name command.
|
|
3. Select the Define command.
|
|
4. Under Names in workbook, select the range name you want
to delete.
|
|
5. Select Delete.
|
|
6. Select OK.
|
f Step-by-Step
Delete the range name.
Go to the Qtr 1 worksheet, if necessary.
|
Steps
|
Practice Data
|
|
1. Select the Insert menu.
The Insert menu appears.
|
Click Insert
|
|
2. Point to the Name command.
The Name submenu appears.
|
Point to Name
|
|
3. Select the Define command.
The Define Name dialog box opens.
|
Click Define...
|
|
4. Under Names in workbook, select the range name you want
to delete.
The range name is selected.
|
Click Net_Profits
|
|
5. Select Delete.
The range name is removed from the workbook.
|
Click Delete
|
|
6. Select OK.
The Define Name dialog box closes.
|
Click OK
|
Notice that the formula in cell G8 now displays an error
message, #NAME?. Recreate the range name Net_Profits for the
range G4:G7. Notice that the formula updates.
d Discussion
A 3-D formula is when cell references in a formula refer to
cells in more than one worksheet. In standard 3-D formulas, you must activate
the worksheets and select the cells you want to use while you are building the
formula.
You can use range names as a simple and effective way to create
3-D formulas. Since range names are available to all worksheets in the
workbook, you can select range names from the Name box or type them into
the formula rather than going to each worksheet to select cell references. This
option can save you time and reduce confusion in creating 3-D formulas.
Range names are often easier to remember than cell addresses,
particularly in a large worksheet or in multiple workbooks when you cannot see
the desired cell.

Using names in a 3-D formula
|
|
|
|
o
|
If you make a typing error or misspell the name, the #NAME?
error appears in the cell.
|
|
|
|
C Procedures
|
1. Select the worksheet in which you want to create the formula.
|
|
2. Select the cell that in which you want to create the formula.
|
|
3. Type = to start the formula.
|
|
4. Type the first range name in the formula.
|
|
5. Type the desired mathematical operator.
|
|
6. Type range names and mathematical operators as necessary to
complete the formula.
|
|
7. Press [Enter].
|
f Step-by-Step
Use range names in a 3-D formula.
|
Steps
|
Practice Data
|
|
1. Select the worksheet in which you want to
create the formula.
The worksheet appears.
|
Click the Annual tab
|
|
2. Select the cell that in which you want to create the formula.
The cell is selected.
|
Click cell D3
|
|
3. Type = to start the formula.
An equal sign (=) appears in the cell and on the formula bar.
|
Type =
|
|
4. Type the first range name in the formula.
The range name appears in the cell and on the formula bar.
|
Type Qtr1_NetProfits
|
|
5. Type the desired mathematical operator.
The mathematical operator appears.
|
Type +
|
|
6. Type range names and mathematical operators as necessary to
complete the formula.
The formula appears on the formula bar.
|
Complete the formula as indicated below
|
|
7. Press [Enter].
The result of the formula appears in the cell.
|
Press [Enter]
|
Create the following formula:
=Qtr1_NetProfits+Qtr2_NetProfits+Qtr3_NetProfits+Qtr4_NetProfits
The result of the formula should be $73,009.98.
d Discussion
You can create range names that refer to the same range in
multiple worksheets. For example, you can define a range name for the same cell address in four
different worksheets. Naming a 3-D range can simplify creating a formula.

Naming a 3-D range
C Procedures
|
1. On the first worksheet of the desired group, select the range
you want to name.
|
|
2. Select the Insert menu.
|
|
3. Point to the Name command.
|
|
4. Select the Define command.
|
|
5. Under Refers to, click the Collapse Dialog button  . .
|
|
6. Hold [Shift], click the tab of the last worksheet you
want to include in the group, and release [Shift].
|
|
7. Click the Expand Dialog button  . .
|
|
8. Select the Names in workbook text box.
|
|
9. Type the desired range name.
|
|
10. Select Add.
|
|
11. Select OK.
|
f Step-by-Step
Create a 3-D range name.
Go to the Qtr 1 worksheet, if necessary.
|
Steps
|
Practice Data
|
|
1. On the first worksheet of the desired
group, select the range you want to name.
The range is selected.
|
Click cell E8
|
|
2. Select the Insert menu.
The Insert menu appears.
|
Click Insert
|
|
3. Point to the Name command.
The Name submenu appears.
|
Point to Name
|
|
4. Select the Define command.
The Define Name dialog box opens.
|
Click Define...
|
|
5. Under Refers to, click the Collapse Dialog button.
The Define Name dialog box collapses.
|
Click 
|
|
6. Hold [Shift], click the tab of the last worksheet you
want to include in the group, and release [Shift].
The worksheets are grouped and the range in each worksheet is selected.
|
Hold [Shift], click the Qtr 4 tab, and
release [Shift]
|
|
7. Click the Expand Dialog button.
The Define Name dialog box expands and the 3-D range is selected.
|
Click 
|
|
8. Select the Names in workbook text box.
The insertion point appears in the Names in workbook text box.
|
Click the Names in workbook text box
|
|
9. Type the desired range name.
The range name appears in the Names in workbook text box.
|
Type All_Total
|
|
10. Select Add.
The range name is added to the Names in workbook list.
|
Click Add
|
|
11. Select OK.
The Define Name dialog box closes and the 3-D range is named.
|
Click OK
|
d Discussion
You can use a named 3-D range in a function just as you would
any other named range. 3-D ranges can save you a significant amount
of time. For example, if you name each of the four cells containing quarterly
totals in four worksheets, you can sum all four cells using the range name.

Referencing a 3-D range name
C Procedures
|
1. Select the worksheet in which you want to create the formula.
|
|
2. Select the cell in which you want to create the formula.
|
|
3. Type =, the function name, and an open parenthesis ( ( ).
|
|
4. Type the 3-D range name you want to reference.
|
|
5. Type any additional information needed to complete the function
and a closing parenthesis ( ) ).
|
|
6. Press [Enter].
|
f Step-by-Step
Use a 3-D range name in a formula.
|
Steps
|
Practice Data
|
|
1. Select the worksheet in which you want to
create the formula.
The worksheet appears.
|
Click the Annual tab
|
|
2. Select the cell in which you want to create the formula.
The cell is selected.
|
Click cell B3
|
|
3. Type =, the function name, and an open parenthesis ( ( ).
An equal sign (=), the function name, and an open parenthesis ( ( ) appear
on the cell and in the formula bar.
|
Type =sum(
|
|
4. Type the 3-D range name you want to reference.
The range name appears in the cell and on the formula bar.
|
Type All_Total
|
|
5. Type any additional information needed to complete the function
and a closing parenthesis ( ) ).
The completed function appears in the cell and on the formula bar.
|
Type )
|
|
6. Press [Enter].
The result of the formula appears in the cell.
|
Press [Enter]
|
The result of the formula should be $94,613.98.
Close NAME1.XLS.
e Task
To make formulas easier to read, name ranges and apply the
names to existing formulas. Then create formulas using existing names in the
worksheet. Finally, create 3-D names for the totals for each week in all the
worksheets and use those names in formulas that add the weekly totals for all
the worksheets.
|
1. Open Region17.
|
|
2. On the NorthEast worksheet, select B5:B8. Name the range Jan_NE.
|
|
3. Select C5:C8 and name the range Feb_NE.
|
|
4. Select D5:D8 and name the range Mar_NE.
|
|
5. Apply the range names to the formulas in B9:D9.
|
|
6. Use the Name box to jump to the Total_Jan range.
Notice that the Totals worksheet now appears on the screen.
|
|
7. Select cell B10 on the Totals worksheet. Create an =SUM
formula to add the Total_Jan name.
|
|
8. Select cell C10 on the Totals worksheet. Create an =SUM
formula to add the Total_Feb name.
|
|
9. Select cell D10 on the Totals worksheet. Create an =SUM
formula to add the Total_Mar name.
|
|
10. Create a 3-D range name that includes cell E5 in all the regional
worksheets, i.e. NorthEast, SouthEast, Central,
SouthWest, and NorthWest. Name the range Week1.
|
|
11. Create 3-D range names for cells E6, E7 and E8 in all five
regional worksheets. Name the ranges Week2, Week3, and Week4.
|
|
12. In cell B5 in the By Week sheet, create an =SUM
function that totals the 3-D range named Week1.
|
|
13. Sum the other 3-D range names on the By Week worksheet.
Sum Week2 in cell B6, Week3 in cell B7, and Week4 in
cell B8.
|
|
14. Close the workbook without saving it.
|

In this lesson, you will
learn how to:
·
Use labels in formulas
·
Use labels to define a range
·
Use multiple stacked headings
·
Identify individual cells
d Discussion
In formulas, you can refer to a cell or a range of cells using
column and/or row headings. Formulas which use column or row headings to define
a cell or a range of cells are called natural language formulas.
In Excel, row and column headings are called labels. Labels
provide an efficient means of performing calculations using names already
existing in the worksheet. You can use labels to refer to a cell or range of cells without actually creating a named range.
In formulas, you can use the labels in the column heading to
name the range of cells below the heading, those in the row heading to name the
range of cells to the right of the heading, and those in both the column and
row headings to refer to a specific cell (located at the intersection of the
specified column and row). In addition, you can use multiple labels to refer to
a range of cells.
|
|
|
|
o
|
You cannot use a label to refer to cells in another
worksheet.
|
|
|
|
d Discussion
You can use labels in formulas to perform calculations on
columns or rows of numbers. Formulas which use labels as references are called
natural language formulas. Excel recognizes column and row headings as labels. For
example, if a column of numbers has the heading January, you can add the
numbers in the column by typing =SUM(January).
A label refers only to those cells below the heading or to the
right of a row before the first blank cell. Any cells beyond the blank cell are
not included in the range.
If you enter a label that appears more than once in the same
worksheet, Excel prompts you to identify the label to which you are referring.
Labels in formulas act as relative references. That is, when
you copy a formula using labels and paste it into a new location, the formula
adjusts the label to the new location. For example, when you copy the formula =SUM(January)
to the corresponding cell below the column heading February, the formula
changes to =SUM(February).

Using labels to define a range
|
|
|
|
o
|
If you use a label in a formula that is the same as a
named range in the workbook, the formula may not work properly.
|
|
|
|
C Procedures
|
1. Select the cell in which you want to create the formula.
|
|
2. Start typing the formula or function.
|
|
3. Type the label in the column or row heading of the cell or range
you want to use in the formula.
|
|
4. Type the remainder of the formula as needed.
|
|
5. Press [Enter].
|
f Step-by-Step
From the Student Data directory, open PROD1.XLS.
Use a label in a formula to define a range.
|
Steps
|
Practice Data
|
|
1. Select the cell in which you want to create
the formula.
The cell is selected.
|
Click cell D6
|
|
2. Start typing the formula or function.
The text appears in the cell and on the formula bar.
|
Type =sum(
|
|
3. Type the label in the column or row heading of the cell or range
you want to use in the formula.
The label appears in the formula.
|
Type apparel
|
|
4. Type the remainder of the formula as needed.
The formula appears in the cell and on the formula bar.
|
Type )
|
|
5. Press [Enter].
The result of the formula appears in the cell.
|
Press [Enter]
|
Copy the formula to the range D7:D8. Select cell D7 and then
cell D8. Notice that the labels in each formula have adjusted to the
corresponding row headings.
d Discussion
At times, a worksheet may contain multiple stacked headings for the same column or row. For example, Projected
may appear in the first cell in a column and 1996 in the cell below
it. You can use both headings to identify the cell or range you want to include
in the formula. Multiple stacked headings are particularly useful when one of
the labels in a column or row heading appears
more than once in the worksheet. For example, in a worksheet tracking projected
and actual sales in 1996, 1996 appears in two column headings: once for
the projected sales and once for the actual sales. You can use the labels Projected
or Actual in combination with 1996 to define exactly which
sales amounts you want to add, i.e. =SUM(Projected 1996) adds projected
sales for 1996 and =SUM(Actual 1996) adds actual sales for 1996.
When you enter multiple labels in a formula, you must include a
space between them. This space is called the intersection operator.
You should enter stacked headings into a formula or function in
the same order in which they appear from top to bottom in column headings or
from right to left in row headings. The formula refers only to those cells
below or to the right of the label before the first blank cell. Any cells
beyond the blank one are not included in the range.
When you copy formulas using multiple labels, the labels adjust
to the new location.

Using multiple stacked headings
C Procedures
|
1. Select the cell in which you want to create the formula.
|
|
2. Start typing the formula or function.
|
|
3. Type the first column or row heading label.
|
|
4. Type a space.
|
|
5. Type the second column or row heading label.
|
|
6. Type the remainder of the formula as needed.
|
|
7. Press [Enter].
|
f Step-by-Step
Use multiple stacked headings in
a formula.
|
Steps
|
Practice Data
|
|
1. Select the cell in which you want to create
the formula.
The cell is selected.
|
Click cell B9
|
|
2. Start typing the formula or function.
The text appears in the cell and on the formula bar.
|
Type =sum(
|
|
3. Type the first column or row heading label.
The label appears in the cell and on the formula bar.
|
Type projected
|
|
4. Type a space.
The space appears in the cell and on the formula bar.
|
Press [Spacebar]
|
|
5. Type the second column or row heading label.
The label appears in the cell and on the formula bar.
|
Type 1996
|
|
6. Type the remainder of the formula as needed.
The formula appears in the cell and on the formula bar.
|
Type )
|
|
7. Press [Enter].
The result of the formula appears in the cell.
|
Press [Enter]
|
Copy the formula to the range C9:E9. Select cells C9, D9, and
E9 to verify that the labels in the formulas have adjusted to the corresponding
column headings.
d Discussion
You can use a natural language formula to refer to a single cell in a
worksheet. To refer to a single cell, you enter both the column and row heading
for that cell. The column and row headings can be entered in any order. For
example, in a worksheet containing 1996 sales for different sporting goods
products, the formula =1996 Footwear refers to the data in the cell at
the intersection of the column heading 1996 and the row heading Footwear.
You can also use stacked headings in a label that refers to a single cell.
When you copy a formula using a label to refer to a single cell
to a new location, the label adjusts accordingly.

Identifying individual cells
C Procedures
|
1. Select the cell in which you want to create the formula.
|
|
2. Start typing the formula or function.
|
|
3. Type the label defining the first cell reference.
|
|
4. Type a space.
|
|
5. Type the label defining the second cell reference.
|
|
6. Type the remainder of the formula as needed.
|
|
7. Press [Enter].
|
f Step-by-Step
Use a label in a formula to refer to a single cell.
|
Steps
|
Practice Data
|
|
1. Select the cell in which you want to create
the formula.
The cell is selected.
|
Click cell H6
|
|
2. Start typing the formula or function.
The text appears in the cell and on the formula bar.
|
Type =
|
|
3. Type the label defining the first cell reference.
The label appears in the formula.
|
Type Actual 1996
|
|
4. Type a space.
The space appears in the formula.
|
Press [Spacebar]
|
|
5. Type the label defining the second cell reference.
The label appears in the formula.
|
Type Apparel
|
|
6. Type the remainder of the formula as needed.
The formula appears in the cell and on the formula bar.
|
Type -Projected 1996 Apparel
|
|
7. Press [Enter].
The result of the formula appears in the cell.
|
Press [Enter]
|
Copy the formula to the range H7:H9. Select cells H7, H8, and
H9 to verify that the labels have adjusted to the new locations.
Close PROD1.XLS.
e Task
Use natural language formulas to perform calculations. First,
use the column headings to total the columns. Then, use the row headings to
total the rows. Use single cell natural language formulas to calculate the
increase from the first to last months in the quarter. Finally, sum the total
first quarter increase using a stacked column in a natural language formula.
|
1. Open Region18.
|
|
2. Select cell B9.
|
|
3. Use a label to create a formula that sums the Jan column:
=SUM(Jan)
|
|
4. Copy the formula to C9:E9.
|
|
5. In cell E5, use a label to create a formula that sums the Week1
row:
=SUM(Week1)
|
|
6. Copy the formula to E6:E8.
|
|
7. In cell B13, use a label to create a formula that subtracts the
cell at the intersection of the row Week1 and the column Jan
from the cell at the intersection of the row Week1 and the column Mar:
=Week1 Mar-Week1 Jan
|
|
8. Copy the formula to B14:B16.
|
|
9. In cell B17, use a label to create a formula that adds the First
Quarter column:
=SUM(First Quarter)
|
|
10. Close the workbook without saving it.
|

In this lesson, you will
learn how to:
·
Open multiple workbooks
·
Cascade windows
·
Activate cascaded windows
·
Tile windows
·
Activate tiled windows
·
Copy data between workbooks
·
Save a workspace
·
Close all open workbooks
·
Open a workspace
d Discussion
You can open more than one workbook
at a time. This option is useful for comparing data or for moving and copying
information between workbooks. For example, you could open files from several
regional reps and then consolidate and compare the data in the workbooks.
When you open multiple workbooks, each workbook appears in its
own window. You can arrange the windows in the workspace so that you can view
the data in each, if desired.
No matter how many workbooks are open, only one is active at a
time. The title bar of the active workbook is highlighted. Any command you
execute or data you enter affects only the active workbook.

Opening multiple workbooks
|
|
|
|
o
|
Files listed consecutively can be selected by clicking
the first file in the series, holding the [Shift] key, click the last
file in the series, and releasing the [Shift] key.
|
|
|
|
C Procedures
|
1. Click the Open button  . .
|
|
2. Select the Look in list.
|
|
3. Select the drive where the file you want to open is stored.
|
|
4. Select the folder where the file you want to open is stored.
|
|
5. Select the desired file.
|
|
6. Hold [Ctrl] and select the name of the second file you
want to open.
|
|
7. Select all additional files you want to open and release [Ctrl].
|
|
8. Select Open.
|
f Step-by-Step
Open multiple workbooks at the
same time.
|
Steps
|
Practice Data
|
|
1. Click the Open button.
The Open dialog box opens.
|
Click 
|
|
2. Select the Look in list.
A list of available drives appears.
|
Click Look in 
|
|
3. Select the drive where the file you want to open is stored.
A list of available folders appears.
|
Click the student data drive
|
|
4. Select the folder where the file you want to open is stored.
A list of available files appears.
|
Double-click to select the student data folder
|
|
5. Select the desired file.
The file is selected.
|
Click Q1centrl
|
|
6. Hold [Ctrl] and select the name of the second file you
want to open.
The files are selected.
|
Hold [Ctrl] and click Q1neast
|
|
7. Select all additional files you want to open and release [Ctrl].
The files are selected.
|
Click Q1seast and release [Ctrl]
|
|
8. Select Open.
The Open dialog box closes and the workbooks open.
|
Click Open
|
d Discussion
If multiple workbooks are open, you can arrange the workbook
windows in various positions in the workspace.
Cascaded windows are arranged on top of each other
with the title bar of each window visible. The active window appears at the
front of the stack. Cascading windows allows you to move easily from one to
another and still display a large portion of the active window. For example,
you can cascade workbooks containing sales data from several regional reps so
that you can move easily between the workbooks when comparing and contrasting
data.

Cascaded windows
C Procedures
|
1. Open multiple windows.
|
|
2. Select the Window menu.
|
|
3. Select the Arrange command.
|
|
4. Select the Cascade option.
|
|
5. Select OK.
|
f Step-by-Step
Cascade open workbooks.
Open Q1centrl, Q1seast, and Q1neast, if
necessary.
|
Steps
|
Practice Data
|
|
1. Select the Window menu.
The Window menu appears.
|
Click Window
|
|
2. Select the Arrange command.
The Arrange Windows dialog box opens.
|
Click Arrange...
|
|
3. Select the Cascade option.
The option is selected.
|
Click  Cascade Cascade
|
|
4. Select OK.
The Arrange Windows dialog box closes and the windows are cascaded.
|
Click OK
|
d Discussion
Only one window can be active at a time. Excel maintains a list
of all open workbooks. You can activate any
workbook window by selecting its name from the Window menu. For example,
if you have many workbooks open, you can activate the workbook containing the
data with which you want to work.

Activating cascaded windows
|
|
|
|
o
|
You can also activate a window by clicking any portion
of the window.
|
|
|
|
C Procedures
|
1. Open multiple workbooks.
|
|
2. Select the Window menu.
|
|
3. Select the workbook you want to view.
|
f Step-by-Step
Activate cascaded windows.
Open Q1centrl, Q1seast, and Q1neast and
cascade the workbook windows, if necessary.
|
Steps
|
Practice Data
|
|
1. Select the Window menu.
The Window menu appears.
|
Click Window
|
|
2. Select the workbook you want to view.
The workbook window appears in the workspace.
|
Click Q1neast
|
Activate each of the other two cascaded windows.
d Discussion
When you tile windows, all open windows are made small enough
to fit in the workspace next to one another. For example, you can tile all the
open workbooks so that you can view at least some portion of each workbook
on the screen at the same time.
There are three tiling options in Excel. The Tiled
option arranges the windows in a grid in the workspace and places the active
window in the upper left corner. The Horizontal option places the
windows top-to-bottom in the workspace. The Vertical option places the
windows side-by-side.

Tiling windows
|
|
|
|
o
|
To display only one window, click the desired window
and then select the Windows of active workbook option in the Arrange
Windows dialog box.
|
|
|
|
C Procedures
|
1. Open multiple workbooks.
|
|
2. Select the Window menu.
|
|
3. Select the Arrange command.
|
|
4. Under Arrange, select the desired option.
|
|
5. Select OK.
|
f Step-by-Step
Tile open windows.
Open Q1centrl, Q1seast, and Q1neast, if
necessary.
|
Steps
|
Practice Data
|
|
1. Select the Window menu.
The Window menu appears.
|
Click Window
|
|
2. Select the Arrange command.
The Arrange Windows dialog box opens.
|
Click Arrange...
|
|
3. Under Arrange, select the desired option.
The option is selected.
|
Click  Vertical Vertical
|
|
4. Select OK.
The Arrange Windows dialog box closes and the windows are tiled in the
workspace.
|
Click OK
|
d Discussion
When windows are tiled, you can see a portion of each open
workbook window. You can click in any workbook window to activate
it. For example, you may want to activate a single workbook out of many open
workbooks containing data from regional representatives so that you can work on
the data it contains.
C Procedures
|
1. Open multiple workbooks.
|
|
2. Tile open workbooks.
|
|
3. Click the workbook window you want to activate.
|
f Step-by-Step
Activate a tiled workbook window.
Open Q1centrl, Q1seast, and Q1neast and
vertically tile the open workbooks, if necessary.
|
Steps
|
Practice Data
|
|
1. Click the workbook window you want to
activate.
The window is activated and the title bar is highlighted.
|
Click in the Q1centrl
window
|
d Discussion
You can copy data between open workbooks in
much the same way you copy data between worksheets in a single workbook. For example, you can copy
data from several workbooks containing regional sales data to a single
consolidation workbook. By default, the cell format is copied as well as the
data.
|
|
|
|
o
|
You can also use drag-and-drop editing to copy data
between workbooks.
|
|
|
|
C Procedures
|
1. Open multiple workbooks.
|
|
2. Click in the workbook window containing the range you want to
copy.
|
|
3. Select the range you want to copy.
|
|
4. Click the Copy button  . .
|
|
5. Click in the workbook window where you want to paste the data.
|
|
6. Select the paste range.
|
|
7. Click the Paste button  . .
|
f Step-by-Step
Copy data from one workbook
to another workbook.
Open Q1centrl, Q1seast, and Q1neast and
vertically tile the workbooks, if necessary.
|
Steps
|
Practice Data
|
|
1. Click in the workbook window containing the
range you want to copy.
The window is activated.
|
Click the Q1centrl window
|
|
2. Drag to select the range you want to copy.
The range is highlighted as you drag.
|
Drag A1:A2
|
|
3. Release the mouse button.
The range is selected.
|
Release the mouse button
|
|
4. Click the Copy button.
A blinking marquee appears around the range.
|
Click 
|
|
5. Click in the workbook window where you want to paste the data.
The window is activated.
|
Click the Q1neast window
|
|
6. Select the paste range.
The range is selected.
|
Click cell A1, if necessary
|
|
7. Click the Paste button.
The data appears in the paste range.
|
Click 
|
d Discussion
By creating a workspace file, you can open multiple workbooks at
once. A workspace file saves information about which workbooks are open and the
size and position they occupy in the workspace.
This feature is useful if you have several workbooks that
relate to one another. Instead of having to open each of them separately, you
can save them as a workspace in order to open them as a unit. For example, if
you always work on workbooks provided by several regional representatives at
the same time, you can save the workbooks in the desired screen configuration
as a workspace.
Once you have opened a workspace, you can make the desired
changes to any of the workbooks, and you will be prompted to save the
applicable workbooks. However, if you make changes to the appearance of the
workspace, you must save the workspace again with the Save Workspace
command from the File menu. You are not prompted to save a workspace.
For example, if you change the workbooks from appearing tiled vertically to
being tiled horizontally, you must save the workspace in order to save the
change in appearance.

Saving a workspace
C Procedures
|
1. Select the File menu.
|
|
2. Select the Save Workspace command.
|
|
3. Type the desired file name for the workspace.
|
|
4. Select the Save in list.
|
|
5. Select the drive where you want to save the workspace.
|
|
6. Select the folder where you want to save the workspace.
|
|
7. Select Save.
|
|
8. Select Yes to save changes made to the workbooks, if
necessary.
|
f Step-by-Step
Save a workspace.
Open Q1centrl, Q1seast, and Q1neast and
vertically tile the workbooks, if necessary.
|
Steps
|
Practice Data
|
|
1. Select the File menu.
The File menu appears.
|
Click File
|
|
2. Select the Save Workspace command.
The Save Workspace dialog box opens.
|
Click Save Workspace...
|
|
3. Type the desired file name for the workspace.
The file name appears in the File name text box.
|
Type regions
|
|
4. Select the Save in list.
A list of available drives appears.
|
Click Save in 
|
|
5. Select the drive where you want to save the workspace.
The folders in the selected drive appear.
|
Click the student data drive
|
|
6. Select the folder where you want to save the workspace.
The files in the selected folder appear.
|
Double-click to select the student data folder
|
|
7. Select Save.
The Save Workspace dialog box closes and the workspace is saved.
|
Click Save
|
|
8. Select Yes to save changes made to the workbooks, if
necessary.
Any changes to the workbook are saved.
|
Click Yes to save the changes made to Q1neast
|
d Discussion
You can use the Close All command to close all open
workbooks at one time. If you have made changes to any workbook since it was
last saved, Excel prompts you to save or reject the changes.
Closing all workbooks at once can save time when you have
finished working on a group of workbooks.

Closing all open workbooks
C Procedures
|
1. Open multiple workbooks.
|
|
2. Hold [Shift], select the File menu, and release [Shift].
|
|
3. Select the Close All command.
|
f Step-by-Step
Close all open workbooks at once.
Open Q1centrl, Q1seast, and Q1neast, if
necessary.
|
Steps
|
Practice Data
|
|
1. Hold [Shift], select the File
menu, and release [Shift].
The File menu appears.
|
Hold [Shift], click File,
and release [Shift]
|
|
2. Select the Close All command.
All open workbooks close.
|
Click Close All
|
If Excel prompts you to save changes made to any workbook,
select Yes.
d Discussion
When you open a workspace file, all the workbooks in the
workspace file open in the configuration saved with the workspace.
The workspace file contains information regarding the
location of the workbooks as well as their size and position in the workspace.
Therefore, if you move a workbook to another folder, the workspace file cannot
locate and open it. In this case, the workspace opens only the workbooks it can
find.
C Procedures
|
1. Click the Open button  . .
|
|
2. Select the Look in list.
|
|
3. Select the drive where the workspace
file is stored.
|
|
4. Select the folder where the workspace file is stored.
|
|
5. Select the Files of type list.
|
|
6. Select Workspaces.
|
|
7. Select the desired workspace file.
|
|
8. Select Open.
|
f Step-by-Step
Open a workspace.
|
Steps
|
Practice Data
|
|
1. Click the Open button.
The Open dialog box opens.
|
Click 
|
|
2. Select the Look in list.
A list of available drives appears.
|
Click Look in 
|
|
3. Select the drive where the workspace file is stored.
A list of available folders appears.
|
Click the student data drive
|
|
4. Select the folder where the workspace file is stored.
A list of available files appears.
|
Double-click to select the student data folder
|
|
5. Select the Files of type list.
A list of available file types appears.
|
Click Files of type 
|
|
6. Select Workspaces.
Workspaces appears in the Files of type box.
|
Scroll as necessary and click Workspaces
|
|
7. Select the desired workspace file.
The file is selected.
|
Click Regionsa
|
|
8. Select Open.
The Open dialog box closes and the workbooks in the workspace open.
|
Click Open
|
Close all open workbooks.
e Task
Open multiple workbooks. Tile and cascade the open workbooks.
Copy a title from one workbook to another. Finally, arrange the workbooks, save
them as a workspace, and then close all workbooks. Open the workspace to verify
that it has been saved correctly.
|
1. Open the Qtr1, Qtr2, Qtr3, and Qtr4
workbooks at one time.
|
|
2. Cascade the open workbook windows.
|
|
3. Select each workbook window one at a time. Notice that the Qtr4
workbook is missing a title in cell A1.
|
|
4. Tile the workbook windows.
|
|
5. Copy the title from cell A1 in Qtr1 to cell A1 in Qtr4.
|
|
6. Correct the title in Qtr4 to Worldwide Sporting Goods
- QTR 4.
|
|
7. Save the current workspace as Quarter.
|
|
8. Close all the open workbooks and save all changes.
|
|
9. Open Quarter.
|
|
10. Close all open workbooks without saving them.
|

In this lesson, you will
learn how to:
·
Use charts
·
Create charts - Chart Wizard
·
Move and resize charts
·
Identify chart objects
·
Move the chart toolbar
·
Change the chart type
·
Change the plot direction
·
Add/remove the legend
·
Change the text orientation
·
Add a data table
·
Format chart objects
·
Change the chart range
·
Print a chart
·
Delete a chart
d Discussion
A chart uses values in a worksheet to create a
graphic representation of their relationship to one another. You can use charts
to make it easier to spot trends, highlight important changes, and compare
individual figures. For example, when comparing sales amounts, a column chart
dramatically illustrates differences between two or more sales amounts. Using
charts in reports and presentations displays numbers to your audience in a
format that is easy to understand.
When you create a chart, each row or column of data on the
worksheet makes up a data series. Each individual value within the row or
column is called a data point.
The range you chart can include row and column headings. These
headings are used as the category labels and the legend text. If the range does
not include headings, Excel creates default headings.
In Excel, you either embed a chart in the worksheet, or you
create it on a chart sheet. An embedded chart is a chart object in the
worksheet. When you want the chart and the worksheet data viewed or printed
together, you should use an embedded chart.
A chart sheet is a separate worksheet in the workbook that
contains only the chart. If you want to use the chart by itself (for example,
in a presentation) you should use a chart sheet. Both kinds of charts are
linked to the worksheet data and update automatically if the data is changed.

A column chart
d Discussion
The Chart Wizard assists you in creating a chart by leading
you through a series of dialog boxes that allow you to
choose options for the chart. You can quickly learn the essentials of creating
a chart using the Chart Wizard. For example, if you have never created a chart
to demonstrate monthly sales by representative, the Chart Wizard will guide you
through the process.
The Chart Wizard contains four steps. In the first step, you
select the chart type and sub-type. In the second step, you select or verify
the data that will be used to create the chart. The third step allows you to
select various chart options. The last step determines whether the chart will
be embedded in the worksheet or displayed in its own chart sheet.

A chart created with the Chart Wizard
|
|
|
|
o
|
If you want to change a chart feature after you have
created a chart, you can edit the chart.
|
|
|
|
|
o
|
You can preview the selected chart type and sub-type
by clicking and holding the Press and hold to view sample button in
Step 1 of the Chart Wizard.
|
|
|
|
C Procedures
|
1. Select the range containing the data you want
to chart.
|
|
2. Click the Chart Wizard button  . .
|
|
3. Select a chart type from
the Chart type list box.
|
|
4. Select a chart sub-type under Chart sub-type.
|
|
5. Select Next >.
|
|
6. Select the desired data orientation from the Series in
options, if necessary.
|
|
7. Select Next >.
|
|
8. Select the desired tab.
|
|
9. Make the desired changes to the chart options.
|
|
10 Select Next >.
|
|
11. Select the desired chart placement under Place chart.
|
|
12. Select Finish.
|
f Step-by-Step
From the Student Data directory, open CHART1.XLS.
Create a chart using the Chart Wizard.
|
Steps
|
Practice Data
|
|
1. Drag to select the range containing the
data you want to chart.
The range is highlighted as you drag.
|
Drag A2:D6
|
|
2. Release the mouse button.
The range is selected.
|
Release the mouse button
|
|
3. Click the Chart Wizard button.
The Chart Wizard - Step 1 of 4 - Chart Type dialog box opens.
|
Click 
|
|
4. Select a chart type from the Chart type list box.
The chart type is selected.
|
Click Line
|
|
5. Select a chart sub-type under Chart sub-type.
The chart sub-type is selected.
|
Click  ,
if necessary ,
if necessary
|
|
6. Select Next >.
The Chart Wizard - Step 2 of 4 - Chart Source Data dialog box opens.
|
Click Next >
|
|
7. Select the desired data orientation from the Series in
options, if necessary.
The option is selected.
|
Click  Columns, if necessary Columns, if necessary
|
|
8. Select Next >.
The Chart Wizard - Step 3 of 4 - Chart Options dialog box opens.
|
Click Next >
|
|
9. Select the desired tab.
The desired page appears.
|
Click the Titles tab, if necessary
|
|
10. Make the desired changes to the chart options.
The changes to the chart options are made.
|
Click in the Chart title text box
|
|
11. Continue making changes to the chart options as necessary.
The changes to the chart options are made.
|
Type First Quarter Sales
|
|
12. Select Next >.
The Chart Wizard - Step 4 of 4 - Chart Location dialog box opens.
|
Click Next >
|
|
13. Select the desired chart placement under Place chart.
The option is selected.
|
Click  As object in, if necessary As object in, if necessary
|
|
14. Select Finish.
The Chart Wizard - Step 4 of 4 - Chart Location dialog box closes and the
chart appears in the worksheet.
|
Click Finish
|
d Discussion
After a chart has been placed on a worksheet, it can
be moved and resized. Moving a chart places it in a desired location. For
example, if you create an embedded chart that is placed over your data, you can
move it to a more appropriate location. Resizing a chart allows you to create a
larger or smaller chart. For example, you may want to increase the size of a
chart so that its labels are more legible.

A moved and resized chart
|
|
|
|
o
|
To select a chart, click a blank area inside of the
chart. If you click the legend or the title inside of a chart, only the
object you clicked is selected, not the entire chart.
|
|
|
|
C Procedures
|
1. Select the chart you want to move.
|
|
2. Drag the chart to the desired location.
|
|
3. Release the mouse button.
|
|
4. To resize the chart, point to the desired selection handle.
|
|
5. Drag the selection handle to the desired location.
|
|
6. Release the mouse button.
|
f Step-by-Step
Move and resize a chart.
|
Steps
|
Practice Data
|
|
1. Select the chart you want to move.
Selection handles appear around the chart.
|
Click the chart area, if
necessary
|
|
2. Drag the chart to the desired location.
An outline of the chart appears as you drag.
|
Drag the chart until the upper left corner is in cell
A9
|
|
3. Release the mouse button.
The chart appears in the new location.
|
Release the mouse button
|
|
4. To resize the chart, point to the desired selection handle.
The mouse pointer changes into a black double-headed arrow.
|
Scroll as necessary and point to the lower right
selection handle
|
|
5. Drag the selection handle to the desired location.
An outline of the chart expands or contracts as you drag.
|
Drag the lower right selection handle until the lower
right corner is in cell E26
|
|
6. Release the mouse button.
The chart is resized.
|
Release the mouse button
|
d Discussion
Excel charts contain several elements
called objects. You can identify each object in a chart using chart tips. Chart
tips display the name of an individual object. Being able to identify each
object will help you when you are creating and editing your charts. Not all the
objects appear in every chart type. For example, pie charts do not have axes.
The various chart objects and their descriptions are listed in
the following table:
|
Object
|
Description
|
|
Chart area
|
The entire area inside the
chart border including the chart itself and all related elements.
|
|
Plot area
|
The area in which Excel plots data.
|
|
Category axis (x axis)
|
The axis that contains the categories being plotted.
It is usually the horizontal axis.
|
|
Value axis
(y axis)
|
The axis that contains the values being plotted. It is
usually the vertical axis.
|
|
Chart title
|
Text describing the chart that is automatically
centered and placed at the top of the chart.
|
|
Legend
|
Describes the data series being plotted.
|
|
Series markers
|
Graphic elements that make up your data plot, such as
bars or lines. The chart tip names the series using the name displayed in the
legend.
|
|
Data points
|
The individual parts of a data series. Data points can
be bars, points on a line, a slice of a pie, a circle, etc. Data points are
identified in chart tips using the series name and the value of the data
point.
|
|
Gridlines
|
Lines that extend from an axis across the plot area to
help guide the eye from the data point to its corresponding value.
|

Identifying chart objects
|
|
|
|
o
|
If the chart tips are not visible, you can select the Show
names option on the Chart page of the Options dialog box.
|
|
|
|
|
o
|
Be careful when selecting a chart object. For example,
it is easy to select the plot area when you are trying to select the category
axis. Therefore, after you select a chart object, verify that the selection
handles appear around the correct chart object.
|
|
|
|
C Procedures
|
1. Position the insertion point over the desired object to display a chart tip.
|
f Step-by-Step
Identify a chart object.
|
Steps
|
Practice Data
|
|
1. Position the insertion point over the
desired object to display a chart tip.
The chart tip appears displaying the name of the chart object.
|
Position the insertion point
over the last data point in the Feb series
|
Position the insertion point over other chart objects and view
the chart tips.
d Discussion
Whenever a chart or chart
object is selected, the Chart toolbar appears. Whether you create an
embedded chart or a chart sheet, you can use the same editing tools on the Chart
toolbar to modify the chart. For example, if you want to change the chart
type, you can use the Chart Type button on the Chart toolbar. The
Chart toolbar is a floating palette and can be moved anywhere within the
Excel window. You can place the toolbar below the other toolbars at the top of
the window, if desired.
The tools available on the Chart toolbar along with
their functions are listed in the following table:
|
Tools
|
Use
|
|
 Chart Type Chart Type
|
Changes the chart type.
|
|
 Legend Legend
|
Shows or hides the legend.
|
|
 Format Format
|
Provides formatting options for the selected chart
object.
|
|
 Data Table Data Table
|
Adds or removes the data table that displays the data
used to create the chart.
|
|
 By Row By Row
|
Changes the plot direction so that the data is plotted
by row.
|
|
 By Column By Column
|
Changes the plot direction so that the data is plotted
by column.
|
|
 Angle Text Downward Angle Text Downward
|
Angles the text in the selected object downward.
|
|
 Angle Text Upward Angle Text Upward
|
Angles the text in the selected object upward.
|
|

Chart Objects
|
Provides a list of chart objects.
|

The Chart toolbar
C Procedures
|
1. Select the chart to display the Chart toolbar.
|
|
2. Drag the Chart toolbar to the desired position on the screen.
|
|
3. Release the mouse button.
|
f Step-by-Step
Move the Chart toolbar.
|
Steps
|
Practice Data
|
|
1. Select the chart to display the Chart toolbar.
Selection handles appear around the chart and the Chart toolbar
appears.
|
Click the chart area, if
necessary
|
|
2. Drag the Chart toolbar to the desired position on the
screen.
Selection handles appear around the chart and the Chart toolbar
moves as you drag.
|
Drag the Chart toolbar by its title bar below
the Formatting toolbar
|
|
3. Release the mouse button.
The Chart toolbar appears in the new location.
|
Release the mouse button
|
d Discussion
You can change the chart type to one of a number of types:
column, bar, line, pie, XY (scatter), area, doughnut, radar, surface, bubble,
stock, cylinder, cone, and pyramid. Changing the chart
type can change the way your data is represented. For example, if your sales
data appears as a line chart, it will clearly demonstrate sales trends. Using
the same data in a pie chart provides a clear idea of what percent of the total
sales each amount represents.

Changing the chart type
C Procedures
|
1. Select the chart.
|
|
2. Click the arrow on the Chart Type button  . .
|
|
3. Select the desired chart type.
|
f Step-by-Step
Change the chart type using
the Chart toolbar.
|
Steps
|
Practice Data
|
|
1. Select the chart.
Selection handles appear around the chart.
|
Click the chart area, if
necessary
|
|
2. Click the arrow on the Chart Type button.
A list of chart types appears.
|
Click the arrow on 
|
|
3. Select the desired chart type.
The chart type changes accordingly.
|
Click  (third row, first column) (third row, first column)
|
d Discussion
You can use the By Row and By Column buttons on
the Chart toolbar to change the plot direction of the data. For example, you can change a sales
chart that displays the representatives names along the category axis and the
month names in the legend to a sales chart that displays the month names along
the category axis and the representatives names in the legend. The By Row button
changes the chart so that the data series is taken from rows of data. The By
Column button changes the chart so that the data series is taken from
columns of data.

Changing plot direction
C Procedures
|
1. Select the chart.
|
|
2. To change the plot direction from columns to rows, click the By
Row button  . .
|
|
3. To change the plot direction from rows to columns, click the By
Column button  . .
|
f Step-by-Step
Change the plot direction of a chart.
|
Steps
|
Practice Data
|
|
1. Select the chart.
Selection handles appear around the chart.
|
Click the chart area, if
necessary
|
|
2. To change the plot direction from columns to rows, click the By
Row button.
The chart changes to display the plot direction by row.
|
Click 
|
|
3. To change the plot direction from rows to columns, click the By
Column button.
The chart changes to display the plot direction by column.
|
Click 
|
Plot the direction of the data by row.
d Discussion
In a chart, a legend is used to label the data series. When you
create a chart with the Chart Wizard, a legend automatically
appears. However, you can delete the legend if you want more room in the chart,
if you want to make the chart smaller, or if you want to identify the data
series in some other way. For example, if you are going to add a data table,
the legend will be redundant and will take up valuable space on the chart.

A chart without a legend
|
|
|
|
o
|
You can also reposition the legend by selecting it and
dragging it to a new location.
|
|
|
|
C Procedures
|
1. Select the chart.
|
|
2. Click the Legend button  . .
|
f Step-by-Step
Remove or add the chart
legend.
|
Steps
|
Practice Data
|
|
1. Select the chart.
Selection handles appear around the chart.
|
Click the chart area, if
necessary
|
|
2. Click the Legend button.
The legend is removed from or appears in the chart.
|
Click 
|
d Discussion
You can change the orientation of selected text in a chart using
the Angle Text Upward or Angle Text Downward buttons on the Chart
toolbar. The Angle Text Upward button angles selected text upward at
a 45 degree angle. The text is angled with the first letter at the bottom and the last letter at the top. The
Angle Text Downward button angles selected text downward at a 45 degree
angle. The text is angled with the first letter at the top and the last letter
at the bottom. You can angle text to provide room for long labels on the
category axis or to improve the appearance of the chart. For example, if a
chart contains many entries for sales representatives along the category axis,
you can angle the labels to make them easier to read.

Changing text orientation
|
|
|
|
o
|
If the text is already angled, clicking the Angle
Text Upward or Angle Text Downward buttons returns the text to its
default alignment.
|
|
|
|
C Procedures
|
1. Select the text you want to angle.
|
|
2. To angle the text downward, click the Angle Text Downward
button  . .
|
|
3. To angle the text upward, click the Angle Text Upward
button  . .
|
f Step-by-Step
Change the text orientation.
|
Steps
|
Practice Data
|
|
1. Select the text you want to angle.
The text is selected.
|
Click the Value Axis to
select the titles along the axis
|
|
2. To angle the text downward, click the Angle Text Downward
button.
The text is angled downward.
|
Click 
|
|
3. To angle the text upward, click the Angle Text Upward
button.
The text is angled upward.
|
Click 
|
d Discussion
A data table displays the chart values in a
grid below the chart. While charts are useful for providing a visual display of
relative amounts, data tables are useful for providing the actual amounts
referred to in the chart. For example, a chart showing monthly sales by
representative allows you to compare the amounts earned by each representative.
If you add a data table to the chart, you also display the actual sales values
in each month. You can use the Data Table button on the Chart toolbar
to add or remove the data table.

Adding a data table
|
|
|
|
o
|
Data tables require a large amount of space in the
chart area. Adding a data table may significantly reduce the amount of space
available for your chart. You can resize the chart to accommodate the data
table.
|
|
|
|
C Procedures
|
1. Select the chart.
|
|
2. Click the Data Table button  . .
|
f Step-by-Step
Add a data table to a chart.
|
Steps
|
Practice Data
|
|
1. Select the chart.
Selection handles appear around the chart.
|
Click the chart area, if
necessary
|
|
2. Click the Data Table button.
The data table appears in or is removed from the chart.
|
Click 
|
Select the chart and drag the bottom center selection handle to
the bottom of row 35 to create space for both the data table and the chart.
d Discussion
You can use the Format button on the Chart toolbar
to format a selected chart object. Formatting changes
the appearance of the chart. For example, if you are using the chart in a
presentation, you may want to change the font of the text in the chart to match
the font you will be using throughout the presentation.
The formatting options available depend on the selected object.
For example, if the chart area is selected, you can change the patterns, fonts,
and chart area properties. If the category axis is selected, you can change the
patterns, scale, font, number, and alignment. You can select the desired chart
object using the Chart Objects list on the Chart toolbar or by
clicking the chart object.

Formatting the chart title
|
|
|
|
o
|
The name of the Format button will change
depending on the selected object. For example, if the chart area is selected,
the button name changes to Format Chart Area. If the category axis is
selected, the button name changes to Format Axis.
|
|
|
|
C Procedures
|
1. Select the desired chart object.
|
|
2. Click the Format button  . .
|
|
3. Select the desired tab.
|
|
4. Make the desired changes.
|
|
5. Select OK.
|
f Step-by-Step
Format a chart object.
|
Steps
|
Practice Data
|
|
1. Select the desired chart object.
Selection handles appear around the chart object.
|
Click the title First
Quarter Sales
|
|
2. Click the Format button.
The Format dialog box opens.
|
Click 
|
|
3. Select the desired tab.
The desired page appears.
|
Click the Font tab
|
|
4. Make the desired changes.
The changes appear in the Preview box.
|
Scroll as necessary and click 12 in the Size
list box
|
|
5. Select OK.
The Format dialog box closes and the changes appear in
the chart.
|
Click OK
|
Format the numbers on the value axis to appear without decimal
places using the Number page in the Format dialog box.
d Discussion
When a chart is selected, colored borders appear around the
labels and data used in the chart. You can add
or remove data from a chart by changing the border surrounding the data to
include or exclude one or more series of data. For example, if you want to
remove a sales representative from a chart, you can drag the border surrounding
the sales data so that it does not include that representative. You can only
redefine the range to include or exclude adjacent data.

A border around the data used by a chart
C Procedures
|
1. Select the chart.
|
|
2. Point to the bottom right corner of the border surrounding the
data used in the chart.
|
|
3. Drag the border to the desired location.
|
|
4. Release the mouse button.
|
f Step-by-Step
Change the chart range.
|
Steps
|
Practice Data
|
|
1. Select the chart.
Selection handles appear around the chart.
|
Click the chart area, if
necessary
|
|
2. Point to the bottom right corner of the border surrounding the data
used in the chart.
The mouse pointer changes into a solid black cross.
|
Scroll as necessary and point to the lower right
corner of cell D6
|
|
3. Drag the border to the desired location.
The border adjusts as you drag.
|
Drag the border to the lower right corner of cell C6
|
|
4. Release the mouse button.
The chart adjusts to reflect the new chart range.
|
Release the mouse button
|
Scroll to view the chart, if necessary.
d Discussion
Charts embedded on a worksheet print automatically
when you print the worksheet. If you want to print the chart alone, select the
chart before you print. For example, you can print the chart alone if you want
to use the chart to create a slide overhead for a presentation.
|
|
|
|
o
|
Selecting the chart changes the Selection
option in the Print dialog box to Selected Chart.
|
|
|
|
C Procedures
|
1. To print the chart without the worksheet,
select the chart.
|
|
2. Click the Print button  . .
|
|
3. To print the chart with the worksheet, click outside the chart
in the worksheet area.
|
|
4. Click the Print button  . .
|
f Step-by-Step
Print a chart with and without the
worksheet.
|
Steps
|
Practice Data
|
|
1. To print the chart without the worksheet,
select the chart.
Selection handles appear around the chart.
|
Click the chart area, if
necessary
|
|
2. Click the Print button.
The chart prints without the worksheet.
|
Click 
|
|
3. To print the chart with the worksheet, click outside the chart
in the worksheet area.
The cell pointer appears in the worksheet.
|
Click outside the chart in the worksheet area
|
|
4. Click the Print button.
The chart and worksheet print.
|
Click 
|
d Discussion
If you no longer need a chart, you can delete
it from a worksheet. When you delete a chart, only the chart is deleted. The
data from which the chart was created remains in the worksheet.
C Procedures
|
1. Select the chart.
|
|
2. Press [Delete].
|
f Step-by-Step
Delete a chart.
|
Steps
|
Practice Data
|
|
1. Select the chart.
Selection handles appear around the chart.
|
Click the chart area, if
necessary
|
|
2. Press [Delete].
The chart is deleted from the worksheet.
|
Press [Delete]
|
Close CHART1.XLS.
e Task
Use the Chart Wizard to create an embedded chart. Format and
edit the chart using the Chart toolbar. Print the chart.
|
1. Open Chregion.
|
|
2. Select A4:D9 on the NorthEast worksheet.
|
|
3. Open the Chart Wizard.
|
|
4. Create an Area chart using the Area with a 3-D
visual effect. sub-type. Plot the data by columns. Enter the chart title Weekly
Sales and embed the chart as an object in the current worksheet.
|
|
5. Move the chart so that the upper left corner is in cell A12.
|
|
6. Resize the chart so that it fills A12:G30.
|
|
7. Use the Chart Type list on the Chart toolbar to
change the chart to a Column Chart (third row, first column).
|
|
8. Use the Angle Text Upward button to angle the labels on
the category axis.
|
|
9. Use the Data Table button to add the data table.
|
|
10. Resize the chart so that it fills A12:H40.
|
|
11. Remove the legend from the chart.
|
|
12. Remove the data table from the chart.
|
|
13. Restore the legend to the chart.
|
|
14. Use the By Row button to change the data so that it is
plotted by rows.
|
|
15. Use the Format button to bold the names along the category
axis.
|
|
16. Redefine the range used in the chart to exclude the Total
row (B9:D9).
|
|
17. Resize the chart so that it fills A12:G28.
|
|
18. Print the chart only.
|
|
19. Close the workbook without saving it.
|

In this lesson, you will
learn how to:
·
Create user-defined charts
·
Apply user-defined charts
·
Delete user-defined charts
·
Change the data range
·
Edit chart and axis titles
·
Add unlinked text
·
Remove and add axis labels
·
Use the time-scale axis
·
Disable the time-scale axis
·
Use the Range Finder
·
Move the legend
·
Add data labels
·
Display a data table
d Discussion
You may have a chart that contains all the basic formats and
characteristics you want in all your charts. You can use this chart as a model
for creating other charts by identifying the chart as a user-defined chart and
saving it under a different name. The chart is then added to the Chart type
list box in the Chart Type dialog box.

The Chart Type dialog box
C Procedures
|
1. Display the worksheet containing the chart
on which you want to base the user-defined chart.
|
|
2. Click the right mouse button on a blank area
of the chart.
|
|
3. Select the Chart Type command.
|
|
4. Select the Custom Types tab.
|
|
5. Select the User-defined option.
|
|
6. Select Add.
|
|
7. Type a name for the custom chart.
|
|
8. Select OK.
|
|
9. Select OK.
|
f Step-by-Step
From the Student Data directory, open WWSALES.XLS.
Create a user-defined chart.
Display the Chart1 worksheet.
|
Steps
|
Practice Data
|
|
1. Click the right mouse button on a blank
area of the chart.
Selection handles appear around the chart and a shortcut menu appears.
|
Click the right mouse button to
the left of the chart title
|
|
2. Select the Chart Type command.
The Chart Type dialog box opens.
|
Click Chart Type...
|
|
3. Select the Custom Types tab.
The Custom Types page appears.
|
Click the Custom Types tab
|
|
4. Select the User-defined option.
The User-defined option is selected and a sample of
the chart appears in the Sample box.
|
Click  User-defined User-defined
|
|
5. Select Add.
The Add Custom Chart Type dialog box opens.
|
Click Add...
|
|
6. Type a name for the custom chart.
The name appears in the Name text box.
|
Type My Chart
|
|
7. Select OK.
The Add Custom Chart Type dialog box closes and the new chart name appears
in the Chart type list box in the Chart Type dialog box.
|
Click OK
|
|
8. Select OK.
The Chart Type dialog box closes.
|
Click OK
|
d Discussion
User-defined charts are listed in the Chart type list box in
the Chart Type dialog box and usually contain the basic formats and
characteristics of the chart types you use most frequently. Any time you create
a chart, instead of using one of the standard chart types, you can select a
user-defined chart from the Chart type list box.

Applying user-defined charts
C Procedures
|
1. Display the worksheet to which you want to
apply the user-defined chart.
|
|
2. Click the Chart Wizard button
 . .
|
|
3. Select the Custom Types tab.
|
|
4. Select the User-defined option.
|
|
5. Select the chart you want to apply from the Chart type list
box.
|
|
6. Select Next.
|
|
7. Click the Collapse Dialog button  at the end of the Data range text
box. at the end of the Data range text
box.
|
|
8. Select the range you want to use in the chart.
|
|
9. Press [Enter].
|
|
10. Select Next.
|
|
11. Select the Titles tab.
|
|
12. Select the text in the Chart title text box.
|
|
13. Type the title of the chart.
|
|
14. Select Next.
|
|
15. Select the As new sheet option.
|
|
16. Type the name of the sheet.
|
|
17. Select Finish.
|
f Step-by-Step
Apply a user-defined chart.
Display the Sheet2 worksheet.
|
Steps
|
Practice Data
|
|
1. Click the Chart Wizard button.
The Chart Wizard - Step 1 of 4 - Chart Type dialog box opens.
|
Click 
|
|
2. Select the Custom Types tab.
The Custom Types page appears.
|
Click the Custom Types tab, if necessary
|
|
3. Select the User-defined option.
The User-defined option is selected.
|
Click  User-defined User-defined
|
|
4. Select the chart you want to apply from the Chart type list
box.
The chart is selected.
|
Click My Chart
|
|
5. Select Next.
The Chart Wizard - Step 2 of 4 - Chart Source Data dialog box opens.
|
Click Next>
|
|
6. Click the Collapse Dialog button at the end of the Data
range text box.
The Chart Wizard - Step 2 of 4 - Chart Source Data dialog box collapses so
that you can view the worksheet.
|
Click Data range 
|
|
7. Drag to select the range you want to use in the chart.
A marquee appears around the range as you drag.
|
Drag A2:D6
|
|
8. Release the mouse button.
The range is selected.
|
Release the mouse button
|
|
9. Press [Enter].
The Source Data dialog box opens with the range reference displayed in the
Data range text box.
|
Press [Enter]
|
|
10. Select Next.
The Source Data dialog box closes and the Chart Wizard - Step 3 of
4 - Chart Options dialog box opens.
|
Click Next>
|
|
11. Select the Titles tab.
The Titles page appears.
|
Click the Titles tab, if necessary
|
|
12. Drag to select the text in the Chart title text box.
The text is highlighted as you drag.
|
Drag to select the text in the Chart title text
box
|
|
13. Release the mouse button.
The text is selected.
|
Release the mouse button
|
|
14. Type the title of the chart.
The title appears in the Chart title text box.
|
Type Second Quarter
|
|
15. Select Next.
The Chart Wizard - Step 4 of 4 - Chart Location dialog box opens.
|
Click Next>
|
|
16. Select the As new sheet option.
The As new sheet option and the text in the corresponding
text box are selected.
|
Click  As new sheet As new sheet
|
|
17. Type the name of the sheet.
The sheet name appears in the text box.
|
Type My Chart
|
|
18. Select Finish.
The Chart Wizard dialog box closes and a worksheet with a
user-defined chart is inserted into the workbook.
|
Click Finish
|
d Discussion
When a user-defined chart has been created, it becomes part of the overall
Excel setup. It is not associated with any particular worksheet. It is stored
as a custom chart and appears in the Chart type list box in the
Chart Type dialog box. If you no longer need a user-defined chart, you can
delete it from the Chart type list box.
C Procedures
|
1 Display any worksheet that contains a
chart.
|
|
2. Click the right mouse button on a blank area of the chart.
|
|
3. Select the Chart Type command.
|
|
4. Select the Custom Types tab.
|
|
5. Select the User-defined option.
|
|
6. Select the chart you want to delete.
|
|
7. Select Delete.
|
|
8. Select OK.
|
|
9. Select OK.
|
f Step-by-Step
Delete a user-defined chart.
Display the My Chart worksheet, if necessary.
|
Steps
|
Practice Data
|
|
1. Click the right mouse button on a blank
area of the chart.
Selection handles appear around the chart and a shortcut menu appears.
|
Click the right mouse button to
the left of the chart title
|
|
2. Select the Chart Type command.
The Chart Type dialog box appears.
|
Click Chart Type...
|
|
3. Select the Custom Types tab.
The Custom Types page appears.
|
Click the Custom Types tab, if necessary
|
|
4. Select the User-defined option.
The User-defined option is selected and a sample of a
chart appears in the Sample box.
|
Click  User-defined User-defined
|
|
5. Select the chart you want to delete.
The chart is selected and a sample of the chart appears in the Sample box.
|
Click My Chart
|
|
6. Select Delete.
A Microsoft Excel warning box opens, asking you to confirm the deletion.
|
Click Delete
|
|
7. Select OK.
The Microsoft Excel warning box closes and the chart is deleted from the Chart
type list box.
|
Click OK
|
|
8. Select OK.
The Chart Type dialog box closes and the user-defined chart is no longer
available.
|
Click OK
|
d Discussion
There may be times when
you want to view the data in a chart. For example, you have created a chart
with data from the second quarter but you now want to view similar data from
the third quarter. To accomplish this, you can change the data source. The
worksheet range currently displayed in a chart can be replaced with a range of
data from a different worksheet.
When switching between worksheets in an Excel workbook, if a
range is selected during the charting process, that same range is selected when
you move to a new worksheet. This process is convenient if you want to select
identical ranges on different worksheets.

The Source Data dialog box
C Procedures
|
1. Display the
worksheet that contains the chart for which you want to change the data
source.
|
|
2. Click the right mouse button on a blank area of the chart.
|
|
3. Select the Source Data command.
|
|
4. Select the Data Range tab.
|
|
5. Click the Collapse Dialog button  at the end of the Data range text
box. at the end of the Data range text
box.
|
|
6. Select the worksheet containing the new source data.
|
|
7. Press [Enter].
|
|
8. Select OK.
|
f Step-by-Step
Change the data source in
a chart.
Display the My Chart worksheet, if necessary.
|
Steps
|
Practice Data
|
|
1. Click the right mouse button on a blank
area of the chart.
Selection handles appear around the chart and a shortcut menu appears.
|
Click the right mouse button to
the left of the chart title
|
|
2. Select the Source Data command.
The Source Data dialog box opens.
|
Click Source Data...
|
|
3. Select the Data Range tab.
The Data Range page appears.
|
Click the Data Range tab, if necessary
|
|
4. Click the Collapse Dialog button  at the end of the Data range text
box. at the end of the Data range text
box.
The Source Data dialog box collapses so that you can view the worksheet.
|
Click Data range 
|
|
5. Select the worksheet containing the new source data.
The worksheet appears with the same source data range selected.
|
Click the Sheet3 worksheet tab
|
|
6. Press [Enter].
The Source Data dialog box expands with the range reference displayed in
the Data range text box.
|
Press [Enter]
|
|
7. Select OK.
The Source Data dialog box closes and the new source data appears in the chart.
|
Click OK
|
d Discussion
Excel normally inserts any labels you
include in the selected range into the worksheet. If you want to
add a title to the chart or add descriptions to the axes, you have to insert
them separately using the Chart Options dialog box. You can also use the Chart
Options dialog box when you want to change the chart or axis titles.

The Chart Options dialog box
C Procedures
|
1. Display the worksheet that contains
the chart for which you want
to edit the chart and axis titles.
|
|
2. Click the right mouse button on a blank area of the chart.
|
|
3. Select the Chart Options command.
|
|
4. Select the Titles tab.
|
|
5. Select the text in the Chart title text box.
|
|
6. Type the title for the chart.
|
|
7. Select the Category (X) axis text box.
|
|
8. Type the title for the X axis.
|
|
9. Select the Value (Y) axis text box.
|
|
10. Type the title for the Y axis.
|
|
11. Select OK.
|
f Step-by-Step
Edit chart and axis
titles.
Display the My Chart worksheet, if necessary.
|
Steps
|
Practice Data
|
|
1. Click the right mouse button on a blank
area of the chart.
Selection handles appear around the chart and a shortcut menu appears.
|
Click the right mouse button to
the left of the chart title
|
|
2. Select the Chart Options command.
The Chart Options dialog box opens.
|
Click Chart Options...
|
|
3. Select the Titles tab.
The Titles page appears.
|
Click the Titles tab, if necessary
|
|
4. Drag to select the text in the Chart title text box.
The text is highlighted as you drag.
|
Drag to select the text in the Chart title text
box
|
|
5. Release the mouse button.
The text is selected.
|
Release the mouse button
|
|
6. Type the title for the chart.
The title appears in the Chart title text box and the
Sample box.
|
Type Third Quarter
|
|
7. Select the Category (X) axis text box.
The insertion point appears in the text box.
|
Press [Tab]
|
|
8. Type the title for the X axis.
The title appears in the Category (X) axis text box
and the Sample box.
|
Type Months
|
|
9. Select the Value (Y) axis text box.
The insertion point appears in the text box.
|
Press [Tab]
|
|
10. Type the title for the Y axis.
The title appears in the Value (Y) axis text box and
the Sample box.
|
Type Sales in Thousands
|
|
11. Select OK.
The Chart Options dialog box closes and the chart appears with the new
chart and axis titles.
|
Click OK
|
Click in an area outside of the chart to deselect any text.
d Discussion
You can create unlinked text in a
chart. Unlinked text is text that is not linked to a chart element or a
worksheet cell. It is most often used to call attention to, or further explain,
chart data.
Unlinked text is contained in text boxes. Since text boxes
float above the surface of a chart, you can position them anywhere within the
chart.
If a chart object is selected when you create unlinked text, it
is possible that the selected chart object will have its contents altered by
the new text. Therefore, you should make sure that no chart objects are
selected when you are creating unlinked text.
C Procedures
|
1. Display the worksheet that contains the chart to which you want
to add unlinked text.
|
|
2. Deselect any chart objects, if
necessary.
|
|
3. Type the desired text.
|
|
4. Press [Enter].
|
|
5. Point to a border of the text box.
|
|
6. Drag the text box to the desired location.
|
|
7. Release the mouse button.
|
f Step-by-Step
Add unlinked text to a chart.
Display the My Chart worksheet, if necessary.
|
Steps
|
Practice Data
|
|
1. Deselect any chart objects, if necessary.
No selection handles appear in the chart.
|
Click in the area outside of
the chart, if necessary
|
|
2. Type the desired text.
The text appears on the formula bar.
|
Type 1997 Sales
|
|
3. Press [Enter].
A text box with selection handles appears on the chart sheet.
|
Press [Enter]
|
|
4. Point to a border of the text box.
The mouse pointer changes into a black, four-headed arrow with a single,
white arrow attached to it.
|
Point to a border of the text box
|
|
5. Drag the text box to the desired location.
An image of the text box appears as you drag.
|
Drag the text box so that it is centered under the
chart title Third Quarter
|
|
6. Release the mouse button.
The text box appears in the new location on the chart.
|
Release the mouse button
|
Click in an area outside of the chart to deselect the text.
d Discussion
There may be times when
you want to remove or add the axis labels on a chart. For example, you may want to
emphasize the comparative size of the data bar charts without referencing the
values used to create them. You can add or remove axis labels using the Chart
Options dialog box.

Removing axis labels
C Procedures
|
1. Display the worksheet that contains the
chart for which you want to add and remove axis
labels.
|
|
2. Click the right mouse button on a blank area of the chart.
|
|
3. Select the Chart Options command.
|
|
4. Select the Axes tab.
|
|
5. Deselect or select the Category (X) axis or Value (Y)
axis option, as necessary.
|
|
6. Select OK.
|
f Step-by-Step
Remove and add axis labels.
Display the My Chart worksheet.
|
Steps
|
Practice Data
|
|
1. Click the right mouse button on a blank
area of the chart.
Selection handles appear around the chart and a shortcut menu appears.
|
Click the right mouse button to
the left of the chart title
|
|
2. Select the Chart Options command.
The Chart Options dialog box opens.
|
Click Chart Options...
|
|
3. Select the Axes tab.
The Axes page appears.
|
Click the Axes tab
|
|
4. Deselect or select the Category (X) axis or Value (Y)
axis option, as necessary.
The option is deselected or selected and the axis labels are removed from
or added to the chart in the Sample box.
|
Click  Value (Y) axis Value (Y) axis
|
|
5. Select OK.
The Chart Options dialog box closes and the chart appears with or without
the axis labels.
|
Click OK
|
Display the Y axis labels.
d Discussion
Excel contains a special feature called a
time-scale axis. The time-scale axis is automatically applied to any chart axis
data that is formatted by date. The time-scale axis arranges the data
chronologically. It does this even if the data is not in chronological order.
The resulting chart shows the data on a time-scale that is evenly distributed
in the chart. If there are missing dates in the data sequence, the time-scale
axis leaves empty spaces on the axis.

Using the time-scale axis
|
|
|
|
o
|
You can hold the Press and hold to view sample
button in the Chart Wizard dialog box to preview how a chart will appear.
|
|
|
|
C Procedures
|
1. Display the worksheet on which you
want to create a chart.
|
|
2. Select any cell within the range you are using in the chart.
|
|
3. Click the Chart Wizard button  . .
|
|
4. Select the Standard Types tab.
|
|
5. Select the desired chart type from the Chart type list
box.
|
|
6. Select Next.
|
|
7. Select Finish.
|
f Step-by-Step
Use the time-scale axis to create
a chart.
Display the Sheet4 worksheet. Notice that the cells
containing dates in column A are not arranged in chronological order.
|
Steps
|
Practice Data
|
|
1. Select any cell within the range you are
using in the chart.
The cell pointer moves to the cell.
|
Click cell A3
|
|
2. Click the Chart Wizard button.
The Chart Wizard - Step 1 of 4 - Chart Type dialog box opens.
|
Click 
|
|
3. Select the Standard Types tab.
The Standard Types page appears.
|
Click the Standard Types tab, if necessary
|
|
4. Select the desired chart type from the Chart type list
box.
The chart type is selected.
|
Click Column, if necessary
|
|
5. Select Next.
The Chart Wizard - Step 2 of 4 - Chart Source Data dialog box opens and
the chart range is automatically selected.
|
Click Next>
|
|
6. Select Finish.
The Chart Wizard dialog box closes and the chart containing the
automatic time-scale axis appears on the worksheet.
|
Click Finish
|
Notice that the dates appear in chronological order on the
chart.
d Discussion
The time-scale axis feature in Excel automatically arranges
data formatted by date chronologically. There may be times when you have date
formatted data that is not arranged chronologically and
you want to display it this way in the chart. In order to display the data so
that it is not arranged chronologically, you have to disable the automatic
time-scale axis. Selecting the Category option displays the data on the
chart in the same order it appears on the worksheet.

Disabling the time-scale axis
C Procedures
|
1. Display the worksheet that contains the chart for which
you want to disable the time-scale axis.
|
|
2. Click the right mouse button on a blank area of the chart.
|
|
3. Select the Chart Options command.
|
|
4. Select the Axes tab.
|
|
5. Select the Category option.
|
|
6. Select OK.
|
f Step-by-Step
Disable the time-scale axis.
Display the Sheet4 worksheet, if necessary. Notice that
the cells containing dates in column A are not arranged in chronological order.
|
Steps
|
Practice Data
|
|
1. Click the right mouse button on a blank
area of the chart.
Selection handles appear around the chart and a shortcut menu appears.
|
Click the right mouse button to
the left of the chart title
|
|
2. Select the Chart Options command.
The Chart Options dialog box opens.
|
Click Chart Options...
|
|
3. Select the Axes tab.
The Axes page appears.
|
Click the Axes tab, if necessary
|
|
4. Select the Category option.
The Category option is selected and the chart in the Sample
box changes accordingly.
|
Click  Category Category
|
|
5. Select OK.
The Chart Options dialog box closes, the time-scale axis is disabled, and
the sequence of the data in the chart changes accordingly.
|
Click OK
|
d Discussion
The Range Finder places color codes around cell
ranges, making it easy to identify the cells
being used in a graphic. You can move these color coded ranges to adjust the
data displayed in a chart. The borders of each data and label range appear in a
different color. You can resize the ranges to include or exclude data from the
chart. As the ranges are resized, the chart adjusts automatically to reflect
the changes.

Using the Range Finder
C Procedures
|
1. Display the worksheet on which
you want to use the Range Finder.
|
|
2. Select the chart.
|
|
3. Point to one of the drag handles in the lower right corner of a
colored border.
|
|
4. Drag the border to resize the range, as desired.
|
|
5. Release the mouse button.
|
f Step-by-Step
Use the Range Finder.
Display the Sheet4 worksheet.
|
Steps
|
Practice Data
|
|
1. Select the chart.
Selection handles appear around the chart and the data and labels used in
the chart are outlined in color.
|
Click in a blank area of the
chart, if necessary
|
|
2. Point to one of the drag handles in the
lower right corner of a colored border.
The mouse pointer changes into a black cross.
|
Point to the drag handle in the lower right corner of
the blue border in column B
|
|
3. Drag the border to resize the range, as desired.
All the borders adjust as you drag.
|
Drag the border upward so that rows 8 and 9 are not
included in the range
|
|
4. Release the mouse button.
All the ranges are resized and the chart changes accordingly to
display the data included in the new range.
|
Release the mouse button
|
Resize the data range to include rows 8 and 9.
d Discussion
The default position for a chart
legend is on the right side of the chart next to the plotted area. The legend
can be moved to any location around the chart to improve the appearance of the
chart.

Moving the legend
|
|
|
|
o
|
The legend can also be moved to any location on the
chart by dragging it with the mouse.
|
|
|
|
C Procedures
|
1. Display the worksheet that contains the
legend you want to move.
|
|
2. Click the right mouse button on a blank area
of the chart.
|
|
3. Select the Chart Options command.
|
|
4. Select the Legend tab.
|
|
5. Select the desired option.
|
|
6. Select OK.
|
f Step-by-Step
Move the legend.
Display the My Chart worksheet.
|
Steps
|
Practice Data
|
|
1. Click the right mouse button on a blank
area of the chart.
Selection handles appear around the chart and a shortcut menu appears.
|
Click the right mouse button to
the left of the chart title
|
|
2. Select the Chart Options command.
The Chart Options dialog box opens.
|
Click Chart Options...
|
|
3. Select the Legend tab.
The Legend page appears.
|
Click the Legend tab
|
|
4. Select the desired option.
The desired option is selected and the chart in the Sample box
changes accordingly.
|
Click  Left Left
|
|
5. Select OK.
The Chart Options dialog box closes and the legend appears in the new
location.
|
Click OK
|
d Discussion
You can choose to add data labels
to a chart. Excel displays the exact values of the data in a chart next to the
graphic objects they represent. These values help add clarity to the chart.
Data labels can be added to any chart type, but they are usually used for pie
charts.

Adding data labels
C Procedures
|
1. Display the worksheet that contains the
chart to which you want to add data labels.
|
|
2. Click the right mouse button on a blank area of the chart.
|
|
3. Select the Chart Options command.
|
|
4. Select the Data Labels tab.
|
|
5. Select the desired option.
|
|
6. Select OK.
|
f Step-by-Step
Add data labels.
Display the My Chart worksheet, if necessary.
|
Steps
|
Practice Data
|
|
1. Click the right mouse button on a blank
area of the chart.
Selection handles appear around the chart and a shortcut menu appears.
|
Click the right mouse button to
the left of the chart title
|
|
2. Select the Chart Options command.
The Chart Options dialog box opens.
|
Click Chart Options...
|
|
3. Select the Data Labels tab.
The Data Labels page appears.
|
Click the Data Labels tab
|
|
4. Select the desired option.
The desired option is selected and the chart in the Sample box
changes accordingly.
|
Click  Show value Show value
|
|
5. Select OK.
The Chart Options dialog box closes and the data labels appear in the
chart.
|
Click OK
|
d Discussion
You can display a data table
at the bottom of a chart. Excel includes all the ranges and labels that were
used to create the chart in the data table. A data table is helpful when you
want to explain the details of the chart during a presentation, or when exact
figures need to be known.

Adding a data table
C Procedures
|
1. Display the worksheet that contains the
chart to which you want to add a data label.
|
|
2. Click the right mouse button on a blank area of the chart.
|
|
3. Select the Chart Options command.
|
|
4. Select the Data Table tab.
|
|
5. Select the Show data table option.
|
|
6. Select OK.
|
f Step-by-Step
Add a data table.
Display the My Chart worksheet.
|
Steps
|
Practice Data
|
|
1. Click the right mouse button on a blank
area of the chart.
Selection handles appear around the chart and a shortcut menu appears.
|
Click the right mouse button to
the left of the chart title
|
|
2. Select the Chart Options command.
The Chart Options dialog box opens.
|
Click Chart Options...
|
|
3. Select the Data Table tab.
The Data Table page appears.
|
Click the Data Table tab
|
|
4. Select the Show data table option.
The Show data table option is selected and the chart
in the Sample box changes accordingly.
|
Click  Show data table Show data table
|
|
5. Select OK.
The Chart Options dialog box closes and the data table appears in the
chart.
|
Click OK
|
Close WWSALES.XLS.
e Task
Create and apply a user-defined chart. Change the data source,
edit titles, add unlinked text, and remove and add axis labels. Use and then
disable the time-scale axis. Use the Range Finder, move a legend, and add data
labels and a data table.
|
1. Open Region1.
|
|
2. Open the Chart Type dialog box. Create a user-defined chart
using the chart on the Chart1 worksheet. Call the new chart Region.
|
|
3. Display the Sheet2 worksheet. Use the Chart Wizard button
to access the user-defined chart called Region. Use the range A4:D7.
Title the chart Second Quarter. Place the chart on a new sheet called Region.
|
|
4. Delete the Region chart from the Chart type list
box.
|
|
5. Open the Source Data dialog box. Replace the Sheet2
worksheet data with the Sheet3 worksheet data so that the chart now
displays the third quarter.
|
|
6. Use the Chart Options dialog box to change the title of the
chart to Third Quarter and add the title Months to the X axis.
|
|
7. Add the unlinked text Regional Sales to the chart. Place
it in the upper right corner of the chart. Make sure that you deselect any
chart objects first, if necessary.
|
|
8. Use the Chart Options dialog box to remove the axis labels and
then replace them.
|
|
9. Display the Sheet4 worksheet. Select any cell within the
range A3:B9. Use the Chart Wizard button to create a time-scale chart.
|
|
10. Use the Chart Options dialog box to disable the time-scale axis.
|
|
11. With the Sheet4 worksheet still in view, resize the range
so that only the data from rows 4 to 6 are included in the chart. Restore the
chart to include the full range of data.
|
|
12. Display the Region worksheet. Use the Chart Options dialog
box to move the legend to the left of the chart.
|
|
13. Use the Chart Options dialog box to add data labels to the chart.
Show the value above the bars.
|
|
14. Use the Chart Options dialog box to add a data table to the
chart..
|
|
15. Close the workbook without saving it.
|

In this lesson, you will
learn how to:
·
Add a data series
·
Delete a data series
·
Add data - different worksheets
·
Edit data series names
·
Change data series chart types
·
Add a trendline
·
Chart non-adjacent ranges
d Discussion
You can add additional data series
to an existing chart. This option is useful for charts that accumulate data
over a period of time. For example, you may have a chart that adds data at the
end of each quarter. Therefore, you enter the data for each quarter as it comes
in, adding the new data range to the existing chart. Being able to add the data
as it is accumulated prevents charts from having empty placeholders for data
that is not yet available.

Adding a data series
C Procedures
|
1. Display the worksheet that contains the chart to which you want to
add a data series.
|
|
2. Click the right mouse button on a blank area of the chart.
|
|
3. Select the Source Data command.
|
|
4. Select the Series tab.
|
|
5. Select Add.
|
|
6. Select the Name text box.
|
|
7. Type the name of the new data series.
|
|
8. Click the Collapse Dialog button  at the end of the Values text box. at the end of the Values text box.
|
|
9. Select the worksheet containing the data series you want to add.
|
|
10. Select the range containing the new data series.
|
|
11. Press [Enter].
|
|
12. Select OK.
|
f Step-by-Step
From the Student Data directory, open PRODS1.XLS.
Add a data series.
Display the Chart1 worksheet, if necessary.
|
Steps
|
Practice Data
|
|
1. Click the right mouse button on a blank
area of the chart.
Selection handles appear around the chart and a shortcut menu appears.
|
Click the right mouse button to
the left of the chart title
|
|
2. Select the Source Data command.
The Source Data dialog box opens.
|
Click Source Data...
|
|
3. Select the Series tab.
The Series page appears.
|
Click the Series tab
|
|
4. Select Add.
A new data series is added to the Series list box.
|
Click Add
|
|
5. Select the Name text box.
The insertion point appears in the Name text box.
|
Click in the Name text box
|
|
6. Type the name of the new data series.
The name appears in the Name text box.
|
Type Leisure
|
|
7. Click the Collapse Dialog button at the end of the Values
text box.
The Source Data dialog box collapses so that you can see the worksheet.
|
Click Values 
|
|
8. Select the worksheet containing the data series you want to add.
The worksheet appears.
|
Click the NorthEast worksheet tab
|
|
9. Drag to select the range containing the new data series.
A marquee appears around the range as you drag.
|
Drag B12:E12
|
|
10. Release the mouse button.
The range is selected.
|
Release the mouse button
|
|
11. Press [Enter].
The Source Data dialog box expands with the range reference displayed in
the Values text box.
|
Press [Enter]
|
|
12. Select OK.
The Source Data dialog box closes and the chart appears with the new data
series.
|
Click OK
|
d Discussion
You can delete any data series in
a chart. Deleting a data series from the chart removes the data series itself
(that is, the chart object representing the data) and any data label that is
attached to it. It does not delete the data from the underlying worksheet.
|
|
|
|
o
|
You can also delete a data series by clicking it and
pressing the [Delete] key.
|
|
|
|
C Procedures
|
1. Display the worksheet that contains the
chart from which you want to delete a data series.
|
|
2. Click the right mouse button on a blank area of the chart.
|
|
3. Select the Source Data command.
|
|
4. Select the Series tab.
|
|
5. Select the data series you want to delete from the Series list
box.
|
|
6. Select Remove.
|
|
7. Select OK.
|
f Step-by-Step
Delete a data series.
Display the Chart1 worksheet.
|
Steps
|
Practice Data
|
|
1. Click the right mouse button on a blank
area of the chart.
Selection handles appear around the chart and a shortcut menu appears.
|
Click the right mouse button to
the left of the chart title
|
|
2. Select the Source Data command.
The Source Data dialog box opens.
|
Click Source Data...
|
|
3. Select the Series tab.
The Series page appears.
|
Click the Series tab
|
|
4. Select the data series you want to delete from the Series list
box.
The data series is selected.
|
Click Leisure
|
|
5. Select Remove.
The data series is removed from the Series list box and the sample
chart.
|
Click Remove
|
|
6. Select OK.
The Source Data dialog box closes and the data series is deleted from the
chart.
|
Click OK
|
d Discussion
You can add data series from different worksheets to the
same chart. This option is useful when you want to compare similar data from
different locations. For example, you may want to compare the sales of similar
products from different regions. However, each region’s data is kept on
separate worksheets. The product sales data series from each worksheet can be
added to the same chart using the Source Data dialog box.

Adding a data series from a different worksheet
C Procedures
|
1. Display the worksheet that contains the
chart to which you want to add a data series from a different
worksheet.
|
|
2. Click the right mouse button on a blank area of the chart.
|
|
3. Select the Source Data command.
|
|
4. Select the Series tab.
|
|
5. Select Add.
|
|
6. Click the Collapse Dialog button  at the end of the Values text box. at the end of the Values text box.
|
|
7. Select the worksheet containing the data series you want to add.
|
|
8. Select the range you want to add to the chart.
|
|
9. Press [Enter].
|
|
10. Select OK.
|
f Step-by-Step
Add a data series from a different worksheet.
Display the First Quarter worksheet.
|
Steps
|
Practice Data
|
|
1. Click the right mouse button on a blank
area of the chart.
Selection handles appear around the chart and a shortcut menu appears.
|
Click the right mouse button to
the left of the chart title
|
|
2. Select the Source Data command.
The Source Data dialog box opens.
|
Click Source Data...
|
|
3. Select the Series tab.
The Series page appears.
|
Click the Series tab, if necessary
|
|
4. Select Add.
A new data series is added to the Series list box.
|
Click Add
|
|
5. Click the Collapse Dialog button at the end of the Values
text box.
The Source Data dialog box collapses so that you can see the worksheet.
|
Click Values 
|
|
6. Select the worksheet containing the data series you want to add.
The worksheet appears.
|
Click the SouthEast worksheet tab
|
|
7. Drag to select the range you want to add to the chart.
A marquee appears around the range as you drag.
|
Drag B9:B12
|
|
8. Release the mouse button.
The range is selected.
|
Release the mouse button
|
|
9. Press [Enter].
The Source Data dialog box expands with the range reference displayed in
the Values text box.
|
Press [Enter]
|
|
10. Select OK.
The Source Data dialog box closes and the chart appears with the new data
series from another worksheet.
|
Click OK
|
d Discussion
When you create a data series without including a
name for the series, Excel provides default names such as Series1, Series2,
etc., depending on the number of data series you create. You can edit these
default names to be more representative of the data they are depicting.

Editing data series names
C Procedures
|
1. Display the worksheet that contains
the chart for which you want edit the data series names.
|
|
2. Click the right mouse button on a blank area of the chart.
|
|
3. Select the Source Data command.
|
|
4. Select the Series tab.
|
|
5. Select the data series in the Series list box you want to
edit.
|
|
6. Select the text in the Name text box.
|
|
7. Type the name of the data series.
|
|
8. Select OK.
|
f Step-by-Step
Edit data series names.
Display the First Quarter worksheet, if necessary.
|
Steps
|
Practice Data
|
|
1. Click the right mouse button on a blank
area of the chart.
Selection handles appear around the chart and a shortcut menu appears.
|
Click the right mouse button to
the left of the chart title
|
|
2. Select the Source Data command.
The Source Data dialog box opens.
|
Click Source Data...
|
|
3. Select the Series tab.
The Series page appears.
|
Click the Series tab, if necessary
|
|
4. Select the data series in the Series list box that you
want to edit.
The data series is selected.
|
Click Series1 in the Series list
box, if necessary
|
|
5. Drag to select the text in the Name text box.
The text is highlighted as you drag.
|
Drag to select the text in the Name text
box
|
|
6. Release the mouse button.
The text is selected.
|
Release the mouse button
|
|
7. Type the name of the data series.
The name appears in the Name text box.
|
Type NorthEast
|
|
8. Select OK.
The Source Data dialog box closes and the chart appears with the new data
series name.
|
Click OK
|
Edit the Series2 data series name to read SouthEast.
d Discussion
You can mix different chart types
within a single chart. For example, you can show the total sales for a product
in a column format and, at the same time, show the total sales for another
product in a line format. Mixing chart types can help show the relationships
between the data series more accurately and improves the chart’s overall
appearance and clarity.

Changing data series chart types
|
|
|
|
o
|
You can hold the Press and hold to view sample
button in the Chart Wizard dialog box to preview how a chart will appear.
|
|
|
|
C Procedures
|
1. Display the worksheet that contains
the chart for which you want to change a data series type.
|
|
2. Click the right mouse button on the data series object you want
to change.
|
|
3. Select the Chart Type command.
|
|
4. Select the Standard Types tab.
|
|
5. Select the chart type you want to use from the Chart type list
box.
|
|
6. Select OK.
|
f Step-by-Step
Change a data series chart type.
Display the Chart1 worksheet.
|
Steps
|
Practice Data
|
|
1. Click the right mouse button on the data
series object you want to change.
The data series is selected and a shortcut menu appears.
|
Click the right mouse button on
the “Baseball” data series (one of the yellow columns)
|
|
2. Select the Chart Type command.
The Chart Type dialog box opens.
|
Click Chart Type...
|
|
3. Select the Standard Types tab.
The Standard Types page appears.
|
Click the Standard Types tab
|
|
4. Select the chart type you want to use from the Chart type list
box.
The chart type is selected and the corresponding subtypes appear under Chart
sub-types.
|
Click Line
|
|
5. Select OK.
The Chart Type dialog box closes and the chart appears with the selected
data series represented by the new chart type.
|
Click OK
|
Select the data series with the Line chart type you just
created. Change the data series back to the Column chart type.
d Discussion
Because of the varying height of the
bars in a column chart, it is sometimes difficult to
determine the general direction of the action. Excel enables you to quickly add
a trendline to a data series. A trendline has the effect of smoothing out the
rough spots in a chart and giving you a better picture of the data series.

Adding a trendline
C Procedures
|
1. Display the worksheet that contains the chart to which you want to add a trendline.
|
|
2. Click the right mouse button on the data series to which you
want to add a trendline.
|
|
3. Select the Add Trendline command.
|
|
4. Select the trendline type you want to use under Trend/Regression
type.
|
|
5. Select OK.
|
f Step-by-Step
Add a trendline to a data
series.
Select the Chart1 worksheet, if necessary.
|
Steps
|
Practice Data
|
|
1. Click the right mouse button on the data
series to which you want to add a trendline.
The data series is selected and a shortcut menu appears.
|
Click the right mouse button on
the “Baseball” data series (one of the yellow columns)
|
|
2. Select the Add Trendline command.
The Add Trendline dialog box opens.
|
Click Add Trendline...
|
|
3. Select the trendline type you want to use under Trend/Regression
type.
The trendline type is selected.
|
Click Linear, if necessary
|
|
4. Select OK.
The Add Trendline dialog box closes and the chart appears with a
trendline.
|
Click OK
|
Select the trendline, if necessary, and press [Delete]
to delete it.
d Discussion
You can chart non-adjacent ranges
in a worksheet. This option allows you to select only the data you want to
chart and is especially useful when you want to present a clean chart showing
only the current items of interest.

Charting non-adjacent ranges
|
|
|
|
o
|
You can hold the Press and hold to view sample
button in the Chart Wizard dialog box to preview how a chart will appear.
|
|
|
|
C Procedures
|
1. Display the worksheet on which you want to chart non-adjacent ranges.
|
|
2. Click the Chart Wizard button  . .
|
|
3. Select the Standard Types tab.
|
|
4. Select the desired chart type from the Chart type list
box.
|
|
5. Select Next.
|
|
6. Click the Collapse Dialog button  at the end of the Data range text
box. at the end of the Data range text
box.
|
|
7. Select the first range you want to use in the chart.
|
|
8. Hold [Ctrl] and drag to select the non-adjacent range.
|
|
9. Release [Ctrl] and the mouse button.
|
|
10. Press [Enter].
|
|
11. Select Finish.
|
f Step-by-Step
Chart non-adjacent ranges.
Display the NorthEast worksheet.
|
Steps
|
Practice Data
|
|
1. Click the Chart Wizard button.
The Chart Wizard - Step 1 of 4 - Chart Type dialog box opens.
|
Click 
|
|
2. Select the Standard Types tab.
The Standard Types page appears.
|
Click the Standard Types tab, if necessary
|
|
3. Select the desired chart type from the Chart type list
box.
The chart type is selected.
|
Click Column, if necessary
|
|
4. Select Next.
The Chart Wizard - Step 2 of 4 - Chart Source Data dialog box opens.
|
Click Next>
|
|
5. Click the Collapse Dialog button at the end of the Data
range text box.
The Chart Wizard - Step 2 of 4 - Chart Source Data dialog box collapses so
that you can view the worksheet.
|
Click Data range 
|
|
6. Drag to select the first range you want to use in the chart.
A marquee appears around the range as you drag.
|
Drag A9:E9
|
|
7. Release the mouse button.
The range is selected.
|
Release the mouse button.
|
|
8. Hold [Ctrl] and drag to select the non-adjacent range.
A marquee appears around the range as you drag.
|
Hold [Ctrl] and drag A11:E11
|
|
9. Release [Ctrl] and the mouse button.
The range is selected.
|
Release [Ctrl] and the mouse button
|
|
10. Press [Enter].
The Source Data dialog box expands with the selected range references
displayed in the Data range text box.
|
Press [Enter]
|
|
11. Select Finish.
The Source Data dialog box closes and an embedded chart appears on the
worksheet displaying the non-adjacent data series chart objects.
|
Click Finish
|
Close PRODS1.XLS.
e Task
Add and delete data series from the same worksheet. Add a data
series from a different worksheet to a chart. Change a chart type. Add and
remove a trendline. Chart non-adjacent data series.
|
1. Open City1.
|
|
2. Display the Chart1 worksheet, if necessary. Use the
Source Data dialog box to add a data series. Add the range B12:E12 from the NewYork
worksheet and name it Football.
|
|
3. Use the Source Data dialog box to remove the data series you
just added to the chart.
|
|
4. Display the First Quarter worksheet. Use the Source Data
dialog box to add the range B9:B12 from the Chicago worksheet to the
chart.
|
|
5. Use the Source Data dialog box to change data series names. Give
the name NewYork to Series1 and Chicago to Series2.
|
|
6. Display the Chart1 worksheet. Use the Chart Type dialog
box to change the chart to a Bar chart. Then, change it back to a Column
chart.
|
|
7. Add a Linear trendline to the Soccer product.
Delete the trendline.
|
|
8. Display the NewYork worksheet. Use the Chart Wizard button
to create an embedded Column chart. The chart should display the
non-adjacent ranges A10:F10 and A12:F12.
|
|
9. Close the workbook
without saving it.
|

In this lesson, you will
learn how to:
·
Change patterns and colors
·
Create borders
·
Change the plot order
·
Format an axis
·
Change the axis scaling
·
Format data markers
·
Adjust the 3-D view
·
Create a picture graph
·
Scale and stack a picture graph
d Discussion
Excel creates charts in color. However, if
you print to a black and white
printer, the colors appear in grayscale on the printout. Some printers handle
grayscale better than others. To improve the quality of the printout, you can
change the foreground color of the data series to black, the background color
to white, and then fill them with different patterns. It is best to choose
dissimilar patterns for each data series so that adjacent series within a chart
can be easily identified. If you are creating a chart to be printed or
displayed in color, different patterns and colors can still be used for
emphasis.

Changing patterns and colors
C Procedures
|
1. Display the worksheet that contains the chart to which
you want for change patterns and colors.
|
|
2. Click the right mouse button on the data series you want to
change.
|
|
3. Select the Format Data Series command.
|
|
4. Select the Patterns tab.
|
|
5. Select the desired color from the color palette under Area.
|
|
6. Select Fill Effects.
|
|
7. Select the Pattern tab.
|
|
8. Select the Background list.
|
|
9. Select the background color.
|
|
10. Select the desired pattern.
|
|
11. Select OK.
|
|
12. Select OK.
|
f Step-by-Step
From the Student Data directory, open MONTHLY.XLS.
Change patterns and colors.
Display the Chart1 worksheet,
if necessary.
|
Steps
|
Practice Data
|
|
1. Click the right mouse button on the data
series you want to change.
The data series is selected and a shortcut menu appears.
|
Click the right mouse button on
the "Jan" data series (one of the blue columns)
|
|
2. Select the Format Data Series command.
The Format Data Series dialog box opens.
|
Click Format Data Series...
|
|
3. Select the Patterns tab.
The Patterns page appears.
|
Click the Patterns tab, if necessary
|
|
4. Select the desired color from the color palette under Area.
The selected color appears in the Sample box.
|
Click Black (first row, first column)
|
|
5. Select Fill Effects.
The Fill Effects dialog box opens.
|
Click Fill Effects...
|
|
6. Select the Pattern tab.
The Pattern page appears.
|
Click the Pattern tab
|
|
7. Select the Background list.
A color palette appears.
|
Click Background 
|
|
8. Select the background color.
The selected color appears in the Background box.
|
Click White (upper palette, last row, last
column)
|
|
9. Select the desired pattern.
The selected pattern appears in the Sample box.
|
Click the Dark vertical pattern (fifth row,
fourth column)
|
|
10. Select OK.
The Fill Effects dialog box closes.
|
Click OK
|
|
11. Select OK.
The Format Data Series dialog box closes and the chart appears with the
selected data series color and pattern.
|
Click OK
|
Change the “Feb” data series to the Dark horizontal
pattern (last row, fourth column) and the “Mar” data series to the Large
grid pattern (second row, last column). Set the foreground color to black
and the background color to white for both data series.
Click outside of the chart to deselect the data series.
d Discussion
You can place a border around most
chart objects for emphasis or to delineate data. For example,
you could place a border around the chart area to create a frame for the chart
and around a chart title to give it a professional look.
You can control the style, color, and weight (i.e., thickness)
of the border. In addition, you can create a drop shadow for a three-dimensional
look.

Creating borders
C Procedures
|
1. Display the worksheet that contains the
chart to which you want to add a border.
|
|
2. Click the right mouse button on a blank area of the chart.
|
|
3. Select the Format Chart Area command.
|
|
4. Select the Patterns tab.
|
|
5. Select the Custom option.
|
|
6. Select the Style list.
|
|
7. Select the desired line style.
|
|
8. Select the Color list.
|
|
9. Select the desired line color.
|
|
10. Select the Weight list.
|
|
11. Select the desired line weight.
|
|
12. Select the Shadow option, if desired.
|
|
13. Select OK.
|
f Step-by-Step
Create a border.
Display the Chart2 worksheet.
|
Steps
|
Practice Data
|
|
1. Click the right mouse button in a blank
area of the chart.
Selection handles appear around the chart and a shortcut
menu appears.
|
Click the right mouse button in
the white space at the top of the chart
|
|
2. Select the Format Chart Area command.
The Format Chart Area dialog box opens.
|
Click Format Chart Area...
|
|
3. Select the Patterns tab.
The Patterns page appears.
|
Click the Patterns tab, if necessary
|
|
4. Select the Custom option.
The Custom option is selected.
|
Click  Custom Custom
|
|
5. Select the Style list.
A list of styles appears.
|
Click Style 
|
|
6. Select the desired line style.
The line style is selected.
|
Click the thin solid line, if necessary (first style
from the top)
|
|
7. Select the Color list.
A color palette appears.
|
Click Color 
|
|
8. Select the desired line color.
The line color is selected.
|
Click Black (first row, first column)
|
|
9. Select the Weight list.
A list of line weights appears.
|
Click Weight 
|
|
10. Select the desired line weight.
The line weight is selected.
|
Click the thick solid line (first line from the
bottom)
|
|
11. Select the Shadow option, if desired.
The Shadow option is selected.
|
Click  Shadow Shadow
|
|
12. Select OK.
The Format Chart Area dialog box closes and the chart appears with
the customized border.
|
Click OK
|
d Discussion
You can rearrange the plot order
of data series within a chart. This option allows you to rearrange data into
logical groups or to simply make the chart easier to read. It is also useful
for listing items alphabetically, if desired.

The Format Data Series dialog box
C Procedures
|
1. Display the worksheet that contains
the chart for which you want to change the plot order.
|
|
2. Click the right mouse button on the data series you want to
move.
|
|
3. Select the Format Data Series command.
|
|
4. Select the Series Order tab.
|
|
5. Select Move Up or Move Down, as desired.
|
|
6. Select OK.
|
f Step-by-Step
Change the plot order.
Display the Chart2 worksheet, if necessary.
|
Steps
|
Practice Data
|
|
1. Click the right mouse button on the data
series you want to move.
The data series is selected and a shortcut menu appears.
|
Click the right mouse button on
the "Wallace, F." data series (one of the yellow bars)
|
|
2. Select the Format Data Series command.
The Format Data Series dialog box opens.
|
Click Format Data Series...
|
|
3. Select the Series Order tab.
The Series Order page appears.
|
Click the Series Order tab
|
|
4. Select Move Up or Move Down, as desired.
The data series moves up or down as appropriate and the new series order
is reflected in the sample chart.
|
Click Move Up twice
|
|
5. Select OK.
The Format Data Series dialog box closes and the chart appears with the
new plot order.
|
Click OK
|
d Discussion
You can change the X or Y axis formats. For example, the Y
axis is formatted with the Number format and two decimal places, but you
want to use the Currency format with zero decimal places. You can use
the Format Axis dialog box to change axis formatting.

The Format Axis dialog box
C Procedures
|
1. Display the
worksheet that contains the chart for which you want to format an axis.
|
|
2. Click the right mouse button on the axis you want to format.
|
|
3. Select the Format Axis command.
|
|
4. Select the Number tab.
|
|
5. Select the category you want to use from the Category
list box.
|
|
6. Select any additional formatting, if desired.
|
|
7. Select OK.
|
f Step-by-Step
Format an axis.
Display the Chart2 worksheet, if necessary.
|
Steps
|
Practice Data
|
|
1. Click the right mouse button on the axis
you want to format.
The axis is selected and a shortcut menu appears.
|
Click the right mouse button on
the Value Axis axis (the vertical axis)
|
|
2. Select the Format Axis command.
The Format Axis dialog box opens.
|
Click Format Axis...
|
|
3. Select the Number tab.
The Number page appears.
|
Click the Number tab
|
|
4. Select the category you want to use from the Category
list box.
The category is selected.
|
Click Currency
|
|
5. Select any additional formatting, if desired.
The additional formatting is selected.
|
Click Decimal places  to 0 to 0
|
|
6. Select OK.
The Format Axis dialog box closes and the chart appears with the newly
formatted axis.
|
Click OK
|
d Discussion
When you create a chart, Excel
creates a scale for the value axis automatically based on the data in the
chart. You can change this scaling, if desired. For example, if the data in the
different data series is similar, the automatic scaling may make the
differences too small to see clearly. You can change the scale to emphasize the
differences.
The options under Auto on the Scale page in the
Format Axis dialog box are selected by default. When these options are
selected, Excel overrides any manual settings. As soon as you manually change
any of the scaling values, the corresponding options under Auto are
deselected, thereby allowing the manual values to be applied to the chart. You
can restore the scaling to its original values by reselecting the appropriate
options under Auto.
The Minimum and Maximum options control the
lowest and highest numbers on the axis, while the Major Unit and Minor
Unit options control how the axis is divided between the minimum and
maximum values. You can also set the number where the category (X) axis crosses
the value axis. The default is 0, but you can change it to any number between
the maximum and minimum values.

Changing the axis scaling
C Procedures
|
1. Display the worksheet that contains the chart for which you want to change the axis
scaling.
|
|
2. Click the right mouse button on the axis you want to scale.
|
|
3. Select the Format Axis command.
|
|
4. Select the Scale tab.
|
|
5. Select the Minimum text box.
|
|
6. Type a new minimum value.
|
|
7. Select the Maximum text box.
|
|
8. Type a new maximum value.
|
|
9. Select OK.
|
f Step-by-Step
Change the axis scaling.
Display the Chart2 worksheet, if necessary.
|
Steps
|
Practice Data
|
|
1. Click the right mouse button on the axis
you want to scale.
The axis is selected and a shortcut menu appears.
|
Click the right mouse button on
the Value Axis axis (the vertical axis)
|
|
2. Select the Format Axis command.
The Format Axis dialog box opens.
|
Click Format Axis...
|
|
3. Select the Scale tab.
The Scale page appears.
|
Click the Scale tab, if necessary
|
|
4. Select the Minimum text box.
The Minimum text box is selected.
|
Double-click the Minimum text box
|
|
5. Type a new minimum value.
The value appears in the text box and the Minimum option is
deselected.
|
Type 1500
|
|
6. Select the Maximum text box.
The Maximum text box is selected.
|
Double-click the Maximum text box
|
|
7. Type a new maximum value.
The value appears in the text box and the Maximum option is
deselected.
|
Type 3000
|
|
8. Select OK.
The Format Axis dialog box closes and the chart appears with the new axis
scaling.
|
Click OK
|
Open the Format Axis dialog box. Select the Minimum and
Maximum options under Auto to restore the scaling to its original
values.
d Discussion
When creating line charts, Excel provides
default data markers at critical points along the line. You can format the line
and the data markers to enhance the chart, if desired. You can use the options
on the Patterns page of the Format Data Series dialog box to format line
components.

Formatting data markers
C Procedures
|
1. Display the worksheet that contains the chart for which you want
to format the data markers.
|
|
2. Click the right mouse button on any data marker.
|
|
3. Select the Format Data Series command.
|
|
4. Select the Patterns tab.
|
|
5. Select the Style list under Marker.
|
|
6. Select the desired style.
|
|
7. Select the Shadow option, if desired.
|
|
8. Select OK.
|
f Step-by-Step
Format data markers.
Display the Chart4 worksheet.
|
Steps
|
Practice Data
|
|
1. Click the right mouse button on any data
marker.
The data markers are selected and a shortcut menu appears.
|
Click the right mouse button on
the Series "Sales" data marker
|
|
2. Select the Format Data Series command.
The Format Data Series dialog box opens.
|
Click Format Data Series...
|
|
3. Select the Patterns tab.
The Patterns page appears.
|
Click the Patterns tab, if necessary
|
|
4. Select the Style list under Marker.
A list of styles appears.
|
Click Style  under Marker under Marker
|
|
5. Select the desired style.
The style is selected and a sample appears in the Sample box.
|
Click one of the large squares
|
|
6. Select the Shadow option, if desired.
The Shadow option is selected and a sample appears in
the Sample box.
|
Click  Shadow Shadow
|
|
7. Select OK.
The Format Data Series dialog box closes and the chart appears with the
newly formatted data markers.
|
Click OK
|
Click outside of the chart to deselect the data markers.
d Discussion
You can change the elevation,
rotation, and perspective of a 3-D chart. The elevation tilts the chart so that
you appear to be viewing it from different heights. The rotation moves the
chart around a vertical axis. The perspective elongates the chart from front to
back, making it appear that its depth is changing.

Adjusting the 3-D view
|
|
|
|
o
|
The 3-D view of a chart can also be adjusted by dragging
one of the selection handles of the chart to the desired position.
|
|
|
|
|
o
|
If you press the [Enter] key after typing in
the desired elevation or rotation, the 3-D View dialog box closes
automatically. You will have to open it again to make any additional changes.
|
|
|
|
C Procedures
|
1. Display the worksheet that contains the chart
for which you want to adjust the 3-D view.
|
|
2. Click the right mouse button on a blank area of the chart.
|
|
3. Select the 3-D View command.
|
|
4. Type the new elevation value.
|
|
5. Select the Rotation text box.
|
|
6. Type the new rotation value.
|
|
7. Select OK.
|
f Step-by-Step
Adjust the 3-D view of
a chart.
Display the Chart5 worksheet.
|
Steps
|
Practice Data
|
|
1. Click the right mouse button on a blank
area of the chart.
Selection handles appear around the chart and a shortcut menu appears.
|
Click the right mouse button to
the left of the chart title
|
|
2. Select the 3-D View command.
The 3-D View dialog box opens with the Elevation text box selected.
|
Click 3-D View...
|
|
3. Type the new elevation value.
The value appears in the Elevation text box.
|
Type 30
|
|
4. Select the Rotation text box.
The Rotation text box is selected.
|
Double-click in the Rotation text box
|
|
5. Type the new rotation value.
The value appears in the Rotation text box.
|
Type 45
|
|
6. Select OK.
The 3-D View dialog box closes and the 3-D view of the chart adjusts
accordingly.
|
Click OK
|
Click outside of the chart to deselect it.
d Discussion
You can insert a graphic into a
column bar to create a picture graph. Picture graphs can add interest to a
presentation and are especially effective if you have access to a color
printer. You should be aware, however, that the graphic can become distorted
and difficult to recognize, depending on the size of the column bar into which
it is inserted.

Creating a picture graph
|
|
|
|
x
|
Adding graphics increases the size of an Excel file.
Therefore, you should not overuse them. A worksheet with many picture graphs
may not print correctly or at all.
|
|
|
|
C Procedures
|
1. Display the
worksheet that contains the chart to which you want to add a picture graph.
|
|
2. Select the data series into which you want to insert a graphic.
|
|
3. Select the Insert menu.
|
|
4. Point to the Picture command.
|
|
5. Select the From File command.
|
|
6. Select the desired graphic file.
|
|
7. Select Insert.
|
f Step-by-Step
Create a picture graph.
Display the Chart6 worksheet.
|
Steps
|
Practice Data
|
|
1. Select the data series into which you want
to insert a graphic.
Selection handles appear on the data series.
|
Click the "Leisure"
data series (one of the turquoise columns)
|
|
2. Select the Insert menu.
The Insert menu appears.
|
Click Insert
|
|
3. Point to the Picture command.
The Picture submenu appears.
|
Point to Picture...
|
|
4. Select the From File command.
The Insert Picture dialog box opens.
|
Click From File...
|
|
5. Select the desired graphic file.
The file is selected and its corresponding picture appears to the right of
the file list.
|
Click lesr
|
|
6. Select Insert.
The Insert Picture dialog box closes and the graphic appears on the data
series.
|
Click Insert
|
Insert the soccer graphic file into the “Soccer”
data series, the golf graphic file into the “Golf” data series,
and the bball graphic file into the “Baseball” data series.
d Discussion
When you insert a graphic into a
column bar, the image becomes distorted because it is stretched to fit the bar
height. Therefore, you can scale any graphic that you insert into
a column bar. Scaling refers to sizing a graphic so that it appears with its
correct proportions. Graphics can also be stacked within a column bar. When you
stack graphics, the images appear on top of one another within the column bar.

Scaling and stacking a picture graph
C Procedures
|
1. Display the worksheet that contains the
chart to which you want for scale and stack the picture graph.
|
|
2. Click the right mouse button on the data series containing the
graphic you want scale and stack.
|
|
3. Select the Format Data Series command.
|
|
4. Select the Patterns tab.
|
|
5. Select Fill Effects.
|
|
6. Select the Stack and scale to option.
|
|
7. Select OK.
|
|
8. Select OK.
|
f Step-by-Step
Scale and stack a picture graph.
Display the Chart6 worksheet.
|
Steps
|
Practice Data
|
|
1. Click the right mouse button on the data
series containing the graphic you want to scale and stack.
The data series is selected and a shortcut menu appears.
|
Click the right mouse button on
the "Leisure" data series (one of the columns containing the
archery graphic)
|
|
2. Select the Format Data Series command.
The Format Data Series dialog box opens.
|
Click Format Data Series...
|
|
3. Select the Patterns tab.
The Patterns page appears.
|
Click the Patterns tab, if necessary
|
|
4. Select Fill Effects.
The Fill Effects dialog box opens.
|
Click Fill Effects...
|
|
5. Select the Stack and scale to option.
The Stack and scale to option is selected.
|
Click  Stack and scale to Stack and scale to
|
|
6. Select OK.
The Fill Effects dialog box closes.
|
Click OK
|
|
7. Select OK.
The Format Data Series dialog box closes and the graphic is scaled and
stacked in the data series column.
|
Click OK
|
Stack and scale the graphics in the other column bars.
Close MONTHLY.XLS.
e Task
Change patterns and colors in a data series. Add a border to a
chart and change the plot order. Format and scale an axis. Format the data
markers. Adjust a 3-D chart. Create, scale, and stack picture graphs.
|
1. Open Chartfmt.
|
|
2. Display the Chart1 worksheet, if necessary. Use the Format
Data Series command to add a pattern of your choice to the "Mar"
data series. Make the background color white and the foreground color black.
|
|
3. Display the Chart2 worksheet. Use the Format Chart
Area command to add a custom border with a shadow around the outside of
the entire chart.
|
|
4. Use the Format Data Series command to change the plot
order. Move the "Adams, G." data series to the first
position in the chart.
|
|
5. Change the format of the Value Axis axis to Number
with zero decimal places.
|
|
6. Scale the Value Axis axis to show a minimum value
of 1200 and a maximum value of 3000. Reset the Minimum and Maximum options
under Auto.
|
|
7. Display the Chart4 worksheet. Use the Format Data
Series command to change the data markers to circles with a shadow.
|
|
8. Display the Chart5 worksheet. Use the 3-D View command
to make the elevation 40 and the rotation 60.
|
|
9. Display the Chart6 worksheet. Select the "Soccer"
data series. Insert a picture into the column bar. Use the Soccer
graphic file.
|
|
10. Use the Format Data Series command to scale and stack the Soccer
graphic.
|
|
11. Close the workbook without saving it.
|

In this lesson, you will
learn how to:
·
Insert a graphic image
·
Draw a filled rectangle
·
Change the graphic layering
·
Change the fill color
·
Add a pattern
·
Change the pattern color
·
Group graphic objects
·
Ungroup graphic objects
d Discussion
You can insert graphic images into
Excel. Graphic images are inserted as pictures. Pictures can be scanned images,
simple line art, or clipart. Graphic images can greatly enhance a worksheet by
depicting an idea that is difficult to describe and by improving the visual
appeal of a worksheet.
Graphic images float above the surface of a worksheet.
Therefore, they can be moved and sized like drawn objects.

Inserting a graphic image
|
|
|
|
o
|
Inserting graphic images greatly increases the size of
an Excel file. Therefore, you should not overuse them. A worksheet with many
graphic images may not print correctly or at all.
|
|
|
|
C Procedures
|
1. Display the worksheet that contains
the chart into which you want to insert a graphic image.
|
|
2. Select the location on the worksheet where you want to insert
the graphic.
|
|
3. Select the Insert menu.
|
|
4. Point to the Picture command.
|
|
5. Select the From File command.
|
|
6. Select the desired graphic file.
|
|
7. Select Insert.
|
f Step-by-Step
From the Student Data directory, open PRODS3.XLS.
Insert a graphic image.
Display the Logo worksheet.
|
Steps
|
Practice Data
|
|
1. Select the location on the worksheet where
you want to insert the graphic.
The cell pointer moves to the cell.
|
Click cell C2
|
|
2. Select the Insert menu.
The Insert menu appears.
|
Click Insert
|
|
3. Point to the Picture command.
The Picture submenu appears.
|
Point to Picture
|
|
4. Select the From File command.
The Insert Picture dialog box opens.
|
Click From File...
|
|
5. Select the desired graphic file.
The file is selected and its corresponding picture appears to the right of
the file list.
|
Click Sports
|
|
6. Select Insert.
The Insert Picture dialog box closes, the picture appears on the
worksheet, and the Picture toolbar appears.
|
Click Insert
|
Resize the object by dragging the lower right selection handle
to the middle of cell E10. Click in a blank area of the worksheet to deselect
the picture and close the Picture toolbar.
d Discussion
You can draw a filled rectangle on
a worksheet. Filled objects hide any objects beneath them, including the cells
in a worksheet.
C Procedures
|
1. Display the worksheet on which you want to
draw a filled rectangle.
|
|
2. Display the Drawing toolbar.
|
|
3. Click the Rectangle button  . .
|
|
4. Drag from the desired location on the worksheet to the opposite
corner.
|
|
5. Release the mouse button.
|
f Step-by-Step
Draw a filled rectangle.
Display the Logo worksheet and the Drawing
toolbar, if necessary.
|
Steps
|
Practice Data
|
|
1. Click the Rectangle button.
The mouse pointer changes into a crosshair when positioned on the
worksheet.
|
Click 
|
|
2. Drag from the desired location on the worksheet to the opposite
corner.
An image of a rectangle appears as you drag.
|
Drag from the top left corner of cell B2 to the center
of cell F11
|
|
3. Release the mouse button.
The rectangle appears in the worksheet.
|
Release the mouse button
|
Click in a blank area of the worksheet to deselect the object.
d Discussion
Graphic objects, including drawn
objects, are placed in layers above the surface of the worksheet. If an object
in an upper layer hides all or part of an object in a lower layer, you can
change layers. You can bring a selected object forward (i.e., towards the top)
in the stack of layers, or you can send it backward (i.e., towards the bottom)
in the stack of layers.
C Procedures
|
1. Display the worksheet on which you want to change the
graphic layering.
|
|
2. Click the right mouse button on the object you want to move.
|
|
3. Point to the Order command.
|
|
4. Select the desired command.
|
f Step-by-Step
Change the graphic layering.
Display the Logo worksheet, if necessary.
|
Steps
|
Practice Data
|
|
1. Click the right mouse button on the object
you want to move.
Selection handles appear around the object and a shortcut menu appears.
|
Click the rectangle
|
|
2. Point to the Order command.
The Order submenu appears.
|
Point to Order
|
|
3. Select the desired command.
The object is moved accordingly in the stack of layers.
|
Click Send to Back
|
Click in a blank area of the worksheet to deselect the object.
d Discussion
You can change the fill color of a
filled object. Changing the color calls more attention to the object and adds a
professional look to the worksheet. If you have a graphic on top of a filled
object, you should not select a fill color for the object that matches part of
the graphic. If you do, you will not be able to distinguish the graphic from
the filled object.

Changing the fill color
C Procedures
|
1. Display the worksheet that contains the
object for which you want to change the fill color.
|
|
2. Display the Drawing toolbar.
|
|
3. Select the filled object for which you want to change the fill
color.
|
|
4. Click the arrow on the Fill Color button  . .
|
|
5. Select the desired fill color.
|
f Step-by-Step
Change the fill color of an object.
Display the Logo worksheet and the Drawing
toolbar, if necessary.
|
Steps
|
Practice Data
|
|
1. Click the filled object for which you want
to change the fill color.
Selection handles appear around the object.
|
Click the rectangle
|
|
2. Click the arrow on the Fill Color button.
A color palette appears.
|
Click 
|
|
3. Select the desired fill color.
The fill color changes accordingly.
|
Click Turquoise (fourth row, fifth column)
|
Click in a blank area of the worksheet to deselect the object.
d Discussion
You can add a pattern to any
filled object. Patterns from which you can choose include thin and thick
vertical, horizontal, and diagonal lines, and a cross pattern. Patterns add
visual appeal to an object.
C Procedures
|
1. Display the worksheet that contains the object to which
you want to add a pattern.
|
|
2. Display the Drawing toolbar.
|
|
3. Select the filled object to which you want to add a pattern.
|
|
4. Click the arrow on the Fill Color button  . .
|
|
5. Select Fill Effects.
|
|
6. Select the Pattern tab.
|
|
7. Select the desired pattern.
|
|
8. Select OK.
|
f Step-by-Step
Add a pattern to a filled object.
Display the Logo worksheet and the Drawing
toolbar, if necessary.
|
Steps
|
Practice Data
|
|
1. Click the filled object to which you want
to add a pattern.
Selection handles appear around the object.
|
Click the rectangle
|
|
2. Click the arrow on the Fill Color button.
A color palette appears.
|
Click 
|
|
3. Select Fill Effects.
The Fill Effects dialog box opens.
|
Click Fill Effects...
|
|
4. Select the Pattern tab.
The Pattern page appears.
|
Click the Pattern tab
|
|
5. Select the desired pattern.
The pattern appears in the Sample box.
|
Click the Light horizontal pattern (second row,
fourth column)
|
|
6. Select OK.
The Fill Effects dialog box closes and the pattern is applied to the
object.
|
Click OK
|
Click in a blank area of the worksheet to deselect the object.
d Discussion
If a filled object has a pattern,
you can change the color of the pattern. For example, you can change the pattern
color of a filled object to complement its background fill color.

The Fill Effects dialog box
C Procedures
|
1. Display the worksheet that contains
the object for which you want to change the pattern color.
|
|
2. Display the Drawing toolbar.
|
|
3. Select the filled object for which you want to change the
pattern color.
|
|
4. Click the arrow on the Fill Color button  . .
|
|
5. Select Fill Effects.
|
|
6. Select the Pattern tab.
|
|
7. Select the Foreground list.
|
|
8. Select the desired pattern color.
|
|
9. Select OK.
|
f Step-by-Step
Change the pattern color.
Display the Logo worksheet and the Drawing
toolbar, if necessary.
|
Steps
|
Practice Data
|
|
1. Click the filled object for which you want
to change the pattern color.
Selection handles appear around the object.
|
Click the rectangle
|
|
2. Click the arrow on the Fill Color button.
A color palette appears.
|
Click 
|
|
3. Select Fill Effects.
The Fill Effects dialog box opens.
|
Click Fill Effects...
|
|
4. Select the Pattern tab.
The Pattern page appears.
|
Click the Pattern tab, if necessary
|
|
5. Select the Foreground list.
A color palette appears.
|
Click Foreground 
|
|
6. Select the desired pattern color.
The color appears in the Sample box.
|
Click Dark Blue (first row, sixth column)
|
|
7. Select OK.
The Fill Effects dialog box closes and the pattern color changes
accordingly.
|
Click OK
|
Click in a blank area of the worksheet to deselect the object.
d Discussion
Drawn objects can be combined into a
group. This option allows you to select, edit, and manipulate several objects
as one. When objects are grouped, only one set of selection handles appears
around the grouped objects. Grouped objects can be ungrouped as well if
individual editing is desired.

Grouping graphic objects
C Procedures
|
1. Display the worksheet that contains
the objects you want to group.
|
|
2. Select the first object you want to group.
|
|
3. Hold [Shift], click the additional objects you want to
group, and release [Shift].
|
|
4. Click the right mouse button on the selected objects.
|
|
5. Point to the Grouping command.
|
|
6. Select the Group command.
|
f Step-by-Step
Group graphic objects.
Display the Logo worksheet, if necessary.
|
Steps
|
Practice Data
|
|
1. Click the first object you want to group.
Selection handles appear around the object.
|
Click the rectangle
|
|
2. Hold [Shift], click the additional objects you want to
group, and release [Shift].
Selection handles appear around the objects and the Picture toolbar
appears, if applicable.
|
Hold [Shift], click the sports picture,
and release [Shift]
|
|
3. Click the right mouse button on the selected objects.
A shortcut menu appears.
|
Click the right mouse button on the selected objects
|
|
4. Point to the Grouping command.
The Grouping submenu appears.
|
Point to Grouping
|
|
5. Select the Group command.
The objects are grouped, one set of selection handles appears
around all the objects, and the Picture toolbar closes, if applicable.
|
Click Group
|
Move the upper left corner of the grouped objects down to cell
B7, and then back to cell B2.
Click in a blank area of the worksheet to deselect the objects.
d Discussion
You can ungroup grouped objects, if desired. This
option allows you to select, edit, and manipulate objects individually. When
objects are ungrouped, separate selection handles appear around each object.
C Procedures
|
1. Display the worksheet that contains the
objects you want to ungroup.
|
|
2. Click the right mouse button on one of the grouped objects.
|
|
3. Point to the Grouping command.
|
|
4. Select the Ungroup command.
|
f Step-by-Step
Ungroup graphic objects.
Display the Logo worksheet, if necessary.
|
Steps
|
Practice Data
|
|
1. Click the right mouse button on one of the
grouped objects.
Selection handles appear around the object and a shortcut menu appears.
|
Click the right mouse button on
the rectangle
|
|
2. Point to the Grouping command.
The Grouping submenu appears.
|
Point to Grouping
|
|
3. Select Ungroup.
The objects are ungrouped, separate selection handles appear around each
individual object, and the Picture toolbar appears, if applicable.
|
Click Ungroup
|
Click in a blank area of the worksheet to deselect the objects.
Close the Picture toolbar.
Close PRODS3.XLS.
e Task
Insert a graphic image into a new, blank worksheet. Resize the
graphic image and place a filled rectangle behind it. Then, add a background
fill color, a pattern, and a pattern color to the filled rectangle. Group and
ungroup the objects.
|
1. Open a new, blank workbook. Insert the Tennis graphic
file into cell D2.
|
|
2. Resize the object so that it occupies the area from cell D2 to
cell F10.
|
|
3. Display the Drawing toolbar, if necessary. Draw a filled
rectangle from the lower right corner of cell B2 to the lower left corner of
cell G10.
|
|
4. Move the filled rectangle behind the Tennis picture.
|
|
5. Add the Red background fill color (third row, first
column) to the rectangle.
|
|
6. Use the Fill Effects dialog box to add a pattern to the
rectangle.
|
|
7. Change the pattern color.
|
|
8. Group the objects and move them to another location on the
worksheet.
|
|
9. Ungroup the objects.
|
|
10. Close the workbook without saving it.
|

In this lesson, you will
learn how to:
·
Work with drawing objects
·
Display the Drawing toolbar
·
Draw a rectangle
·
Select an object
·
Move an object
·
Add text to an object
·
Select text in an object
·
Resize an object
·
Change the fill color
·
Change the font color
·
Change the line color
·
Add a shadow
·
Add a 3-D effect
·
Apply a 3-D setting
d Discussion
A drawing object is a rectangle, oval, line,
arrow, or polygon that is drawn directly on a worksheet. These objects are
often used to enhance a worksheet or chart. For example, arrows point to
important data, rectangles or ovals draw attention to certain areas of a
worksheet, and lines divide different areas of a worksheet. Drawing objects can
also be used to draw attention to trends or growth spurts in charts.
Drawing objects float on top of cells and can be moved or
copied to any location on a worksheet. Once drawn, objects can be modified to
change their shape, size, color, fill, pattern, and a number of other
attributes. The tools used to create drawing objects are located on the Drawing
toolbar.
Enclosed drawing objects, such as circles or squares, are
filled. Filled objects are opaque and contain patterns and/or colors. If filled
objects are drawn on top of data in a worksheet, the cells of data are hidden.
However, you can remove an object’s fill. Unfilled objects enable data in the
cells to be seen.

An object with a 3-D effect
d Discussion
The Drawing toolbar enables
you to create lines, lines with arrows, rectangles, and ovals. You can also
select various symbols from a number of categories including Connectors,
Basic Shapes, Block Arrows, Flowcharts, Stars
and Banners, and Callouts. The Drawing toolbar contains
buttons that allow you to make adjustments to fill and font colors and line,
dash, and arrow styles. You can also place shadow effects on an object and
enter text into text boxes using the Drawing toolbar.

The Drawing toolbar
|
|
|
|
o
|
The Drawing button acts as a toggle to display
or hide the Drawing toolbar.
|
|
|
|
C Procedures
|
1. To display or hide the Drawing
toolbar, click the Drawing button  . .
|
f Step-by-Step
Display or hide the Drawing toolbar.
|
Steps
|
Practice Data
|
|
1. To display or hide the Drawing
toolbar, click the Drawing button.
The Drawing toolbar appears or is hidden.
|
Click 
|
d Discussion
Unlike cell borders, rectangles can be drawn in the middle of cells and can be
moved and sized as desired. Enclosed objects, such as rectangles, are filled by
default. A filled rectangle is opaque and can be used to hide sensitive data.
For example, if you are making a presentation, a rectangle can be placed over
salary information.
When you are drawing a rectangle, the mouse pointer changes
into a crosshair. The center of the crosshair is the point at which the lines
are drawn.

Drawing a rectangle
|
|
|
|
o
|
Hold the [Shift] key as you drag the mouse
pointer to draw a square.
|
|
|
|
|
o
|
To draw more than one rectangle, double-click the Rectangle
button. After you have drawn the desired number of rectangles, you can press [Esc]
or click the Rectangle button to return to normal editing mode.
|
|
|
|
|
o
|
To insert a rectangle with a predefined size, click
the Rectangle button and click in the desired area of the worksheet.
|
|
|
|
C Procedures
|
1. Display the Drawing toolbar.
|
|
2. Click the Rectangle button  . .
|
|
3. Drag diagonally from one corner of the
rectangle to the opposite corner.
|
|
4. Release the mouse button.
|
f Step-by-Step
From the Student Data directory, open UPDATE1.XLS.
Draw a rectangle.
Display the Drawing toolbar, if necessary.
|
Steps
|
Practice Data
|
|
1. Click the Rectangle button.
The mouse pointer changes into a crosshair when positioned in the
worksheet area.
|
Click 
|
|
2. Drag diagonally from one corner of the rectangle to the opposite
corner.
An outline of the rectangle appears as you drag.
|
Drag from the upper left corner of cell B1 to the
lower right corner of cell D3
|
|
3. Release the mouse button.
The rectangle appears in the worksheet.
|
Release the mouse button
|
Click anywhere in the worksheet area to deselect the rectangle.
d Discussion
Before you can modify a drawing object, you must
select it. When an object is selected, white selection handles appear around
it. Any formatting commands you perform only affect the selected object. An
object remains selected until you select another object or a cell in the
worksheet.
You must use different methods when selecting filled and
unfilled objects. Unfilled objects are empty, so you must click the border in
order to select the object. However, you can click anywhere in a filled object
to select the object.
You must also click the border of an object that contains text
to select the object when you want to complete certain tasks such as changing
the fill or font color.
|
|
|
|
o
|
To select more than one drawing object, select the Select
Objects button on the Drawing toolbar, drag across the objects,
and release the mouse button.
|
|
|
|
C Procedures
|
1. Display the Drawing toolbar.
|
|
2. To select a filled object, click in the filled object.
|
|
3. Click anywhere in the worksheet area to deselect the object.
|
|
4. To select an unfilled object, point to the border of the unfilled
object.
|
|
5. Click the border of the unfilled object to select it.
|
f Step-by-Step
Select an object in a worksheet.
Display the Drawing toolbar, if necessary.
|
Steps
|
Practice Data
|
|
1. To select a filled object, click in the filled
object.
Selection handles appear around the object.
|
Click in the rectangle
|
|
2. Click anywhere in the worksheet area to deselect the object.
The object is deselected.
|
Click anywhere in the worksheet area
|
|
3. To select an unfilled object, point to the border of the
unfilled object.
The mouse pointer changes into a single, white arrow with a black
four-headed arrow attached to it.
|
Point to the border of the line under the column
headings
|
|
4. Click the border of the unfilled object to select it.
Selection handles appear around the object.
|
Click the border of the line
|
d Discussion
After
you create an object, you may want to
reposition it in a different area of the worksheet. For example, you may have
an object positioned at the top left of the worksheet and then decide that you
would rather have a heading appear at that location. You can select the object
and move it to a different area.
|
|
|
|
o
|
If you want to make a copy of an
object, point to the object until the mouse pointer changes into a single,
white arrow with a black, four-headed arrow attached to it, hold the
[Ctrl] key, and drag the object to the desired location. Be sure that you
release the mouse button before you release the [Ctrl] key or the
object will not be copied.
|
|
|
|
C Procedures
|
1. Point to the object you want to move.
|
|
2. Drag the object to the desired location.
|
|
3. Release the mouse button.
|
f Step-by-Step
Move an object.
|
Steps
|
Practice Data
|
|
1. Point to the object you want to move.
The mouse pointer changes into a single, white arrow with a black,
four-headed arrow attached to it.
|
Point to the rectangle
|
|
2. Drag the object to the desired location.
An outline of the object moves as you drag.
|
Drag the rectangle down so that the top edge is in the
middle of row 1
|
|
3. Release the mouse button.
The object appears in the new location.
|
Release the mouse button
|
Click anywhere in the worksheet area to deselect the object.
d Discussion
You can add text to an enclosed object. If you
combine text with an object, you can create logos or banners to accentuate your
worksheet. For example, you can use text and an object to create your company
logo on a marketing worksheet. Text in an object wraps within the object’s
borders.

Adding text to an object
C Procedures
|
1. Select the object to which you want to add the text.
|
|
2. Type the desired text.
|
|
3. To add an additional line of text, press [Enter].
|
|
4. Type the remaining text.
|
|
5. When you have finished adding text, click anywhere in the
worksheet area to enter the text into the object.
|
f Step-by-Step
Add text to an object.
|
Steps
|
Practice Data
|
|
1. Select the object to which you want to add
the text.
Selection handles appear around the object.
|
Click in the rectangle
|
|
2. Type the desired text.
The text appears in the selected object.
|
Type WorldWide Sporting Goods
|
|
3. To add an additional line of text, press [Enter].
The insertion point moves to the next line.
|
Press [Enter]
|
|
4. Type the remaining text.
The text appears in the selected object.
|
Type First Quarter
|
|
5. When you have finished typing text, click anywhere in the
worksheet area to enter the text into the object.
The text is entered into the object.
|
Click anywhere in the worksheet area
|
d Discussion
When an object contains text, clicking in the object
places the insertion point in the text. You may then edit, select, or format
the text. For example, after creating a logo, you may want to change the font
and style of the text. However, if you click the object’s border, the insertion
point will not appear and the object itself will be selected. Then, any changes
you make will affect the object, not the text.

Selecting text in an object
|
|
|
|
o
|
When the text is selected, the selection border
surrounding the object contains slashes. When the object is selected, the
selection border surrounding the object contains dots.
|
|
|
|
|
o
|
When selecting text, make sure that the mouse pointer
does not appear as a single, white arrow with a black, four-headed arrow
attached to it. This mouse pointer indicates the movement of objects, not the
selection of text.
|
|
|
|
C Procedures
|
1. Select the object that contains
text.
|
|
2. To place the insertion point in the text, click in the object.
|
|
3. To select the text, drag across the text in the object.
|
|
4. Release the mouse button.
|
f Step-by-Step
Select text in an object.
|
Steps
|
Practice Data
|
|
1. Point to the border of the object that
contains text.
The mouse pointer changes into a single, white arrow with a black
four-headed arrow attached to it.
|
Point to the border of the
rectangle
|
|
2. Click the border of an object.
Selection handles appear around the object and the selection border
surrounding the object contains dots.
|
Click the border of the rectangle
|
|
3. To place the insertion point in the text, click in the object.
The insertion point appears in the text and the selection border
surrounding the object contains slashes.
|
Click in the rectangle
|
|
4. To select the text, drag across the text in the object.
The text is highlighted as you drag.
|
Drag to select the text WorldWide Sporting Goods
First Quarter
|
|
5. Release the mouse button.
The text is selected.
|
Release the mouse button
|
Use the Formatting toolbar to change the font to Times
New Roman and the font size to 12. Center and bold the text.
Click anywhere in the worksheet area to deselect the object.
d Discussion
Drawing objects can be resized easily using
the selection handles. If you use the middle selection handle on the side of an
object, you can only change the size in one direction. However, if you use the
selection handle in the corner of an object, you can change the size in two
directions at once. For example, you may want to resize an object if you are
creating a logo and you want the size of the object to fit the text.
|
|
|
|
o
|
When the text is selected, the selection border
surrounding the object contains slashes. When the object is selected, the
selection border surrounding the object contains dots.
|
|
|
|
C Procedures
|
1. Select the object you want to resize.
|
|
2. Point to the desired selection handle.
|
|
3. Drag the selection handle to increase or decrease the size of
the object.
|
|
4. Release the mouse button.
|
f Step-by-Step
Resize an object.
|
Steps
|
Practice Data
|
|
1. Select the object you want to resize.
Selection handles appear around the object and the selection border
surrounding the object contains slashes.
|
Click in the rectangle
|
|
2. Point to the desired selection handle.
The mouse pointer changes into a black, double-headed arrow.
|
Point to the middle selection handle at the bottom of
the rectangle
|
|
3. Drag the selection handle to increase or decrease the size of
the object.
The size of the object increases or decreases as you drag.
|
Drag the selection handle up to the top of row 4
|
|
4. Release the mouse button.
The object is resized.
|
Release the mouse button
|
Click anywhere in the worksheet area to deselect the object.
d Discussion
You can change the fill color of
an object at any time. Changing the fill color enhances the appearance of
objects. For example, if a rectangle contains important text, making the
rectangle a bright color highlights the text.
The Fill Color button has two parts. You use the list to
display the color palette and choose a desired color. The display on the button
changes to display the currently selected color. To apply the currently
selected color to other objects, you only have to select the objects and click
the button.

Changing the fill color of an object
|
|
|
|
o
|
When you point to a color in the color palette, the
name of the color appears as a ScreenTip.
|
|
|
|
|
o
|
When the text is selected, the selection border
surrounding the object contains slashes. When the object is selected, the
selection border surrounding the object contains dots.
|
|
|
|
C Procedures
|
1. Display the Drawing toolbar.
|
|
2. Select the object that contains the fill color
you want to change.
|
|
3. Click the arrow on the Fill Color button  . .
|
|
4. Select the desired fill color.
|
f Step-by-Step
Change the fill color of
an object.
Display the Drawing toolbar, if necessary.
|
Steps
|
Practice Data
|
|
1. Point to the border of the object that
contains the fill color you want to change.
The mouse pointer changes into a single, white arrow with a black,
four-headed arrow attached to it.
|
Point to the border of the
rectangle
|
|
2. Click the border to select the object that contains the fill
color you want to change.
Selection handles appear around the object and the selection border
surrounding the object contains dots.
|
Click the border of the rectangle
|
|
3. Click the arrow on the Fill Color button.
A color palette appears.
|
Click the arrow on 
|
|
4. Select the desired fill color.
The fill color of the object changes accordingly.
|
Click Dark Blue (first row, sixth column)
|
Click anywhere in the worksheet area to deselect the object.
d Discussion
You can change the color of the font in any
object that contains text. You can change the color of all the text in the
object, or you can change the font color of selected words. Changing font color
draws attention to text.
When selecting a font color for the text, be aware of the
background color of the object. For example, red text will stand out on a white
background, while yellow text will not.
The Font Color button has two parts. You use the list to
display the color palette and choose a desired color. The display on the button
changes to display the currently selected color. To apply the currently
selected color to other objects, you only have to select the objects and click
the button.

Changing the font color of text in an object
|
|
|
|
o
|
When you point to a color in the color palette, the
name of the color appears as a ScreenTip.
|
|
|
|
|
o
|
When the text is selected, the selection border surrounding
the object contains slashes. When the object is selected, the selection
border surrounding the object contains dots.
|
|
|
|
C Procedures
|
1. Display the Drawing toolbar.
|
|
2. Select the object that contains the font color you want to
change.
|
|
3. Click the arrow on the Font Color button  . .
|
|
4. Select the desired font color.
|
f Step-by-Step
Change the font color of text
in an object.
Display the Drawing toolbar, if necessary.
|
Steps
|
Practice Data
|
|
1. Point to the border of the object that
contains the font color you want to change.
The mouse pointer changes into a single, white arrow with a black,
four-headed arrow attached to it.
|
Point to the border of the
rectangle
|
|
2. Click the border to select the object that contains the font
color you want to change.
Selection handles appear around the object and the selection border
surrounding the object contains dots.
|
Click the border of the rectangle
|
|
3. Click the arrow on the Font Color button.
A color palette appears.
|
Click the arrow on 
|
|
4. Select the desired font color.
The font color of the text changes accordingly.
|
Click White (last row, last column)
|
Click anywhere in the worksheet area to deselect the object.
d Discussion
You can change the color of
the an object’s lines. In an enclosed object, the line is the border around an
object. In an open object, such as a line or arrow, the line is the object
itself. Changing the line color can enhance the appearance of the object. For
example, if you are creating a logo, changing the line color can help
distinguish the logo from other text in the worksheet.
The Line Color button has two parts. You use the list to
display the color palette and choose a desired color. The display on the button
changes to display the currently selected color. To apply the currently
selected color to other cells, you only have to select the cells and click the
button.
|
|
|
|
o
|
When you point to a color in the color palette, the
name of the color appears as a ScreenTip.
|
|
|
|
C Procedures
|
1. Display the Drawing toolbar.
|
|
2. Select the object that contains the line color you want to
change.
|
|
3. Click the arrow on the Line Color button  . .
|
|
4. Select the desired line color.
|
f Step-by-Step
Change the line color of
an object.
Display the Drawing toolbar, if necessary.
|
Steps
|
Practice Data
|
|
1. Select the object that contains the line
color you want to change.
Selection handles appear around the object and the selection border
surrounding the object contains slashes.
|
Click in the rectangle
|
|
2. Click the arrow on the Line Color button.
A color palette appears.
|
Click the arrow on 
|
|
3. Select the desired line color.
The line color changes accordingly.
|
Click Red (third row, first column)
|
Click anywhere in the worksheet area to deselect the object.
d Discussion
A shadow is a dark border around one or more
sides of an object. The shadow makes the object appear raised from the
background. For example, a shadow gives the effect of depth to a logo which was
added to or placed on a worksheet. You can select from a variety of shadows.

Adding a shadow to an object
|
|
|
|
o
|
When you point to a shadow style, the name of the
style appears as a ScreenTip.
|
|
|
|
C Procedures
|
1. Display the Drawing toolbar.
|
|
2. Select the object to which you want to add a shadow.
|
|
3. Click the Shadow button  . .
|
|
4. Select the desired shadow style.
|
f Step-by-Step
Add a shadow to an object.
Display the Drawing toolbar, if necessary.
|
Steps
|
Practice Data
|
|
1. Select the object to which you want to add
a shadow.
Selection handles appear around the object and the selection border
surrounding the object contains slashes.
|
Click in the rectangle
|
|
2. Click the Shadow button.
A list of shadow styles appears.
|
Click 
|
|
3. Select the desired shadow style.
The shadow style is applied to the object.
|
Click  (fourth row, second column) (fourth row, second column)
|
Click anywhere in the worksheet area to deselect the object.
d Discussion
If you want an object to appear
3-dimensional, you can add a 3-D effect. For example, if you are creating a
logo, a 3-D effect makes the object stand out from the page. You can select from
a variety of different 3-D styles.

Adding a 3-D effect to an object
|
|
|
|
o
|
When you point to a 3-D style, the name of the style
appears as a ScreenTip.
|
|
|
|
|
o
|
An object can have either a shadow or a 3-D effect,
but not both.
|
|
|
|
C Procedures
|
1. Display the Drawing toolbar.
|
|
2. Select the object to which you want
to add a 3-D effect.
|
|
3. Click the 3-D button  . .
|
|
4. Select the desired 3-D style.
|
f Step-by-Step
Add a 3-D effect to an object.
Display the Drawing toolbar, if necessary.
|
Steps
|
Practice Data
|
|
1. Select the object to which you want to add
a 3-D effect.
Selection handles appear around the object and the selection border
surrounding the object contains slashes.
|
Click in the rectangle
|
|
2. Click the 3-D button.
A list of 3-D styles appears.
|
Click 
|
|
3. Select the desired 3-D style.
The 3-D style is applied to the object.
|
Click  (first row, second column) (first row, second column)
|
Click anywhere in the worksheet area to deselect the object.
d Discussion
Once you have added a 3-D effect to an
object, you can apply various Depth, Direction, Lighting, Surface,
and Color settings. You can also tilt the 3-D objects Down, Up,
Left, or Right.
Depending on the object selected, certain options may not be
available.

Applying a 3-D setting to a 3-D object
|
|
|
|
o
|
If you apply 3-D settings to a selected object without
selecting a 3-D style, certain options will have no effect on the selected
object.
|
|
|
|
C Procedures
|
1. Display the Drawing toolbar.
|
|
2. Select the object to which you want to apply a 3-D setting.
|
|
3. Click the 3-D button  . .
|
|
4. Select 3-D Settings.
|
|
5. Select the desired 3-D setting.
|
|
6. Select the desired option, if necessary.
|
f Step-by-Step
Apply a 3-D setting to a 3-D object.
Display the Drawing toolbar, if necessary.
|
Steps
|
Practice Data
|
|
1. Select the object to which you want to
apply a 3-D setting.
Selection handles appear around the object and the selection border
surrounding the object contains slashes.
|
Click in the rectangle
|
|
2. Click the 3-D button.
A palette of 3-D styles appears.
|
Click 
|
|
3. Select 3-D Settings.
The 3-D Settings toolbar appears.
|
Click 3-D Settings...
|
|
4. Click the desired 3-D setting.
The setting is selected.
|
Click the arrow on 
|
|
5. Select the desired option, if necessary.
The 3-D setting is applied to the object.
|
Click Red (third row, first column)
|
Click anywhere in the worksheet area to deselect the object.
Close the 3-D Settings toolbar and hide the Drawing toolbar.
Close UPDATE1.XLS.
e Task
Draw and format a rectangle with text.
|
1. Open Comm18x.
|
|
2. Display the Drawing toolbar.
|
|
3. Draw a rectangle in B1:D4.
|
|
4. Add the text:
WorldWide
Sporting Goods
First Quarter by Rep
|
|
5. Select the text and format it as centered and bolded with a font
size of 14.
|
|
6. Change the fill color to Turquoise (fourth row, fifth
column).
|
|
7. Change the line color to Dark Red (second row, first
column).
|
|
8. Change the font color to Dark Blue (first row, sixth
column).
|
|
9. Add the 3-D style 3 (first row, third column) to the
rectangle.
|
|
10. Use the 3-D Settings toolbar to change the 3-D color to Bright
Green (fourth row, fourth column).
|
|
11. Close the 3-D Settings toolbar.
|
|
12. Hide the Drawing toolbar.
|
|
13. Click anywhere in the worksheet area to deselect the object.
|
|
14. Close the workbook without saving it.
|

In this lesson, you will
learn how to:
·
Unlock cells in a worksheet
·
Protect a worksheet
·
Unprotect a worksheet
·
Protect a workbook
·
Unprotect a workbook
·
Assign a password
·
Open a protected file
·
Remove a password
·
Set manual calculation
·
Set automatic calculation
d Discussion
You can control access to a worksheet
by locking or unlocking cells in the worksheet. If worksheet protection is
activated, you cannot change the contents of any locked cell. If you want to
allow changes to some cells, you must unlock those cells before you activate
worksheet protection.
Normally, you unlock the cells you want to use for data entry.
For example, you could lock all cells on a sales worksheet except for those
cells in which sales figures are entered.
Normally, you lock cells which have formulas in them so that
the formulas cannot be changed. You can also lock text in a worksheet.

Unlocking cells in a worksheet
|
|
|
|
o
|
Although cells are locked by default, this option has
no effect on a worksheet unless the worksheet is protected.
|
|
|
|
C Procedures
|
1. Select the cells
you want to unlock.
|
|
2. Select the Format menu.
|
|
3. Select the Cells command.
|
|
4. Select the Protection tab.
|
|
5. Deselect the Locked option.
|
|
6. Select OK.
|
f Step-by-Step
From the Student Data directory, open PROJ3.XLS.
Unlock cells in a worksheet.
In order to enter information only in cells E3 and E4, you must
unlock those cells before you protect the worksheet.
|
Steps
|
Practice Data
|
|
1. Drag to select the cells you want to
unlock.
The cells are highlighted as you drag.
|
Drag E3:E4
|
|
2. Release the mouse button.
The cells are selected.
|
Release the mouse button
|
|
3. Select the Format menu.
The Format menu appears.
|
Click Format
|
|
4. Select the Cells command.
The Format Cells dialog box opens.
|
Click Cells...
|
|
5. Select the Protection tab.
The Protection page appears.
|
Click the Protection tab
|
|
6. Deselect the Locked option.
The Locked option is deselected.
|
Click  Locked Locked
|
|
7. Select OK.
The Format Cells dialog box closes and the cells are unlocked.
|
Click OK
|
Click anywhere in the worksheet to deselect the range.
d Discussion
Once you have unlocked cells, you
can prevent changes to the rest of the worksheet by protecting it. Protecting a
worksheet prevents unauthorized or accidental changes to formulas. For example,
if you have unlocked cells E3 and E4 only, all the remaining cells are
protected. You can only enter data in cells E3 and E4.
When you protect a worksheet, you can select whether or not you
want to protect the contents of the cells, the graphic objects, and/or the
scenarios. You can select the desired options in the Protect Sheet dialog box.
A password is optional. Passwords can contain any combination
of letters, numbers, symbols, and spaces, and can be up to 255 characters.
Passwords are case-sensitive. For example, CLASS is a different password
than class.

Protecting a worksheet
|
|
|
|
x
|
If you forget the password for a protected worksheet,
you cannot unprotect the worksheet.
|
|
|
|
C Procedures
|
1. Select the Tools menu.
|
|
2. Point to the Protection command.
|
|
3. Select the Protect Sheet command.
|
|
4. Type the desired password, if necessary.
|
|
5. Select OK.
|
|
6. Type the password again, if necessary.
|
|
7. Select OK.
|
f Step-by-Step
Protect a worksheet.
Unlock cells E3 and E4, if necessary.
|
Steps
|
Practice Data
|
|
1. Select the Tools menu.
The Tools menu appears.
|
Click Tools
|
|
2. Point to the Protection command.
The Protection submenu appears.
|
Point to Protection
|
|
3. Select the Protect Sheet command.
The Protect Sheet dialog box opens.
|
Click Protect Sheet...
|
|
4. Type the desired password, if necessary.
Asterisks appear in the Password text box, one for each character
in the password.
|
Type class
|
|
5. Select OK.
if you typed a password, the Confirm Password dialog box opens.
|
Click OK
|
|
6. Type the password again, if necessary.
Asterisks appear in the Reenter password to proceed text box, one
for each character in the password.
|
Type class
|
|
7. Select OK.
The Confirm Password and the Protect Sheet dialog boxes close and the
sheet is protected.
|
Click OK
|
Select cell D8 and try to type the word test . A
Microsoft Excel message box opens, informing you that the cell is protected and
you cannot edit it. Select OK to close the message box.
Type 20 in cell E3 and 15 in cell E4. You can
change the content of these cells because they are the only ones unlocked in
the worksheet.
d Discussion
Even if you have protected a worksheet, you can unprotect
it. However, if you used a password to protect the worksheet, you must know the
password to unprotect it.
After you have unprotected the worksheet, you can make changes
to any cell in it.
C Procedures
|
1. Select the Tools menu.
|
|
2. Point to the Protection command.
|
|
3. Select the Unprotect Sheet command.
|
|
4. Type the required password, if necessary.
|
|
5. Select OK.
|
f Step-by-Step
Unprotect a worksheet.
|
Steps
|
Practice Data
|
|
1. Select the Tools menu.
The Tools menu appears.
|
Click Tools
|
|
2. Point to the Protection command.
The Protection submenu appears.
|
Point to Protection
|
|
3. Select the Unprotect Sheet command.
If a password was used to protect the worksheet, the Unprotect Sheet
dialog box opens.
|
Click Unprotect Sheet...
|
|
4. Type the required password, if necessary.
Asterisks appear in the Password text box, one for each character
in the password.
|
Type class
|
|
5. Select OK.
The Unprotect Sheet dialog box closes and the sheet is unprotected.
|
Click OK
|
Select cell D8 and type the word test. Since the
worksheet is now unprotected, the word appears in the cell. Delete the word test.
d Discussion
You can protect workbook windows.
When you protect a workbook window, the Minimize, Maximize, and Close
buttons are removed. As a result, the window cannot be moved or sized. This
option is useful if you have arranged the windows and want to prevent them from
being changed.
In addition to protecting a window, you can prevent structural
changes to a workbook. For example, if a workbook structure is protected, you
are unable to insert, delete, or move worksheets.
A password is optional. Passwords are case-sensitive. For
example, CLASS is a different password than class.

Protecting a workbook
|
|
|
|
x
|
If you forget the password for a protected workbook, you
cannot unprotect the workbook.
|
|
|
|
C Procedures
|
1. Select the Tools menu.
|
|
2. Point to the Protection command.
|
|
3. Select the Protect Workbook command.
|
|
4. Type the desired password, if necessary.
|
|
5. Under Protect workbook for, select the desired options.
|
|
6. Select OK.
|
|
7. Type the password again, if necessary.
|
|
8. Select OK.
|
f Step-by-Step
Protect a workbook.
|
Steps
|
Practice Data
|
|
1. Select the Tools menu.
The Tools menu appears.
|
Click Tools
|
|
2. Point to the Protection command.
The Protection submenu appears.
|
Point to Protection
|
|
3. Select the Protect Workbook command.
The Protect Workbook dialog box opens.
|
Click Protect Workbook...
|
|
4. Type the desired password, if necessary.
Asterisks appear in the Password text box, one for each character
in the password.
|
Type class
|
|
5. Under Protect workbook for, select the desired options.
The options are selected.
|
Click  Windows Windows
|
|
6. Select OK.
If you typed a password, the Confirm Password dialog box opens.
|
Click OK
|
|
7. Type the password again, if necessary.
Asterisks appear in the Reenter password to proceed text box, one
for each character in the password.
|
Type class
|
|
8. Select OK.
The Confirm Password dialog box closes and the workbook window is protected.
|
Click OK
|
Notice that the Minimize, Maximize, and Close
buttons no longer appear in the window.
d Discussion
When you unprotect a workbook, the Maximize,
Minimize, and Close buttons are restored and the window can be
resized. You can also perform structural changes (such as inserting, deleting,
or moving worksheets) in an unprotected workbook.
If a password has been used to protect a workbook, you must
know the password to unprotect it.
|
|
|
|
x
|
If you forget the password, you cannot unprotect the
workbook.
|
|
|
|
C Procedures
|
1. Select the Tools menu.
|
|
2. Point to the Protection command.
|
|
3. Select the Unprotect Workbook command.
|
|
4. Type the required password, if necessary.
|
|
5. Select OK.
|
f Step-by-Step
Unprotect a workbook.
|
Steps
|
Practice Data
|
|
1. Select the Tools menu.
The Tools menu appears.
|
Click Tools
|
|
2. Point to the Protection command.
The Protection submenu appears.
|
Point to Protection
|
|
3. Select the Unprotect Workbook command.
If a password was used to protect the workbook, the Unprotect Workbook
dialog box opens.
|
Click
Unprotect Workbook...
|
|
4. Type the required password, if necessary.
Asterisks appear in the Password text box, one for each character
in the password.
|
Type class
|
|
5. Select OK.
The Unprotect Workbook dialog box closes and the workbook is unprotected.
|
Click OK
|
d Discussion
You can assign a password to a
file so that only those users who know the password can open or save changes to
the file.
Passwords can contain any combination of letters, numbers,
symbols, and spaces, and can be up to 15 characters. Passwords are
case-sensitive. After a password has been assigned, you are prompted for the
password each time you open the document.
Passwords are often assigned to files that contain sensitive data,
such as salaries or bonuses. They can also be used to secure files that are
stored on a network.

Assigning a password
|
|
|
|
x
|
If you forget the assigned password, you cannot open
the file.
|
|
|
|
C Procedures
|
1. Select the File menu.
|
|
2. Select the Save As command.
|
|
3. Select Options.
|
|
4. Type the desired password.
|
|
5. Select OK.
|
|
6. Type the password again.
|
|
7. Select OK.
|
|
8. Select Save.
|
|
9. Select Yes.
|
f Step-by-Step
Assign a password to a file.
|
Steps
|
Practice Data
|
|
1. Select the File menu.
The File menu appears.
|
Click File
|
|
2. Select the Save As command.
The Save As dialog box opens.
|
Click Save As...
|
|
3. Select Options.
The Save Options dialog box opens.
|
Click Options...
|
|
4. Type the desired password.
Asterisks appear in the Password to open text box, one for each
character in the password.
|
Type class
|
|
5. Select OK.
The Confirm Password dialog box opens.
|
Click OK
|
|
6. Type the password again.
Asterisks appear in the Reenter password to proceed text box, one
for each character in the password.
|
Type class
|
|
7. Select OK.
The Confirm Password dialog box closes and the Save As dialog box opens.
|
Click OK
|
|
8. Select Save.
The Save As dialog box closes and a Microsoft Excel message box opens,
prompting you to overwrite the existing file.
|
Click Save
|
|
9. Select Yes.
The Microsoft Excel message box closes and the password is saved with the
file.
|
Click Yes
|
Close PROJ3.XLS.
d Discussion
Once a file has been saved with a
password, you must know the password to open it. The Password dialog box opens
whenever a file has been password-protected.
|
|
|
|
x
|
If you forget the assigned password, you cannot open
the file.
|
|
|
|
C Procedures
|
1. Click the
Open button  . .
|
|
2. Select the Look in list.
|
|
3. Select the drive where the file is stored.
|
|
4. Select the folder where the file is stored.
|
|
5. Select the file you want to open.
|
|
6. Select Open.
|
|
7. Type the required password.
|
|
8. Select OK.
|
f Step-by-Step
Open a file protected with a
password.
|
Steps
|
Practice Data
|
|
1. Click the Open button.
The Open dialog box opens.
|
Click 
|
|
2. Select the Look in list.
A list of available drives appears.
|
Click Look in 
|
|
3. Select the drive where the file is stored.
A list of available folders appears.
|
Click the student data drive
|
|
4. Select the folder where the file is stored.
A list of available files appears.
|
Double-click to select the student data folder
|
|
5. Select the file you want to open.
The file name is selected.
|
Click Proj4 or the file indicated by your
instructor
|
|
6. Select Open.
The Open dialog box closes and the Password dialog box opens.
|
Click Open
|
|
7. Type the required password.
Asterisks appear in the Password text box, one for each character
in the password.
|
Type class
|
|
8. Select OK.
The Password dialog box closes and the workbook opens.
|
Click OK
|
d Discussion
If a password is no longer
necessary, you can remove it from the file. You can then open the file at any
time without a password.
After you remove a password, you must save the file to replace
the protected version.
C Procedures
|
1. Select the File menu.
|
|
2. Select the Save As command.
|
|
3. Select Options.
|
|
4. Press [Delete].
|
|
5. Select OK.
|
|
6. Select Save.
|
|
7. Select Yes.
|
f Step-by-Step
Remove a password from an existing
file.
Type class in the Password dialog box to open the file,
if necessary.
|
Steps
|
Practice Data
|
|
1. Select the File menu.
The File menu appears.
|
Click File
|
|
2. Select the Save As command.
The Save As dialog box opens.
|
Click Save As...
|
|
3. Select Options.
The Save Options dialog box opens and the Password to open text box
is selected.
|
Click Options...
|
|
4. Press [Delete].
The password is deleted.
|
Press [Delete]
|
|
5. Select OK.
The Save Options dialog box closes.
|
Click OK
|
|
6. Select Save.
A Microsoft Excel message box opens, prompting you to replace the
existing file.
|
Click Save
|
|
7. Select Yes.
The Microsoft Excel message box and the Save As dialog boxes close, and
the password is removed from the file.
|
Click Yes
|
d Discussion
When you change any number in a
worksheet, all formulas that refer to that number automatically recalculate.
You can specify that the worksheet recalculate manually. Manual recalculation
allows you to change numbers as needed and then recalculate the worksheet only
one time. This option can save time when you are working in large, complex
worksheets.
If the recalculation is set to manual, the Calculate indicator
appears in the status bar when any values have changed and formulas need to be
recalculated. If the Calculate indicator is on, the figures displayed in
the worksheet may not be accurate. For this reason, it is a good idea to
recalculate before you print the worksheet.
Calculation options are system settings. They are not saved
with a workbook. Once you enable manual calculation, you will have to manually
recalculate all worksheets until you change the calculation back to automatic.

Setting manual calculation
|
|
|
|
o
|
Even if calculation is set to manual, the worksheet
automatically recalculates before every save if the Recalculate before
save option is selected on the Calculation page of the Options
dialog box.
|
|
|
|
|
o
|
To recalculate all open workbooks, you can select the Calc
Now button on the Calculation page of the Options dialog box or
press the [F9] key. To recalculate only the current worksheet, you can
select the Calc Sheet button on the Calculation page of the
Options dialog box.
|
|
|
|
C Procedures
|
1. Select the Tools menu.
|
|
2. Select the Options command.
|
|
3. Select the Calculation tab.
|
|
4. Under Calculation, select the Manual option.
|
|
5. Select OK.
|
f Step-by-Step
Set the recalculation to manual, edit
a cell, and recalculate manually.
|
Steps
|
Practice Data
|
|
1. Select the Tools menu.
The Tools menu appears.
|
Click Tools
|
|
2. Select the Options command.
The Options dialog box opens.
|
Click Options...
|
|
3. Select the Calculation tab.
The Calculation page appears.
|
Click the Calculation tab
|
|
4. Under Calculation, select the Manual option.
The Manual option is selected.
|
Click  Manual Manual
|
|
5. Select OK.
The Options dialog box closes and recalculation is set to manual.
|
Click OK
|
Select cell E3, type 25, and press [Enter].
Notice that the formulas do not recalculate and the Calculate indicator
appears in the status bar.
Press [F9] to recalculate the workbook. Notice that cell
B8 changes from 2,140,708 to 2,229,904, cell B10 changes from 1,784,377
to 1,873,573, and the Calculate indicator no longer appears
in the status bar.
d Discussion
Calculation options are system settings.
They are not saved with a workbook. Therefore, if you select manual
recalculation for one workbook, you will have to manually calculate all
workbooks until you change the calculation back to automatic.

Setting automatic calculation
C Procedures
|
1. Select the Tools menu.
|
|
2. Select the Options command.
|
|
3. Select the Calculation tab.
|
|
4. Under Calculation, select the Automatic option.
|
|
5. Select OK.
|
f Step-by-Step
Set the calculation to automatic.
|
Steps
|
Practice Data
|
|
1. Select the Tools menu.
The Tools menu appears.
|
Click Tools
|
|
2. Select the Options command.
The Options dialog box opens.
|
Click Options…
|
|
3. Select the Calculation tab.
The Calculation page appears.
|
Click the Calculation tab, if necessary
|
|
4. Under Calculation, select the Automatic option.
The Automatic option is selected.
|
Click  Automatic Automatic
|
|
5. Select OK.
The Options dialog box closes and recalculation is set to automatic.
|
Click OK
|
Select cell E3, type 15, and press [Enter].
Notice that the formulas recalculate automatically.
Close PROJ4.XLS.
e Task
Use worksheet protection to ensure the accuracy of data entry
and then assign a password to a file. Save the file and open it. Set the file
to manual calculation and test it. Set it back to automatic calculation.
Protect and unprotect the workbook. Remove the file password.
|
1. Open Protect.
|
|
2. You want to be able to enter new hours worked every week. Unlock
D6:D12.
|
|
3. Protect the worksheet. Assign a password of protect.
|
|
4. Select cell E11 and type 2. A Microsoft Excel message box
opens, informing you that the cell is protected and you cannot edit it.
Unprotect the worksheet, change the type of time in cell E11 to 2.
Protect the worksheet again with the password save.
|
|
5. Save the file with a password of save, and then close the
file.
|
|
6. Open Protect. Notice that you must enter the password.
|
|
7. Protect both the structure and windows of the workbook. Use a
password of workbook.
|
|
8. Unprotect the workbook.
|
|
9. Set the recalculation to manual.
|
|
10. Select cell D6 and type 7. Notice that the pay in cell G6
does not change. Recalculate the worksheet manually. Notice that the pay in
cell G6 is now updated.
|
|
11. Change the calculation back to automatic.
|
|
12. Unprotect the worksheet and save the workbook.
|
|
13. Close the workbook.
|

Add borders to
cells, 190, 191
Add colors to
cells, 192, 193
Aligning cells
center align,
186
left align,
187, 188
right align,
184, 185
Application
window, 3
AutoComplete,
39
AutoFormat
applying an
AutoFormat, 210, 211
changing
AutoFormat options, 211, 212
Automatic
calculation
resetting,
480, 481
Bolding text,
147, 148
Borders
creating, 402,
403, 404
Cells
active, 4
cell
addresses, 4
editing
entries, 44, 45
entering
numbers, 42, 43
selecting with
the keyboard, 27, 28
Centering
cells, 188, 189
Charts
adding a data
table, 341, 342, 375, 376
adding axis
labels, 364, 365
adding data
labels, 374, 375
adding
unlinked text, 363
adding/removing
the legend, 338, 339
adjusting the
3-D view, 412, 413, 414
applying
user-defined, 354, 355
changing
colors, 400, 401
changing
patterns, 400, 401
changing the
axis scaling, 408, 409
changing the
chart range, 344, 345
changing the
chart type, 335, 336
changing the
data source, 358, 359
changing the
plot direction, 337, 338
changing the
plot order, 405, 406
changing the
text orientation, 340, 341
creating, 327,
328
creating a
picture graph, 414, 415
creating
borders, 402, 403, 404
creating
user-defined, 352, 353
deleting, 347,
348
deleting
user-defined, 357
disabling the
time-scale axis, 368, 369
editing axis
titles, 360, 361
editing chart
titles, 360, 361
formatting an
axis, 406, 407
formatting
chart objects, 343, 344
formatting
data markers, 410, 411
identifying
chart objects, 331, 333
moving, 330,
331
moving the
Chart toolbar, 333, 335
moving the
legend, 372, 373
printing, 346,
347
removing axis
labels, 364, 365
resizing, 330,
331
scaling and
stacking a picture graph, 416, 417
using, 326
using Chart Wizard,
327, 328
using the
Range Finder, 370, 371
using the
time-scale axis, 366, 367
Colors
changing, 400,
401
Columns, 4
changing
column width, 166, 167, 169, 170
deleting, 177,
178
hiding, 170,
171
inserting,
174, 175
selecting, 164
unhiding, 172,
173
Conditional
formats, 197, 198, 199
adding, 202,
203
changing, 200,
201
deleting, 205,
206
Data
copying and
pasting, 86, 87, 88
copying
between workbooks, 315, 316
creating
absolute cell references, 89, 90, 91
cutting and
pasting, 86, 87, 88
filling cells,
91, 92
using
drag-and-drop to copy, 93, 94
using
drag-and-drop to move, 93, 94
using the Undo
list, 97, 98
using Undo and
Redo, 95, 96
Data series
adding, 382,
383
adding a
trendline, 392, 393
adding from a
different worksheet, 386, 387
changing the
type, 390, 391
deleting, 384,
385
editing names,
388, 389
Decimal places
decreasing,
139, 140
increasing,
138, 139
Drag-and-drop
editing, 93
Excel
exiting, 9, 10
starting, 2, 3
working with
windows, 3
Footers
creating
custom, 121
editing, 119
Format
Painter, 193, 194, 195
Formats
clearing, 196,
197
copying, 193,
194, 195
Formatting
cells, 184
Formula bar, 3
Formulas
creating 3-D,
253, 254, 255
entering, 65,
66
using, 64
using
AutoCalculate, 79
using
AutoCorrect, 71
using
functions, 68, 70
using the
AutoSum button, 67, 68
using the
Formula Palette to create formulas, 72, 73, 75, 76
using the
Formula Palette to edit formulas, 75
using the
Paste Function button, 76, 77, 78, 80
using the
Range Finder, 81, 82
Full Screen
view
switching to,
221, 222
Graphics
changing the
layering, 425
inserting an
image, 422, 423
Gridlines
printing
without, 124
Headers
creating
custom, 121
editing, 119
Indentation
decreasing,
160
increasing,
158, 159
Labels
using multiple
stacked headings, 300, 301
Magnification
changing
range, 219, 220
decreasing,
217, 218
increasing,
216, 217
Manual
calculation
setting, 478,
479, 480
Margins
changing page,
114
Menu bar, 3
Menu commands
using the
keyboard, 6, 7
using the
mouse, 5, 6
Merging cells,
157, 158, 188, 189
Multiple stacked
headings
using, 300,
301
Natural
language formulas
identifying
individual cells, 302, 303
using, 298
using labels
to define a range, 298, 299
Numbers
adding a
currency format, 134, 135
adding commas,
137
adding the
percent sign, 136
formatting,
134
Objects
adding a 3-D
effect, 456, 457
adding a
pattern, 427, 428
adding a
shadow, 454, 455
adding text,
444, 445
applying a 3-D
setting, 458, 459
changing the
fill color, 426, 427, 449, 450
changing the
font color, 451, 452
changing the
line color, 453, 454
changing the
pattern color, 429, 430
displaying the
Drawing toolbar, 439, 440
drawing, 438
drawing a
rectangle, 440, 441
grouping, 430,
431
moving, 443,
444
resizing, 448,
449
selecting,
442, 443
selecting
text, 446, 447
ungrouping,
432, 433
Office Assistant,
4
balloon, 14
changing
options, 19, 20
finding an
answer, 16, 17
hiding, 21, 22
selecting, 17,
18, 19
tips, 14
using, 14, 15
window, 14
Page
orientation
changing, 118
Page setup
centering the
worksheet on the page, 116, 117
changing the
page margins, 114, 115
changing the
page orientation, 118, 119
creating
custom headers and footers, 121, 122, 123
editing
headers and footers, 119, 120
printing
without gridlines, 124
repeating row
and column labels, 125, 126
using Page
Break Preview, 127, 128, 129
Passwords
assigning,
473, 474
opening a
protected file, 475, 476
removing, 477
Paste Special
copying
formats, 262, 263
copying
formulas, 267
copying
values, 264, 265
performing
mathematical operations, 268, 269, 270
using, 262
Patterns
changing, 400,
401
Pick From
List, 40
Picture graphs
scaling and
stacking, 416, 417
Printing
multiple
copies, 107, 108
page ranges,
108, 109
previewing a
worksheet, 102, 103
selected
ranges, 105, 106
worksheets,
105
zooming the
preview window, 103, 104
Range Finder,
370, 371
Range names
applying, 283,
284
assigning,
278, 279
creating 3-D,
289, 290
creating from
titles, 281, 282
deleting, 285,
286
jumping to,
276, 277
using, 276
using 3-D
names in formulas, 292
using in a 3-D
formula, 287, 288
using in a
formula, 279, 280
Ranges
charting
non-adjacent, 394, 395
entering data,
56, 57
printing
selected, 105
selecting
non-adjacent, 55, 56
selecting with
the keyboard, 52, 53
selecting with
the mouse, 54, 55
using
AutoFill, 58, 59
working with,
52
Rectangles
drawing a
filled, 424
Redo, 95
Repeat, 96
Rotating text,
151, 152
Rows, 4
changing row
height, 167, 168
deleting, 179
hiding, 170,
171
inserting,
175, 176
selecting,
164, 165
unhiding, 172,
173
Scroll bars,
4, 5
Shrinking
text, 155, 156
Status bar, 3
SUM function,
67
Tab scrolling buttons,
4
Tab split box,
4
Text
adding color,
150, 151
changing font
size, 146, 147
changing the
font, 144, 145
entering into
cells, 31, 32
formatting,
144
Toolbars, 3
displaying, 7,
9
hiding, 7, 9
Trendlines
adding to a
data series, 392, 393
Underlining text,
149
Undo, 95
using the Undo
list, 97
Windows
activating
cascaded, 311, 312
activating
tiled, 314, 315
cascading,
310, 311
freezing
panes, 225, 226
removing
panes, 224, 225
splitting,
222, 223
tiling, 313,
314
unfreezing
panes, 227
Workbook
window, 4
Workbooks, 4
closing, 35,
36, 319, 320
copying data
between, 315, 316
creating, 26
editing cell
entries, 44, 45
entering
numbers, 42, 43
entering text,
31, 32
moving with
the keyboard, 27, 28
opening an
existing, 37, 38
opening
multiple, 308, 309
protecting,
469, 470
renaming
existing, 46, 47
saving new,
33, 34, 35
scrolling with
the mouse, 29, 30
unprotecting,
471, 472
using
AutoComplete, 39, 40
using Pick
From List, 40, 41
Worksheet
area, 4
Worksheet
tabs, 4
Worksheets
copying, 246,
247
copying data
between, 252, 253
deleting, 240,
241
inserting,
238, 239
moving, 247,
248
moving data
between, 250, 251
multiple, 232
navigating,
233, 234
printing, 105
printing
selected, 241, 242
protecting,
466, 467
renaming, 236
selecting,
234, 235
selecting
multiple, 237, 238
unlocking
cells, 464, 465
unprotecting,
468
using
functions, 256, 257
using grouped,
249
working with,
4
Workspaces
opening, 320,
321
saving, 317,
318
Wrapping text,
153, 154
Zoom
changing the
magnification, 219, 220
decreasing the
magnification, 217, 218
increasing the
magnification, 216, 217